Hello

Welcome to my blog, a place where I can lose myself in a crafty haven. Pull up a comfy chair grab a cuppa and come and have a read. Oh and if you like what you see, stop by and leave me some love in the comments section

Followers

Showing posts with label Black. Show all posts

Wednesday, September 28, 2022

Christmas Peace

Hello! Fall has finally arrived and I am loving the cooler temperatures, makes being outside so much more enjoyable!

My post today is inspiration for a Christmas card using Maker Forte products.


I have used elements of Modern Christmas Watercolor Stamp Set. First I wanted to achieve a fir branch across my card. Using the branch stamp I stamped it in the top corner of my stamping card with British Racing Green Ink.


To avoid it crossing the previous stamped image I masked the branch end of the stamp with masking paper and repeatedly stamped the branch across the card.


To add some depth to the image I repeated these steps with Lady Liberty Ink.

I used one of the sentiments from the stamp settle gorgeous font is a very fine lettering I love the way it works with the images in this set. As it's a fine detail font it needs to stand out against the dark green. Eclipse Black Ink works well for this.


The card needed more detail so using a red alcohol marker and a white gel pen I drew berries among the branches.

While doing this my hand smudge the green ink. I have happy accidents like this all the time, usually a cleverly placed embellishment covers this. This wouldn't have worked on this card, I pressed my ink pad onto a mat and added lots of water. Then, using a paint brush I splattered ink all over my stamping card. Yes the smudges are still there but they now look like part of the design!
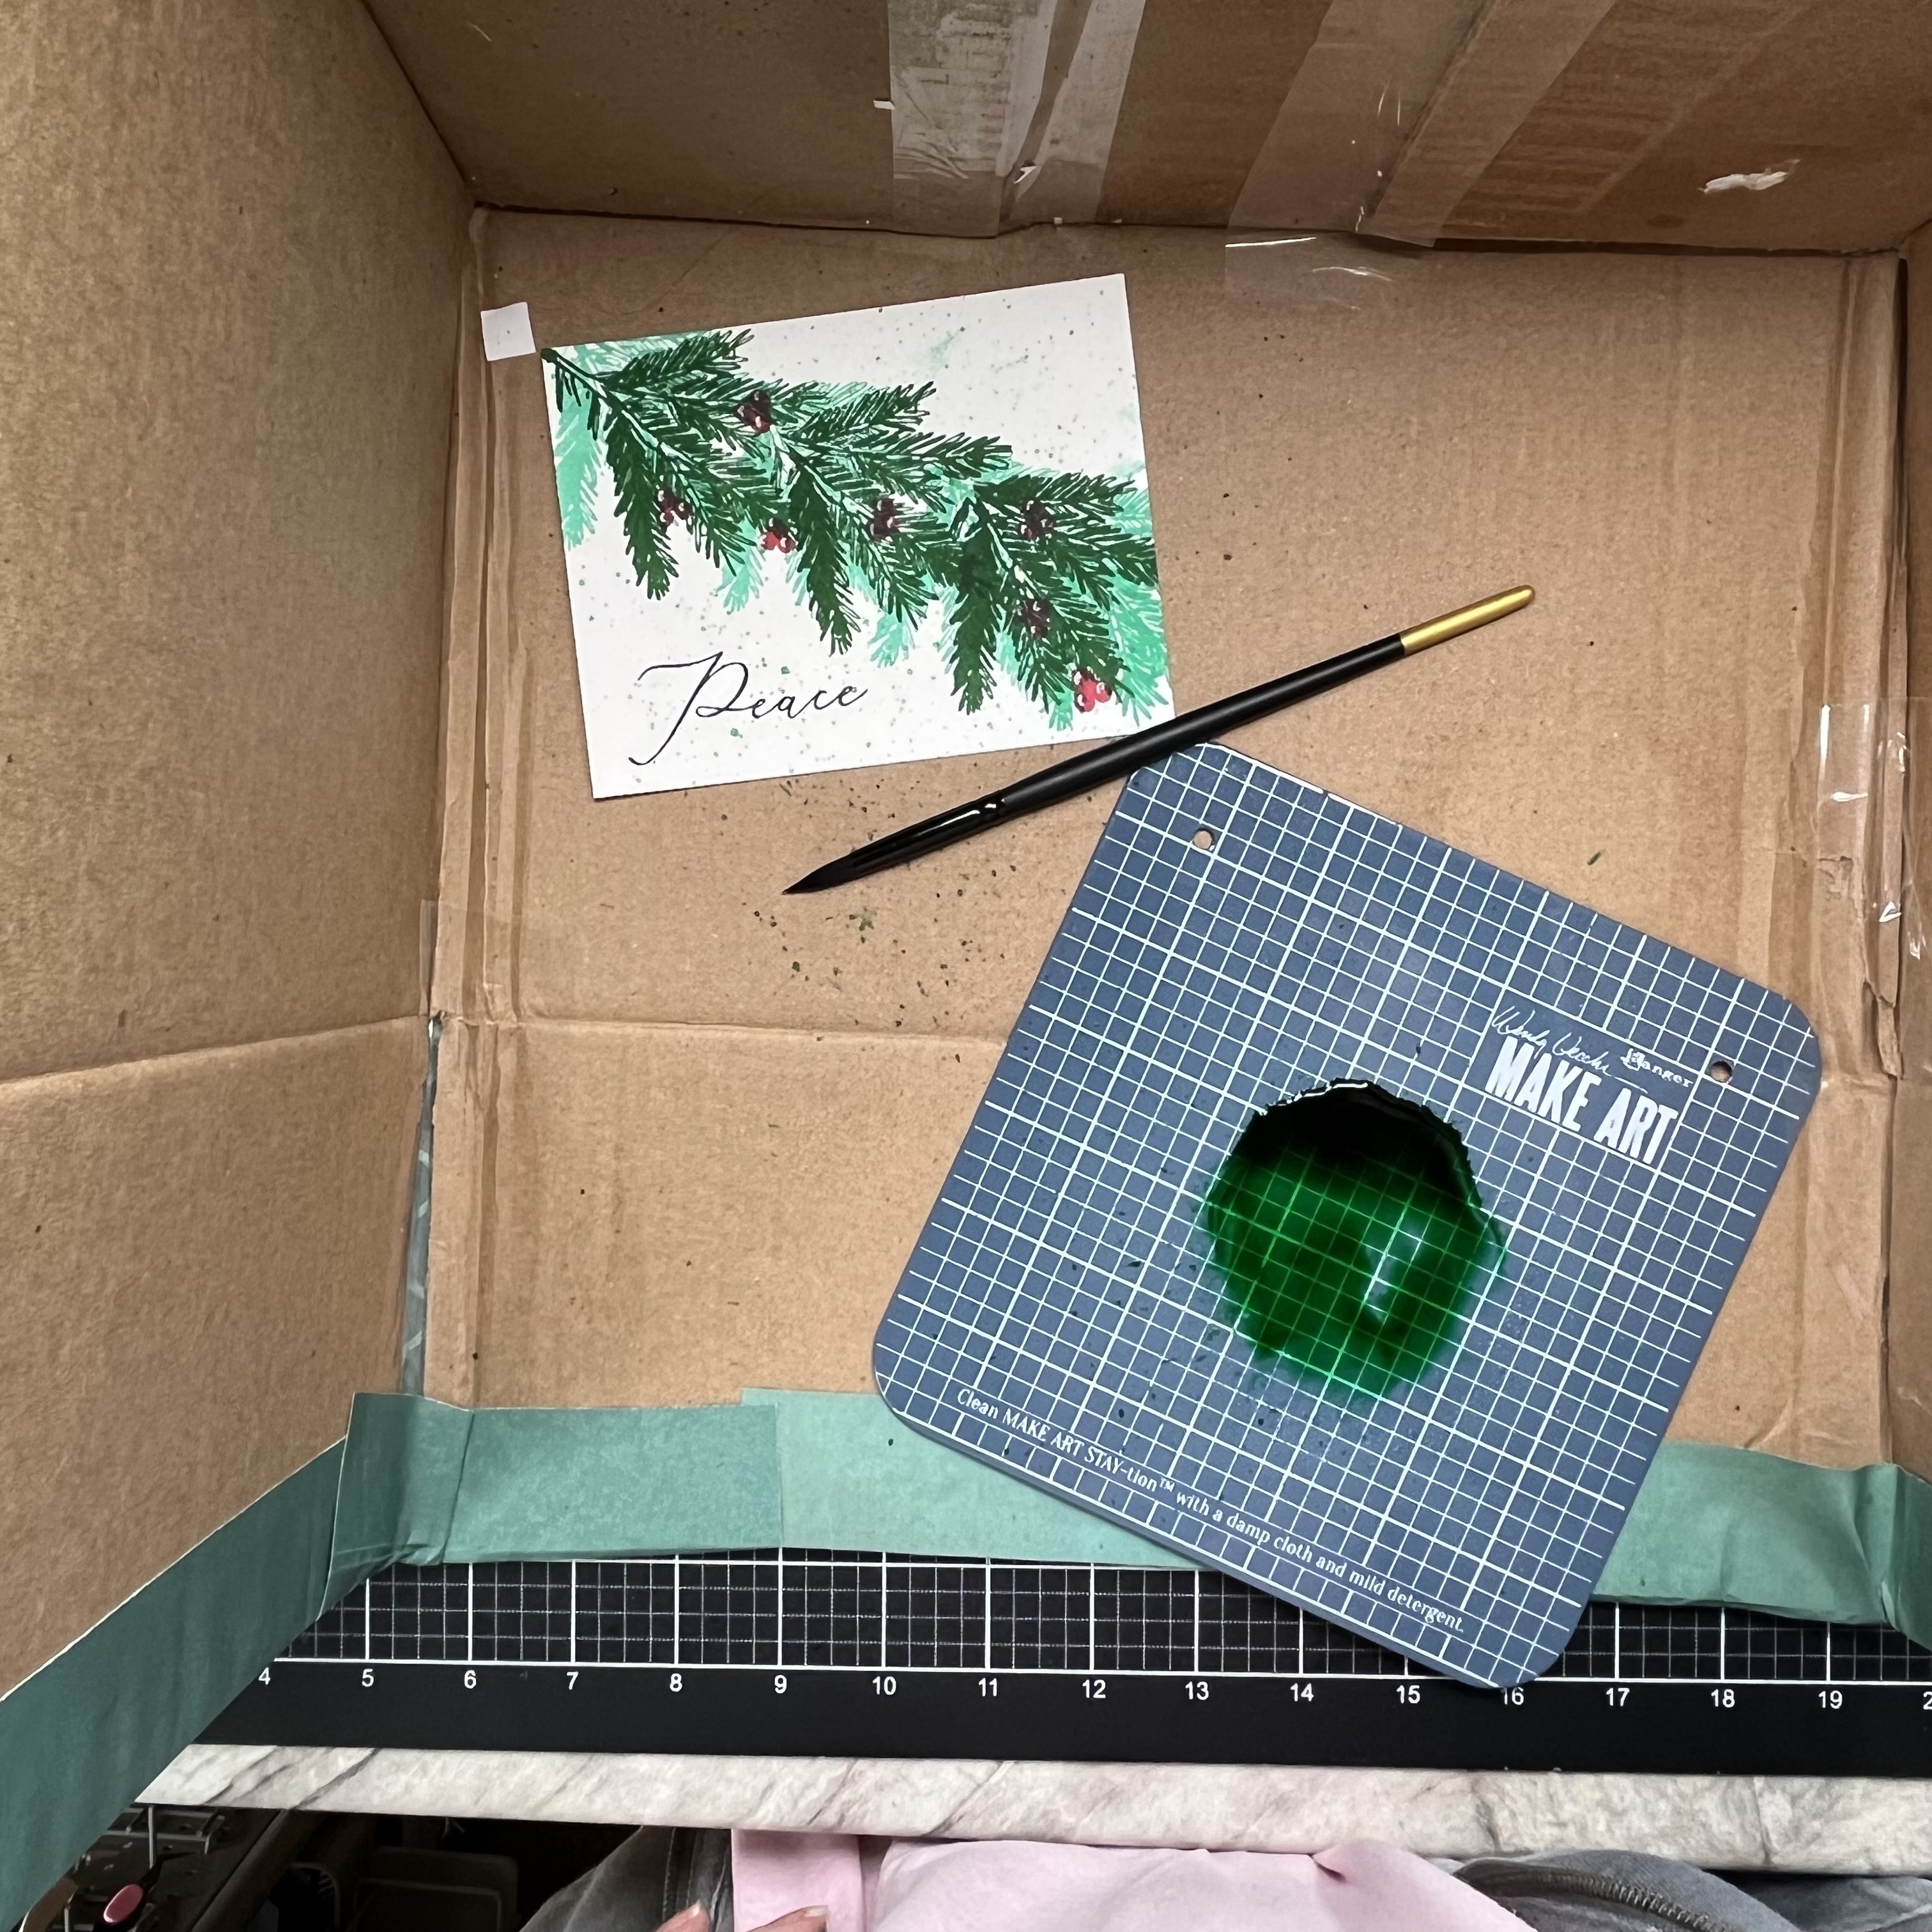
I had planned on matting my card with British Racing Green Cardstock but when I tried this it just didn't pop behind the design. Red is too bright so Eclipse Black Cardstock was used. This is a very dark black so makes the sentiment stand out against the splattered background.


Black is not something you usually see on a Christmas card but I feel it works well with this. Finally I matted the design on to a Side Folding A2 Card Base.


Thank you for taking time to read my post and I hope it gives you motivation to start your holiday cards.

Wednesday, September 15, 2021

Come and Hop along with Crescent Creations.

 Good afternoon! It's hump day already, where is the time going?

My post today is inspiration and a link for a blog hop for a company new to me. Crescent Creations is an online craft store that sells lots of crafting goodies including their own digital stamp collections. It's a new release day today and we are having a blog hop to celebrate.

If you comment on each stop and we would love you to subscribe to our platforms you are in with a chance of winning a $25 gift certificate to spend in the store.

The digital images are PNG files, but are white on the inside so you can layer them up. I have chosen to use their brand new Happy Diwali set. This comes with 2 mandalas a candle and 5 sentiments in different fonts.

I have made 2 cards to showcase both the mandalas which are stunning colored in bright colors.


The first mandala reminded my so much of a marigold flower which is synonymous with Diwali -used for garlands and offerings to the Hindu gods.
I printed it onto stamping cardstock and colored it with shades of orange marker.


The second is stunning, I used markers to color the mandala I also added silver paint pen for extra shine.
For both cards I used a paisley digital design paper on which I printed my sentiment.

I matted an A2 black card base with orange and black cardstock to make the colors pop even more. My design paper was added and the mandala was adhered with foam squares for dimension. Finally I added some iridescent bubbles which pick up the colors of the mandalas.

The winner of the hop will be announced on 23rd September on Crescent Creations social media. You should have hopped here from Tammi and you are heading to our next design team member Theary. If you have somehow gotten lost you can head back to Crescent Creations to find your way! You should have commented on all of the design team's inspiration posts or videos.

I will be back later in the month with more inspiration for the new release.

Thank you for stopping by.

Saturday, August 21, 2021

Sweet Sentiment - I love you 2

 Good morning! The weekend is upon us! Nothing planned but kicking back and chilling.

I'm back with the second card I made for Sweet Sentiment's sponsor event at Passionate Paper Creations. Using the same sentiment I have designed a male themed card:


I stamped the boy, sentiment and ASL 'I Love You' onto stamping card and colored with Copic Markers.
I then repeated the ASL sign onto blue cardstock. I chose some cardstock that coordinated my image to cut an oval aperture from and adhered this over my ASL stamped cardstock.
My A7 card base was matted with black card and my aperture card. My sentiments were matted with the same black card and added to my design. Finally using glue gel for dimension I added my signing boy.

I will be back tomorrow with her male counterpart but in the meantime please head on over to the PPC Facebook group and check out my teamies posts as well as all the other amazing work that the coloring community is sharing there.
Also go checkout Sweet Sentiment's website and other fab products!

If you love what you see please let me know in the comments!


Thursday, August 19, 2021

Sweet Sentiment - I love you!

 Good morning! It's almost school time - we are counting down the days!

Today I am blogging about both a new Facebook Group and a new release from Sweet Sentiment.

If you know Rhea Weigan she is an amazing colorist and used to run a successful FB group well started up Passionate Paper Creations & Friends again and is promoting sponsors. 

For the next 4 Days Sweet Sentiment is the sponsor. This is a company run by Jammie Clark who teaches coloring classes but also has their own range of stamps. My card today is using one for her new releases - I love You, Friend


There is both a male and female character included in the set as well as I LOVE YOU spelt out in ASL 
I colored the image with copic markers along with the signed phrase which was stamped multiple times.
My A7 card base was matted with black and red card stock. Black card was used to mat my sign language panel and the included sentiments.
Finally I added my girl with glue gel to give her dimension.

I will be back tomorrow with her male counterpart but in the meantime please head on over to the PPC Facebook group and check out my teamies posts as well as all the other amazing work that the coloring community is sharing there.
Also go checkout Sweet Sentiment's website and other fab products!
 
Thanks for stopping by and if you love what you see please let me know in the comments!


Saturday, May 8, 2021

Mer-May-Zing!

 Good afternoon and happy weekend. For my American friends Happy Mother's Day too! 

It's Chibi turn to release new stamps over at Stamper's Delights and I have a super cute design to share with you:

Meet Marina Mermaid, she is available as a clear stamp along with her little fish and some cute sentiments.

A digital collection is also available if you prefer that!

I colored Marina and her fishy friends in the colors of one of Mollie's favorite mermaids. I stamped the images onto masking paper and fussy cut these before laying over my colored images. I then used distress oxide inks to color my background.

My A2 card base was matted with teal and black cardstock and after removing the masking paper I added my image. 
Green and blue 'bubbles' were added . I inked another piece of card and stamped my sentiment onto this. Matting it with black card before adhering to my card.

Head on over to the Stamper's Delights Store to see Marina and all of this week’s new releases.

Why not stop by the Stamper's Delight Facebook page for regular news and inspiration from my Teamies you can also enter the progressive challenge there, no blog needed and receive freebies!  

All the design team projects are available on the Inspiration blog - hop on over there for more inspiration.
Thanks for stopping by and if you like what you see please leave a comment to let me know! 


Tuesday, September 29, 2020

Shake the Mummy

 Good Morning! The rain has finally arrived and brought cooler weather with it - Thank goodness.

Guess what - It's Tuesday! so head on over to Digi Choosday and enter our challenge - The design team are focusing on Halloween and making shaker cards so I chose Spooky Mummy as my inspiration image:

What I Did:
I resized and printed the image twice, once on stamping card and once on printable acetate.
I colored him and cut the body from the card one. I then glued the acetate on so the body was on show giving me a window for my shaker. Turning my image over I cover the back side with foam tape excluding the window. I filled the window area with sequins, removed the backing from the foam tape and placed a piece of white card over this. this sealed the sequins in place giving me my shaker. I then added this onto an A7 card base which had been matted with black cardstock. As the image filled the card I didn't feel anything else what needed on that card.

What I Used:
Stamping Card: X-Press It
Alcohol Markers: Copic
Acetate: From my stash
White Cardstock: Neenah Solar White
Black Card: Linda Chapman
Foam Tape: Dollar Store
Sequins: Dollar Store
Glue: ZipDry

The Digi Choosday Challenge runs for 2 weeks, it is always anything goes so there is no reason not to enter and you never know you may just win!

 Looking for more inspiration? Then check out my teamies designs over on the Facebook page, you can also post your own Polkadoodles' designs on the Craft Stamp and Colour with Polkadoodles Facebook group

Thanks for stopping by, now go join the challenge!


Saturday, September 19, 2020

Trick or Treating and Graveyard Fun for Halloween

 Good afternoon, hope you are enjoying your weekend, we need to get out and clear the garden now we've had most of the veggies from it!

I'm continuing with showcasing the Polkadoodles Halloween new release. Today I have designed 2 cards using 2 stamp sets - Happy Halloween Winnie Wednesday and Spooky Time:

My first is a trick or treat scene:


What I Did:
I Stamped Winnie first then masked her to stamp the spooky house. I then colored the images. I made the images into a full scene by freehand adding a path, grass and a starry sky. Finally I stamped bats and the BOO sentiment.
My A7 card base was matted with orange cardstock which I stamped with the bats. I then added a strip of black cardstock and a piece of design paper.
My image was matted with black cardstock and added to the base.

What I Used:
Stamping Card: X-Press It
Alcohol Markers: Copic
White Pen for 'stars' - Uniball Signo Broad
Black and Orange Cardstock: Core'Dinations Premium
Glue: ZipDry

My second card is Winnie Wednesday in a grave yard:


What I Did:
This was a simple card, I ink blended my background using Distress Oxide inks. Once dry I then stamped the images from Spooky Time to create my scene. Winnie Wednesday was stamped and then fussy cut her. She does have pumpkins on the original stamp but I decided to use her without these. I then colored her with alcohol markers. I matte an A2 card base with orange cardstock then added my background. finally I adhered Winnie to the corner of the card. 

What I Used: 
Stamping Card: X-Press It
Alcohol Markers: Copic
Blending card - Bristol Smooth
Inks: Tim Holtz Distress Oxide
Black and Orange Cardstock: Core'Dinations Premium Heavyweight


Looking for more inspiration? Then check out my teamies designs over on the Facebook page, you can also post your own Polkadoodles' designs on the Craft Stamp and Colour with Polkadoodles Facebook group


Thanks for stopping by.


Tuesday, August 4, 2020

Missing School

Good Morning! We are desperate from some rain here, not had much in months, the yards are all looking brown and crispy!

Here we are again another Tuesday! So go ahead and check out the new Digi Choosday challenge! The design team this week have used Miss you as our inspiration and as it still isn't known what school is going to look like I have made a miss you teacher card using Polkadoodles' Work and Play 3 collection:


What I Did:
I decided for this card I was going to use the pre-colored images so I resized the digital design paper and added the teacher and her stack of books as overlays. I then printed this and trimmed so it would fit on my 5x7in card base. I also used a circle die to cut a notch from the top as this card has a pull out section:


The pull out was made in the same way as the top section of my card except I digitally erased the blackboard which was on the easel, making it a white board, I then added the sentiments to this, overlaid it over the digital paper and printed it. 

I matted my card base with Pink cardstock, made fold back flaps on my top set of images and glued these in place on the card. My inner section then just slid into place. I added Pull Me to the center of the inner section which fits where the notch on the topper is. Finally I matted a sentiment again from the same collection and added this with foam tape.

What I Used:
Digital images, papers and teacher sentiments: Polkadoodles - Work and Play 3 Full collection Craft Download
White cardstock for printing: X-Press It
Black cardstock for base: Core'Dinations Premium Heavy Weight
Pink cardstock: Core'Dinations Premium
Glue: ZipDry
Double sided tape: Scor-Pal
Foam tape: Dollar Store

The Digi Choosday Challenge runs for 2 weeks, it is always anything goes so there is no reason not to enter and you never know you may just win!

Looking for more inspiration? Then check out my teamies designs over on the Facebook page, you can also post your own Polkadoodles' designs on the Craft Stamp and Colour with Polkadoodles Facebook group

Thanks for stopping by, now go join the challenge!


Monday, March 30, 2020

It's a Polka-dot Kind of Day

Good Morning! Hope everyone is well. We are starting week 3 of home schooling and working from home.

My work is of course making cards using gorgeous images and today's is from Sherry West Art. Meet Poppi Pokkadott:


Isn't she just a sweetheart!
What I Did:
I resized and printed Poppi onto stamping card and colored her with alcohol markers. She was the fussy cut. I made a 5x7in card base and matted this with black card and some digital design paper. The frame was also a digital design. I resized and printed on white card. I then used a craft knife to cut around the ladybugs so that Poppi would fit under them. Once she was adhered in place I matted the frame with back card and added this to the center of my card.

What I Used:
Digital Stamp: Sherry West: Poppi Pokkadott 
Stamping Card: X-Press It
Alcohol Markers: Copic
White Cardstock for card base: Core'Dinations Premium Heavy Weight
Black Cardstock: Linda Chapman
Digital Design Paper: Mein Lila Park printables
Digital Design Frame: Free Clip art
Glue: Zip Dry

Thanks for stopping by you can see my teamies inspiration over on our Facebook group and you can buy the digital stamp in Sherry's Etsy store


Thursday, January 16, 2020

Finding Balance

Good afternoon, It's the 3rd Thursday of the month which mean Scrapper's Delights is doing their thrifty Thursday offers this week, head over to their store to see what fab offers they have

I got the play with anime Grace, she is both an angel and a devil, which sounds very much like Mollie but lets not go there! No, life is all about balance you can't take the good without the bad and visa versa. I wanted to highlight both sides of Grace so I colored her hair in different colors as well as highlighting the difference with blue and grey backgrounds. As she is both an angel and a devil I colored the gems around her feet and on her scythe green for envy - I'm sure this would be a deadly sin that would show its face with such a split personality. The sentiment is one that comes with the image and one I'm going to use to focus me this year!


Head on over to the Scrapper's Delights Store to see all of this weeks thrifty offers.
We also have a monthly challenge where you can enter any makes you do
Why not stop by the Scrapper's Delight Facebook page for regular news on and inspiration from my Teamies and keep your eyes peeled on my blog for new releases from them!

Supply List:
Cardstock for card base, mats and die cuts - Core'dinations
design paper - My Craft Studio
Digital Stamp Anime Grace from Scrapper's Delights 
Lace dies - Joanna Sheen
Copic Markers
Staedtler Triplus Fineliners
Gold Gelliroll pen


Sunday, February 24, 2019

New Home

Good morning, we are expecting more winter storms today and we are heading out to a birthday party so I am hoping that they aren't that bad!

Today's card is a new home card using my favorite CAS style:


I started with a white piece of card and masked the top and bottom of it. I then used a blending brush to blend 2 shades of purple dye ink in the center of the card. I then used stamps from 4 Crafter's Companion sets. Using fine black ink I stamped the little toadstool village from Fairy Magic along the bottom edge of my blended section. The stamp was a little short so I lined it up again and stamped it again filling the lower edge of the purple section, I love stamps that you can do this with.
My little fairy is from Fairy Door stamp set and I gave her fairy dust from the Sparkle Garden set.
Once this was all dry I stamped Home Sweet Home sentiment from Love Blooms.
I made a 5x7 inch card base from white card and matted this with purple and black card. I then added my stamped card.
I few little purple glitter dots just balanced the card.

Thank you for stopping by and if you like what you see please leave me some love in the comments.


Sunday, February 3, 2019

Cheers!

Good morning sorry I have been absent for a while, my dad's death hit me hard and I have not been in the mood for crafting jus doing the odd card here and there but after doing some reorganizing of my craft room I have found my mojo again and am ready to jump back in.
We have had an extremely cold week with a ton of snow, temperatures have been well below zero and the wind chill has made is hazardous to venture out. For now it has warmed up and the snow has started to shrink back.

Today I am sharing a birthday card I made using a digi stamp from one of my many CDs:


I printed the stamp onto X-press It card and colored it with my alcohol markers. I then matted this with green card, pulling the color from the bottles. I then matted an 8x8in white card base with the same green card and some digital paper from the same CD.

I mounted my colored topper into the right hand bottom corner of the card leaving room for some card Candy.
Lastly I die cut the word cheers again from the green card and adhered this to my topper.

This was a card for a male friend. I always struggle with masculine cards but thought that this hit the spot!
Thanks for stopping by today, if you like what you see please leave me some love


Monday, March 26, 2018

Tractor TLC

Good afternoon. I'm taking a break from preparing our house for guests next week. My college friend that I haven't seen for more than 10 years is coming from England for the week. 
I am SOOOO EXCITED!!!! 

But  lets get grounded, I need to share with you all this card I made for a colleague of my husband. The instructions were 'he likes doing up old tractors'

So I had a digital stamp of a John Deere Tractor and just needed to 'rust' it up a bit:


I used colored pencils to color it, this was my first attempt and using the pencils for a full image and realize there is a learning curve with them!

Once colored I matted the image onto black and green card. 


I used a grass patterned paper on my card base along with mats of green and black like my image.

I angled the image on the card and added a die cut Happy Birthday which was 2 cuts one black one green and placed on top of one another to give a shadow.
A few black card candi finished the design.

I just hope the recipient doesn't pledge allegiance to the International! 

Thanks for stopping by and if you like what you see please leave me a comment - it will make my day!


Wednesday, March 21, 2018

Motorbiking

Good morning! Life is good at moment, sun is shining and my craft room is finally getting some organization thanks to Evernote - Wow this program is great for cataloging all my stamps, dies and more!

I made today's card as part of my husband's birthday club at work, it's turning in to a challenge for me making so many masculine cards:


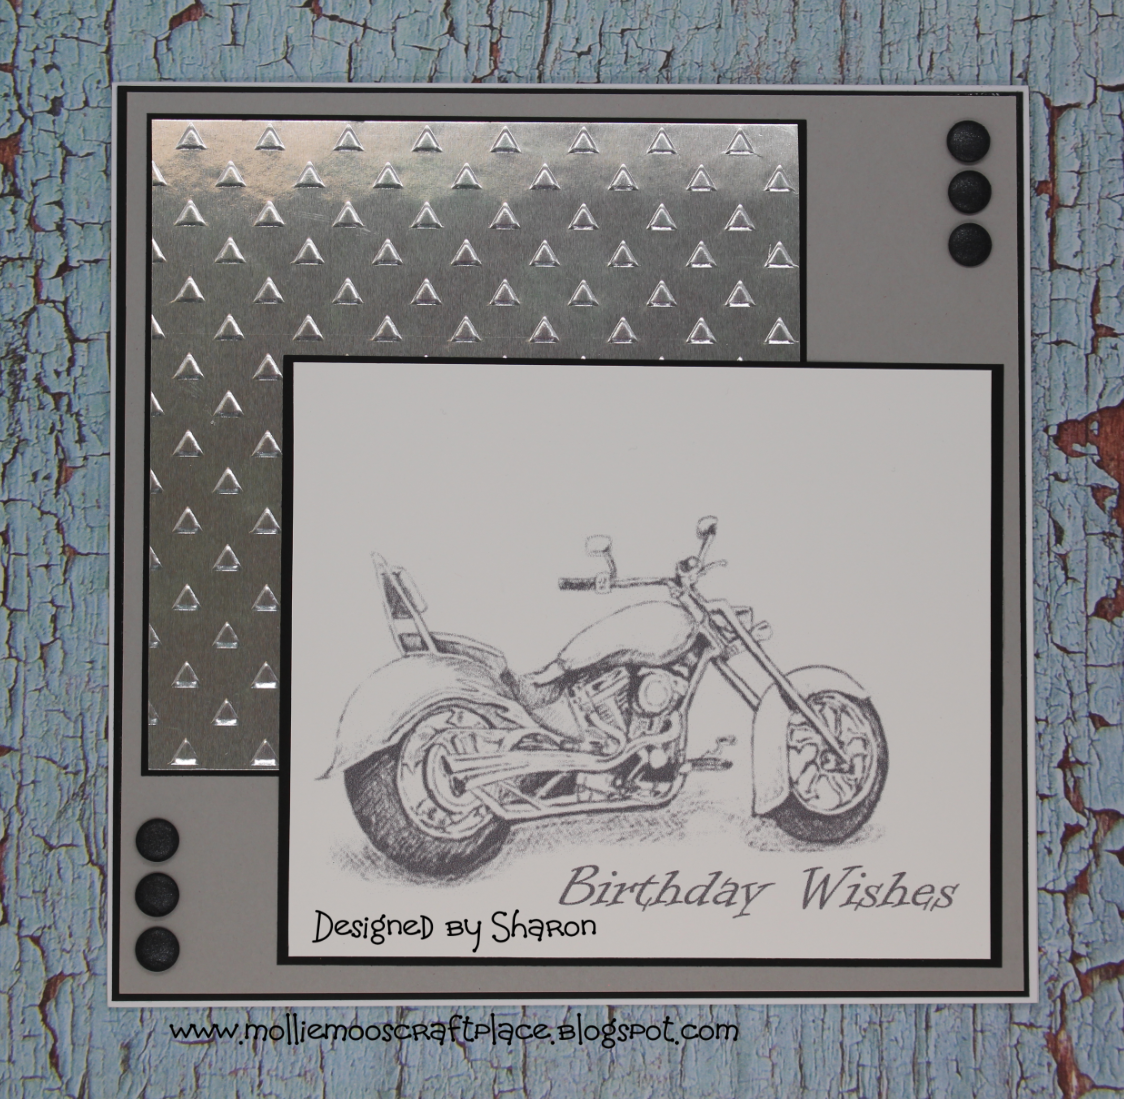
This one was for a guy who love's his Harley. I chose a greyscale image and edited it with My Craft Studio so that the sentiment was in the same shade as the bike.
I matted an 8x8 inch card base with black and grey card. I then embossed some brushed silver mirror card to look like metal walk way. This and my image was matted in black card and adhered to my base so they overlapped. 
A few black Card Candi just balanced the card.

Thank you for stopping by and if you like what you see I would love to know, please leave a comment 😊


Friday, February 16, 2018

Hello Daisy

Good morning! The snow is receding and the weather has been a bit warmer for the last few days lets just hope it stays.

It's the start of a new challenge over at SumMore Fun as always this is a moodboard challenge and as spring is on the way it's a bright and cheery one this time:


just look at the luscious colors and pretty flowers. The flowers are my inspiration for my design team card:


I used SumMore Fun's Large Stemmed Daisy Stamp, but tried a new technique to me - mirror stamping. I stamped the original flower and masked this off. I then stamped the image again onto acetate. I then carefully laid this onto my card and gently pressed down. The image stamped fainter  than the original but I resolved this by outlining both images with a black fineline marker. I colored both flowers in bright reds and pinks and then matted my image on to a scalloped card using black and red card to make the image pop.
I die cut 'hello' in the same black and red card, adhered these together so they had a shadow effect. This and a few enamel dots completed my card

The challenge is for 2 weeks and you could win a gift certificate to the SumMore Fun store.

Thank you for stopping by, If you are looking for more inspiration check out my teamies cards on the Blog, FaceBook, Instagram and Pinterest.


Wednesday, January 17, 2018

Flamingo fun!

Good afternoon! I have a few personal cards I have made over the last month that I will be blogging over the next couple of weeks, some of these will be Christmas cards.

Today's cards were Christmas cards for my neighbors and there is a story behind them. 

During the summer my best friend and neighbors took her girls on vacation and I looked after her house and fur babies.

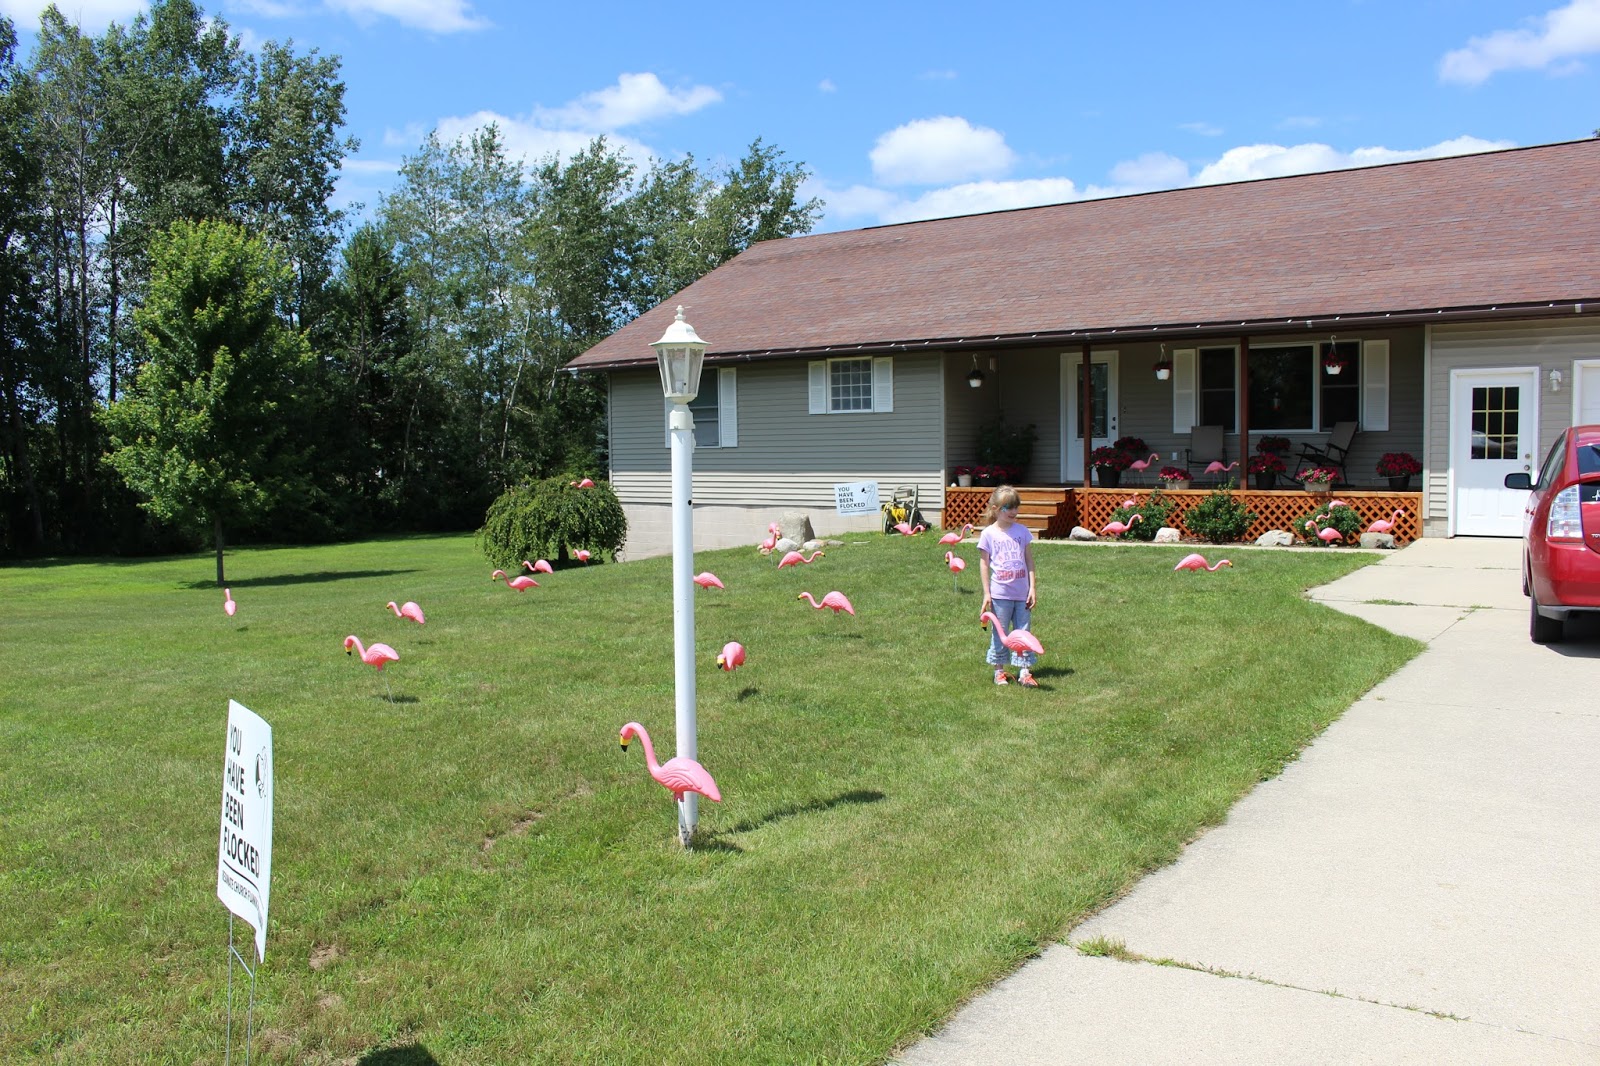
Whilst she was away a local church was raising funds for their children's section by "flocking" peoples yards overnight. So I paid to have her yard flocked in time for her return home:


35 bright pink flamingos adorned her front yard, her house is the first one as you enter the subdivision so everyone saw! She wasn't aware I was the one involved but paid the church to tell her who had done it!!!

Well the flamingo theme has stuck with us so I just had to find some for her Christmas card:


This is a digital stamp from Sasayaki Glitter. I colored them in using alcohol markers and added Spectrum Noir clear Sparkle pen which was difficult to show in the photo.
I then matted my white card base with black card and pink snowflake digital paper. The black card was also used to mat my image and sentiment which I typed and printed using my PC. 
I little snowman charm just complemented the design. 
The neighbor in between us was also in on the "flocking" so I made a similar card for her using the same products:


Both were taken in good humor and resulted in our outdoor Christmas lights gaining a pink lit flamingo!!

Thanks for stopping by and if you like what you see please let me know in the comments!

I am entering these cards into the following challenges:

Christmas at Sweet Stamps - Anything goes Christmas.
Moo Mania & More - Frosty Winter
ABC Christmas Challenge - A is for Antlers B is for birds


Tuesday, December 26, 2017

Kick up your heels

Good Morning!
Well was Santa good to all of you? I hope you had a blessed day and enjoyed time spent with loved ones.

My card today gives you a little insight into my personality:


Despite growing up in a city I am a country girl at heart, give me boots and jeans and I'm happy.

The stamps I have used today are from 2 Raisin Boat sets sold by SumMore Fun first one is Urban Cowgirl I have used the lasso, horseshoe and Urban Cowgirl sentiment from this set. Both stamped in a dark brown ink. I then Stamped the rest of my wording using the Goes with Mountain Country Gal set along with the boots which I colored with Copic Markers.
I used a white card base, matted with black card, I inked the edges of my topper with distress ink to tie in with the colors of my stamped images.


A few enamel dots completed my design.

So kicking up your heels fits in with the theme of the current moodboard challenge over at SumMore Fun - who likes to party on New Year's Eve? 

This shows that your card for the challenge doesn't need to be all sparkly just use the colors included in the mood board! There is still plenty of time to get your entries in

Thank you for stopping by, If you are looking for more inspiration check out my teamies cards on the Blog, FaceBook, Instagram and Pinterest.


Monday, October 16, 2017

Boss's appreciation day

Good afternoon! Well after a very rainy weekend the sun is shining again and it is pleasantly warm. I have had a wonderful weekend, Saturday was my birthday and I was thoroughly spoilt by everyone. The best news ever arrived in the form of a letter from the USCIS stating that we have been granted permanent residency!

As we are now residents I thought it fitting to join in with their appreciation days and when Kev asked me to make him a card for boss's appreciation day I knew exactly what I wanted to do:

Dr Digi have these great funny digital stamps so I picked out Tommy Gun:


Yep his name says it all!

I Printed the image on X-press It card and colored him with alcohol markers and colored pencils adding white gel pen for his suit strips and highlights. 
I then typed out my sentiment using my pc and printer which I think fits great with the image as well as the card theme.
I matted my 5x7 inch handmade card base with red and black card and added my design. I also added a funny verse inside which reads:

On Boss's Day I'd like to pay you a complinment....
You sure have a great bunch of people 
working for you!
😂

A funny card for a great guy!

Thanks for stopping by and if you like what you see let me know in the comment section .