Hello

Welcome to my blog, a place where I can lose myself in a crafty haven. Pull up a comfy chair grab a cuppa and come and have a read. Oh and if you like what you see, stop by and leave me some love in the comments section

Followers

Tuesday, December 26, 2017

Kick up your heels

Good Morning!
Well was Santa good to all of you? I hope you had a blessed day and enjoyed time spent with loved ones.

My card today gives you a little insight into my personality:


Despite growing up in a city I am a country girl at heart, give me boots and jeans and I'm happy.

The stamps I have used today are from 2 Raisin Boat sets sold by SumMore Fun first one is Urban Cowgirl I have used the lasso, horseshoe and Urban Cowgirl sentiment from this set. Both stamped in a dark brown ink. I then Stamped the rest of my wording using the Goes with Mountain Country Gal set along with the boots which I colored with Copic Markers.
I used a white card base, matted with black card, I inked the edges of my topper with distress ink to tie in with the colors of my stamped images.


A few enamel dots completed my design.

So kicking up your heels fits in with the theme of the current moodboard challenge over at SumMore Fun - who likes to party on New Year's Eve? 

This shows that your card for the challenge doesn't need to be all sparkly just use the colors included in the mood board! There is still plenty of time to get your entries in

Thank you for stopping by, If you are looking for more inspiration check out my teamies cards on the BlogFaceBookInstagram and Pinterest.


Friday, December 22, 2017

Cheers

Well the big day is almost upon us, we have all our shopping done, just have to do some wrapping so I'm now concentrating on New Year cards and they fit well with  Moodboard challenge number 18 starting over on the SumMore Fun blog with Happy New year 2018:


Some fabulous golden colors and sparkles to work with there. 
As the turn of the year is midnight I am using SumMore Fun's Clock Minutes stamp:


I have heat embossed it onto black card with gold embossing powder and added some die cut hands held in place with a tiny golden brad.
My black card base has been matted with gold mirror and black card. I have then randomly added the die cut word Cheers across the black.
My stamped clock face has been placed centrally with foam tape to make it stand out. I added few nuvo drops just to make sure there was enough gold in my design!


So what are you waiting for head on over to the Sum More Fun blog and join in the fun.
We do have just a few rules which you can find here 

Thank you for stopping by, If you are looking for more inspiration check out my teamies cards on the BlogFaceBookInstagram and Pinterest.


Saturday, December 16, 2017

Happy Holidays

Good morning, we are knee deep in snow but at least it looks promising that we will be having a white Christmas - something we have wanted since we arrived in the US but has yet to happen
Kev has finished work for the holidays and Mollie finishes school on Wednesday. We are all looking forward to a great holidays!

Today's card is just about that - Happy Holidays!!

Have you got all your cards done and sent? If not I'm show casing a very simple one that is great if you have multiples to do and it just uses one stamp set.


I used the pine bough from Raisin Boat's Holiday Hang Ups set and stamped it around 3 sides of white card using different shades of green ink. I then switched to red ink and stamped berries and my sweet little sentiment. An amber ink was used to stamp the stars.


 I used a fine point pen to 'hang' these on the tree and added the small tied bow to the biggest one - again a stamp from the same set. This stamp set also has a number of Christmas ornaments with it so is packed full of possibilities.
Once stamped I then matted a white base with a silvery blue mirror card, red card and finally my stamped card. 

for the theme I used the current challenge mood board choosing the colors and the pine boughs

There is still almost a week to get your entries in and with the all decked out theme we all have a card made that could be entered.
Thank you for stopping by, If you are looking for more inspiration check out my teamies cards on the BlogFaceBookInstagram and Pinterest.

Tuesday, December 12, 2017

We Three Kings

Hi, hope you are all having a great day. Time is going so quickly the holidays will be here before you know it.

 Today I'm showcasing a traditional Christmas card with a modern twist using Sum More Fun stamps. 


I used distress inks to make a night sky and stamped the Victorine Original stamp: Three Wise Men onto this. I matted a card base with black card. I then die cut and embossed a piece of silver mirror card and arranged this over my image so that it was visible through the oval aperture.


I then stamped The Wishing You Joys of The Season onto white card and matted this onto black and silver card. This was adhered to the top part of the card. 

I love clean and simple cards and this is so easy to do using Sum More Fun stamps.

Thank you for stopping by, If you are looking for more inspiration check out my teamies cards on the BlogFaceBookInstagram and Pinterest.


Friday, December 8, 2017

Dear old Santa

It's the 8th of December, yes we have snow and yes I'm starting to decorate the house. Shopping has been done and my cards are starting to make their appearance.

Today is a new mood board challenge over on the Sum More Fun blog and of course its all about Christmas - All Decked Out:


It"s a great board for this time of year - who doesn't make cards following this theme and if you join in you can win yourself a gift certificate worth $20 
However If you use a Sum More Fun stamp it doubles to $40

 Who doesn't think of  Father Christmas at this time of year. If you've got kids his name is constantly being mentioned.

This leads me to my make I chose the colors of red and green from the mood board:


I love this stamp such a traditional image of Dear Old Santa. I wanted to keep my card simple so I colored him with Copic markers. I then took pieces of green and read card and die cut frames. Using the waste from the green frame I cut it to size and adhered the cut oval over my image. I then added the red frame to the center of the oval. This was then placed onto a 7x5 in card base. I die cut the word believe and some holly. This along with some glittery enamel dots were arranged around the image.

So what are you waiting for head on over to the Sum More Fun blog and join in the fun.
We do have just a few rules which you can find here 

Thank you for stopping by, If you are looking for more inspiration check out my teamies cards on the Blog, FaceBookInstagram and Pinterest.


Friday, December 1, 2017

Cake and balloons - it must be a birthday

Good afternoon, I'm currently incapacitated, I have a problem with my left leg which is causing me a great deal of pain and affecting my ability to do anything. 
Apart from when I color I usually craft standing up so I've had a bit of a lull where card making is concerned. I now have a high stool for my desk and a table so I can keep essentials near by so I'm trying hard to get back into the swing of things - after all I can't bring myself to buy Christmas cards.

Kev called me on Tuesday needing a birthday card for a colleague, it needed to be large enough for the whole team to sign so out came my 8x8in scalloped card bases


The image is a pre-printed one I bought from Lili of the Valley a long while ago. I matted the cute kitty onto pink card along with 2 coordinating Nit Wit Bonnets n Bowties patterned papers, one the same size as my image and one to mat my card base with. I added a colorful ribbon to the paper on the base. I then positioned my layers and adhered these in place.
I die cut Happy Birthday from the same pink card and positioned it in the corner of the card. I added some pink crystal gems from my stash just to balance the card.

A very girly card that was quick and simple to make

Thanks for stopping by, if you like what you see please come and leave me some love in the comments


Tuesday, November 28, 2017

Grazing in the snow

Good morning, snow hasn't arrived here YET! so I thought I would share some with you.

I'm over on the Sum More Fun Blog with a snowy tunnel card using Victorine Original's Elk Silhouette in the snow stamp


I stamped elk image twice using blue ink and added crystal glitter using a quickie glue pen to one make the snow sparkle. I then adhered this onto a card base. Using a set of scalloped circle dies I cut apertures from 2 snowy papers. I used blue card to make 4 concertina stripes, adhered 2 of these to opposite sides of my card base and added the kraft colored snowy layer. I then fussy cut (yes antlers and all!) the 2nd Elk out and turned him over, colored him black and added him to the kraft layer to give the original one a mate!


The blue snowy layer was placed over this using the remaining concertina strips to give dimension. I then decorated the outer layer with die cut snowflakes and the word Noel. 

You can find the products I have highlighted on the Sum More Fun online store
And if you are looking for more inspiration check out their social media sites:

Oh and don't forget the Mood board Challenge is running until the 7th December


Thanks for stopping by


Friday, November 24, 2017

Victorine Originals Mood Board Challenge

Good afternoon! I hope my American friends have all had a wonderful Thanksgiving and are not still in a food coma. Who took advantage of the many Black Friday deals? We have shopped some of them more on line than in-store though.

Today is my debut for Sum More Fun - I found out a few weeks back that I had been given the open design team position and since I just love their stamps I am so thrilled to be on the amazing team.

Sum More Fun have a mood board challenge, you can win a $20 gift certificate - If you use a Victorine Originals or Raisin Boat Products the prize doubles.  


Your project inspiration can come from the photos, the colors palette, and/or the theme. Cards, ATC, Mixed Media, Scrapbook Layouts, Journaling, and Planners are welcome. 
Please read the rules before entering!

On to my make, I am following the color palette:


I have used the Empty Snow Globe Stamp Stamped it onto x-press It cardstock and colored it with my Copics then cut the center circle out of the globe adding snow covered acetate to this..
I stamped the tiny string of lights from the Christmas Borders Set across the top of my image and the tiny snowmen from the same set onto a separate piece of card.
After coloring these I fussy cut a bunch of them, wow was that a task! for inside my globe.
I used a snowflake digital paper for inside the globe and made a fake shaker by gluing the cute tiny snowmen and sequins to the digital paper.
this was then layered over the back of the globe.
I matted a 5x7 inch white card based with some pink snowflake patterned paper and then added my image.
A die cut sentiment across the bottom balanced out my design. 

Sum More fun is an umbrella name for a number of stamps that are being brought together under one name. Today's make is using the Victorine Original stamps range.

Thanks for stopping by and don't forget to go enter the challenge!!!


Wednesday, October 18, 2017

Thanks to You

Good afternoon, The sunny weather continues but the heat has gone so it's just nice to get out and enjoy the fall.

Today's post is the start of a collection of thank you cards I was asked to make and will be showcasing here over the next few days. I decided to do a couple of these gender generic as I didn't have direction of who they were for. Today's card is one of those:


I used the cd from Joanna Sheen's Tom Mielko project book for the images and back ground design paper. Printing them onto Neenah cardstock. 

I matted my white card base with a royal blue cardstock along with the image. I use some of the design paper to print a sentiment on and again matted this with the blue card.
I assembled the card lining up my image to the left of the base so I could slip the sentiment along side of it.

A few enamel dots were all the embellishment that was needed.

I gorgeous sunset, some waves and just you on the beach how peaceful!

Thanks for stopping by and if you like what you see please let me know in the comments section.


Monday, October 16, 2017

Boss's appreciation day

Good afternoon! Well after a very rainy weekend the sun is shining again and it is pleasantly warm. I have had a wonderful weekend, Saturday was my birthday and I was thoroughly spoilt by everyone. The best news ever arrived in the form of a letter from the USCIS stating that we have been granted permanent residency!

As we are now residents I thought it fitting to join in with their appreciation days and when Kev asked me to make him a card for boss's appreciation day I knew exactly what I wanted to do:

Dr Digi have these great funny digital stamps so I picked out Tommy Gun:


Yep his name says it all!

I Printed the image on X-press It card and colored him with alcohol markers and colored pencils adding white gel pen for his suit strips and highlights. 
I then typed out my sentiment using my pc and printer which I think fits great with the image as well as the card theme.
I matted my 5x7 inch handmade card base with red and black card and added my design. I also added a funny verse inside which reads:

On Boss's Day I'd like to pay you a complinment....
You sure have a great bunch of people 
working for you!
😂

A funny card for a great guy!

Thanks for stopping by and if you like what you see let me know in the comment section .


Friday, October 6, 2017

Batty

Good afternoon, we've had a lovely fall day today, Mollie did a cross country run and it was nice to be outside without the overpowering heat.

As Halloween draws ever nearer I am loving using cute images to make a collection of cards.
Today I am showcasing another or the cutsie Lili Of The Valley ones:


Isn't he just the most adorable little bat you have seen??

I colored him and his background using Copic markers and Prismacolor pencils for accents. I added extra tiny stars with white and gold gel markers before matting my image onto black and amber card.

I made a 7 x 5 inch base card and matted this with the same colors of card and some free digital paper with the word Boo! on it.
I used some coordinating ribbon as a border underneath my image and added my Boo sentiment to this using foam dots.
I few black pearls either side of the sentiment were added to draw the eye to it.

Thank you for stopping by and if you like what you see please head to the comments section and let me know!


Wednesday, October 4, 2017

Cats and Pumpkins

Good afternoon, the temperatures fell this afternoon, it was so nice to have the doors open and air blowing through the house. Fall is finally arriving I just hope that we have seen the end of the high temps.

Along with Fall comes Halloween and today's card is such a cute Halloween scene:


Halloween Cats is a digi stamp from Lili Of The Valley. This was my second attempt at coloring the image. My cats on the first one were a touch too dark and you couldn't quite make out their features. 
I colored the image with Copic markers and Prismacolor pencils. I followed Mindy Baxter's tutorial for creating a Halloween background which I think turned out well and really shows off the characters. 
The image is actually framed so I colored this in black rather than adding a mat layer to it.
 I made a 5 x 7 inch card base and matted this with orange and black card. The design paper is a free digital paper which I felt coordinated well. I stamped my Trick or Treat Sentiment on orange card and matted this with black. After arranging my image and sentiment I placed black pearls to balance out the design.

Lili of The Valley used to be my favorite stamp company when I lived in the UK as we lived in the same town as their store I was a frequent customer. I hadn't bought many stamps from them since moving to USA but now they do digital stamps and I don't have to wait for them to be shipped that has changed 😁

Thank you for stopping by and if you like what you see please head to the comments section and let me know!


Tuesday, October 3, 2017

Ride On

Good afternoon, We have finally had some rain today, not enough for what is needed but at least it's broken the drought.

This week I plan on showcasing some cards that I have made using stamps that I have in my personal collection.
Today's card is using a set From Raisin Boat. Now Raisin Boat closed a few months back but I heard some exciting news a couple of weeks ago, They have been taken over by Victorine Originals and I am so happy because I love their stamps - they also do a stamp rental system which again is great if you have a special card to make but don't want to buy a new stamp set.

I do own the stamp set I have used today which is Highway High:


I stamped the main image onto X-press it card and colored it using Copic markers and Prismacolor pencils. I then matted on to black card.
 I then used the Ride On stamp from the set to make my design paper, stamping it multiple times at different angles using black ink on red card. I made a 5x7 inch card base and matted this with black card before adding the red card.
 I stamped another of the sentiments from the set onto white card, matting it with black card. I added this along the side of my image and positioned it into the center of my card.

You can't beat riding a motorcycle in the summer like the sentiment says two wheels move the soul!

Thanks for stopping by and if you like what you see please let me know in the comments.


Tuesday, September 19, 2017

Celebrate the Season

Good afternoon, usually when we say celebrate the season it's the holidays but I love Fall so I want to celebrate the season of pumpkins, harvest and the wonder of natures colors.

Prickley Pear Rubber Stamps are also enjoying this time of year with our here comes Fall theme:


I stamped and colored the Small Sketchy Pumpkin and the Pumpkin corner with alcohol markers. I then stamped the Celebrate the Season sentiment in a lovely fall colored ink. My base card was matted with color coordinating cardstock and I added a fancy corner die cut just to balance the design

Thank you for stopping by, you can find all the Prickley Pear stamps I have used over in their store here. If you are looking more inspiration from me and my teamies check the Prickley Pear blog and our Facebook page.


Wednesday, September 13, 2017

Nothing beats a good book with a cup of tea!

Good afternoon, The sun is shining and the temperatures have climbed again so sweaters put to the back of the closet again - probably not for long!

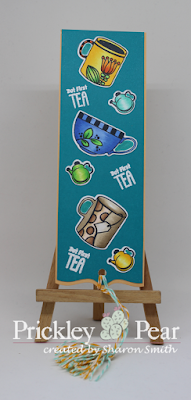
There is nothing better in Fall than to curl up on the couch, steaming hot mug of Yorkshire tea and a good book. Over at Prickley Pear Rubber Stamps our theme today is bookmarks and I have chosen to use the fab new  clear stamp set - Tea Set:


I stamped all the images and colored them with my alcohol markers. They were then fussy cut using my Scan N Cut. 
I used a shaped edge die to cut the base and mat for my bookmark and glued these together. I then added my images in random positions leaving the glue on these to dry so I could stamp and heat emboss the 'But First Tea' stamp from the same collection.
I used a hole punch on the tail of my bookmark and made a tassel from bakers twine to finish the design.

Thank you for stopping by, you can find all the Prickley Pear stamps I have used over in their store here. If you are looking more inspiration from me and my teamies check the Prickley Pear blog and our Facebook page.


Tuesday, September 12, 2017

Special Delivery

Good afternoon, We have had a busy day having repeat medicals for our green card applications, we are just hoping this is the last part of the process and we will get our permanent residency soon!

A colleague of my husband has just been made a dad for the second time so today's post is showcasing the card I have made to celebrate this:


The image is one I have had for a long time but was scared to color as I didn't believe I could do it justice. I used copic markers on Spectrum Noir ultra-smooth cardstock and I am quite pleased with how it turned out. I made a 5x7inch white card base and matted this with aqua colored card. I then used papers from a Lili of the Valley design pad which unfortunately is no longer available. Again these and my image were matted with the aqua cardstock. I typed my sentiment on my pc and added this to the side of the image before attaching it to the card using foam tape. Last but not least I used Joanna Sheen's bunting die to complete the design.  
I am in love with this card and have struggled to give it away I'm just glad it's going to a good home!


Monday, August 28, 2017

Advent tree

Good morning - back to school this week and Mollie is so excited! So am I - I get my days back to get chores done!

Today is my day to showcase a project I have made over on the Riley and Company Blog. When I started making this I didn't realize what a big project it was going to be I have handmade every part of it.
As Christmas is drawing ever nearer I decided to make my advent calendar early 


I started my designing a box using my cameo software and cutting machine and cutting them from kraft card. They started out at 2x2 inch but after working out mats and embellishments I increased then to 2.5 inches meaning the whole thing measures 20.5 inches to top of Santa's hat.
Once I had cut all the boxes I set my cutter back to work cutting the numbers. I then cut 2 mats for each box For the smaller ones I used Riley and Company nesting square dies. I added these and the numbers to the boxes before I assembled them. I formed the shape of a Christmas tree and used red liner tape to adhere all of the boxes together. I stamped and colored enough of the Riley and Company Christmas dress up accessories to decorate each box. These were then die cut using the matching Christmas dress up and Shirt dies. Riley was colored and dressed as Santa and given his place - of course at the top of the tree!


He is holding his box's number of course it has to be THE date!

As it was so tall I chose to photograph it outside rather the confines of my craft room. I know I looked a little odd to photographing Christmas decor in summer so just to give it a bit more of a Christmasy feel I placed it in our fur trees


Now to decide what to fill it with..................

Thank you for stopping by, you can find the stamps I have used over on the Riley and Company store. For more inspiration check out the Riley and Company Blog. Or for more news about what the Moose and his pals are up to head on over to the company Facebook page 


Tuesday, August 22, 2017

Mail Art for New Home

Good afternoon. Who loves to send snail mail? 
I love to send my cards out to people who I know get a warm glow from receiving them. I usually stamp the envelope with some mini sentiments I have specifically for that purpose.

Over at Prickley Pear Rubber Stamps today we are showcasing mail art so I went all out on an envelope:


Please excuse the hand written addresses! 
I started by masking off a circle for the address and then used distress oxides to color my envelope. Whilst this was drying I stamped up sections of a little house from The Prickley Pear Row House Clear Stamp Set, colored these and die cut using the coordinating dies
I then built my house in the corner of the envelope and added the weather vane from the same collect to the roof. I stamped the little home sweet home and Love Lives Here sentiments which also come with the set.
A cute little envelope for a new home card!

Thank you for stopping by, you can find all the Prickley Pear stamps and dies I have used over in their store here. If you are looking more inspiration from me and my teamies check the Prickley Pear blog and our Facebook page.


If the shoe fits......

Good morning from a wet Michigan but we sure do need the rain. Just hope that it doesn't increase the humidity even more!

It's Day 2 of the Riley and Company new release week and I'm sticking with the Halloween theme this morning - It's witching hour!


I love this sentiment - Yes If the Shoe Fits you need the broom and hat to complete the outfit! However I have feet not dissimilar to Riley so wearing the shoes on the sentiment would be a no go for me!
I stamped and inked the edges of the sentiment and matte it on orange card. Standing Witch with Broom was colored with alcohol markers, die cut with a scalloped die and I colored the edges to match with the other mats. I generated the witches shoe paper using a software package and matted my white card base with orange card and the design paper.

Don't forget this week we have special offers:


First up is the Dress up bundle:
This includes all three new Dress Up Clear stamp sets, all three matching die sets and a shirt die! You also get free shipping!!!! It's over 25% off - at a sale price of $90 but only for a limited time only! Get yours now!!!

How about some free shipping?
That's right - we will give you free shipping on any order over $15 until Sunday at midnight. This includes our new release and our entire stock!
Just enter the code FREESHIP in the coupon code when you check out.

Thank you for stopping by, you can find the stamps I have used over in the new release section on the Riley and Company store website . For more inspiration check out the Riley and Company Blog. Or for more news about what the Moose and his pals are up to head on over to the company Facebook page