Hello

Welcome to my blog, a place where I can lose myself in a crafty haven. Pull up a comfy chair grab a cuppa and come and have a read. Oh and if you like what you see, stop by and leave me some love in the comments section

Followers

Showing posts with label pink. Show all posts

Monday, January 29, 2024

Valentine's Card 'Donut" have to be hard to make!

Good morning,  the weather here is being a bit hormonal (😂) We have had lots of snow, then rain and fog then it was snowing again last night!

I'm back with super cute card suitable for my teenager to give her friend.


Aren't these stamps and dies just the cutest! The design is so simple to make. I started with an A2 top folding cardbase and as always this was cut from Neenah Solar White 110lb card stock. I matted this with Razzleberry Pop-Tone Cardstock. 

Using an Altenew Plate die and Pink Lemonade Pop-Tone Cardstock I die cut the lacy panel and adhered this to my base.

The cross-stitch frame is cut from Brown Bag Kraft CardStock 4 times this gives a chipboard effect. I did the same with the fastening at the top of the frame using Stardream Cardstock in Antique Gold Metallic.

My images were stamped using a combination of pink and tan colored inks on to Neenah Solar White Card. This was glued to the back of the frame.

The bow is also included in the set and is cut from Razzleberry Cardstock. This was then glued to the top of the hoop which was then adhered to my base.

Finally I added some flat back pearls to look as those it had sugar balls on.


Products Used:

Diamond Press Sweet Cross Stitch Stamp and Die Collection
Altenew Ornate Cover Die


Thank you for stopping by and as always if you like what you see leave me some love!!!


Wednesday, September 21, 2022

Die Cutting Inlaying

 Good morning! It's finally cooler here, we had storms all day yesterday and has been in the 70s.

I'm back today with some inspiration using Maker Forte products. I am using the Flower Trio Die and a die inlaying technique today.


The card began life as a plain white cardstock. After running the die through my die cut machine I carefully made sure all the waste bits stayed in place in the die. Lifting off the actual image I then placed press and seal over the remaining parts. When I carefully lifted this all the white waste was attached to it.


Bubble Tea Ink and Flamingo Ink make great colors to blend together. Using brushes I started with the darker Flamingo and worked out to edges coloring all the waste pieces.


Some of the pieces lifted while doing this but as long as I didn't lose any I'm not concerned.

Moving onto the actual die cut I masked off the flowers. 


To give my card a frame I inked the remaining edge with Flamingo Ink.


The masking paper keeps the underneath ink free so on removing my flowers are still bright white.


Turning this over I applied foam tape to the edge and smaller pieces to the backs of the flowers. I then adhered this to a 8.5x4in card base. 


The card base isn't a standard size but it gives the die cut a look of matting. Next I inlaid all the 'waste' pieces back into the die countersinking them. This works because the foam tape raises the die cut. I did use Makers Magic Crystal Clearfor this, the fine tip is great for getting into the tiny spaces.


The Rainbow Picker & Poker makes lifting the tiny pieces and placing them easier than using my fat fingers!

The inlaying took quite a while but the effect is worth it.


My card needs a sentiment. I love the A Sentiment For Every Occasion stamp set for cards like this. Making my sentiment coordinate with the colors on the card was easy. I swiped Flamingo Ink across a piece of 1in card strip.


Once this was dry I stamped 'Hope this is the best day ever' using Remarkable Eclipse Black Ink. I the quickly covered this with Crystal Clear Embossing Powder and melted it to give a glossy finish.


I adhered this to my card with foam tape. Subtle embellishments are a great finish to a card. Using Maker's Magic White Pearl instead of gems give a touch without taking away from the card design. These are dotted in an uneven number around my sentiment.


Thank you for taking time to read my post and I hope it gives you inspiration!


Wednesday, May 25, 2022

Blooming in Happiness

 Good morning from Tennessee! Our vacation has finally arrived and we are in s stunning cabin high up in the Smokey Mountains. It's a much needed break from reality.

My post today is inspiration for Maker Forte products. I am using the gorgeous Bloom Its Happiness Stamp Set as my main focus.


As always I gathered my products, before starting my project. I attempted a couple of techniques but discovered some weren't going to achieve the look I wanted so discarded my original idea. I started this card with a piece of Ultra White Heavy Card StockClear Embossing Ink and Supernova Embossing Powder:


Using the main wreath image from the stamp set I stamped it with the clear ink. I used my Perfect First Impression Smoosher to get even pressure when stamping the image on to the card stock. This gives an even ink layer for the embossing powder to adhere to. My card stock needed prepping, I use baby powder so the embossing powder only sticks to the stamped image. The Supernova Embossing Powder has a number of colors within it and gives a pretty finish to end stamped image.


When the embossed image had cooled I added my sentiment. I decided to make this an any occasion  so went with the 'may your day bloom with happiness'. The included sentiments all fit across the center of the wreath image. This image is also perfect for an A2 card.


I used Flamingo Ink which drew attention to the pink within the embossing powder. The stamp set includes lots of extra images including a trio of butterflies in incremental sizes. I stamped these inside the wreath, again with Flamingo Ink, to fill in the white space.

Next came building my design using White A2 Top Folding Card Base, and a mat with Tiptree Jam cardstock. this was cut slightly smaller than the card base. My topper adhered to this again cut smaller than the mat. I like to cut my layers an 1/8th of an inch smaller than the last. This gives a visible border of the base and mat but not too big it detracts from my image.


Because I had so much white space below the image I decided to add some embellishment. White Pearl Maker's Magic is great for this, it gives a touch of shine without distracting you too much. 3 dots in each lower corner is just enough.


The Bloom with Happiness Stamp Set is such a pretty set, it can be used in so many ways for so many occasions that it's perfect addition to anyone's collection.


Thank you for taking time to read my post and I hope it inspires you to make something similar. If it does I would love to see your creation.

Sunday, May 8, 2022

It's Mer-May!

 Good afternoon and happy weekend! Quick puppy update one has now got a forever home. they were all weighed on Friday and are gaining fast so Mama is doing an amazing job!

Stamper's Delights are celebrating May with some Mer-mazing images. Yes if you love mermaids this is the month for you.

My inspiration today is using Adell Happy Hour.


Do you remember the brightly colored plastic mermaids that you could hang on the edge of a glass well this is where my inspiration came from hence the bright pink hair!

I colored her using Copic markers and added sparkle pen to her tail.

My A7 card base was matted with bright pink card and a paler shade of striped design paper. I also matted Adell with the pink cardstock and die cut some bubbles too. These were added under my image.

Finally I added some iridescent bubbles coming from her margarita glass.

If you love this image there are lots more mermaids over on the Stamper's Delights website. Also if you head to the Fan Facebook group you can enter our Progressive challenge.

Thank you for taking time to read my post and happy crafting!

Saturday, March 5, 2022

Some Bunny

Happy Saturday everyone! Hope you are enjoying your weekend.

 I'm back with some more inspiration for the Stamper's Delights new release. The image today is called Some Bunny and isn't she the cutest!


I started the card by printing my image and sentiment on to stamping card. I colored her with Copic markers and die cut using a shabby edged die.
My A2 card base was matted with some neon green cardstock to match her dress and my image was adhered to this with foam tape to give some dimension to the card. A simple card but so spring like!

Why not stop by the Stamper's Delight Facebook page for regular news and inspiration from my Teamies you can also enter the progressive challenge there, no blog needed and if you sign up for the Stamper's Delight Membership you will get free images to enter the challenge with!

If you are looking for more then read on: 

NEVER Having To Struggle With Your Creative Process Alone Ever Again…

What if you had all the knowledge and techniques you need to create beautiful inspiring projects each month and a supportive community all in one place without the hours of unnecessary searching leaving you feeling frustrated, alone and over whelmed?

Stamper's Delights Have Packed This Membership With So Much Goodness!

To inspire you and help you grow... It's finally time to invest in yourself and what YOU love! 

Work together with them to find your own artistic voice, to help you get out of your comfort zone and try new things.

They are looking for Founding Members who can help to mould this membership by sharing ideas, what is working and what could be improved and in return for being an active member you will be locked into the lowest monthly fee it will ever be for as long as you are a member. Stamper's Delights main launch will be much high as they build up the content libraries. 


Wednesday, October 6, 2021

How Beautiful You Are

 Good morning! Fall has finally arrived, the maple tree in the yard is starting to turn to stunning colors it gives us this time of year

My post today is using another of the gorgeous new release digi stamps from Sunshine Bee at The Little Paper Tree. I have done something different with it this time, it started as an experiment and ended up better than I expected.


I started by taking the Autumn Wreath - Circle into my Silhouette software. This automatically traced the image. Then switching my blade to my Foil Quill I adjusted the settings so it would sketch. I laid my stamping card onto my cutting mat and secured rose gold foil over the top, hit send and let my machine do it's magic.
I repeated this for the Beautiful Sentiment. Leaving my card on the mat I switched the foil to green and added the sentiment to the center of the circle. I colored the images using Copic markers and fine liners. I matted an A7 card base with pink cardstock ready for my image. I wanted to add a ribbon slider but didn't have a coordinating one so I colored the silver heart one with an orange Copic marker. This was slid on to ribbon that coordinated with the pink card and was added under my image before I adhered it to my card.
Finally I added a few pink water droplets to the flower centers and around my ribbon slider.


If you love this image it is part of the new release of Sunshine and Bee Designs there are some other floral designs as well as the cute Halloween ones I shared last week.
 
Thank you for stopping by.


Sunday, August 8, 2021

Altenew Educators Certification Program - Impressive Heat Embossing

  Good afternoon! How can it be Sunday already? I wish time would slow down!

I'm back today with my latest submission for my AECP - This class was all about using heating embossing in different ways to stretch your stamps and crafting further.

My first card used the technique from class 2 but I also added elements from class 6, using clear embossing powder to give you a watermark effect - darkening the cardstock:


I started with 2 pieces of cardstock the same size, one green and one white. Using my MISTI I arranged by leaf stamps from the wild fern set long one side of the white card and stamped in green ink. I then, without moving the stamps, switched out the white card for the green piece and stamped the leaves in embossing ink. Turning the card 180 degrees and using embossing ink I stamped the leaves of the opposite side of the green card. I switched this out for the white card and stamped the leaves in green ink. This gave me 2 pieces of card stock both with leaves stamped down their long side. Using clear embossing powder I heat embossed the images on green card. which made the leaves look a darker shiny green.

I die cut the green piece with a rectangle die and when I laid this over the white card I could line up the leaves so they looked like complete leaves just in 2 different greens. These pieces were adhered together using wet glue so I had 'wiggle' time to make sure they were lined up correctly.


My next techniques was from lesson 6 I die cut the word 'Love' and heat embossed it layering the embossing ink and clear powder 4 times to give me a smooth raised die cut that looked like it was enameled. The mistake I made with this is I used clear embossing powder, I should have used white as the clear starts to yellow when you get multiple layers.

I worked out where I wanted my die cut and stamped the remainder of my sentiment directly on my green cardstock and heat embossed with with white powder.

I adhered my design onto a black A2 card base with foam tape to give dimension, lined up the Love with my stamped sentiment and added a few cream colored sequins to balance the card.


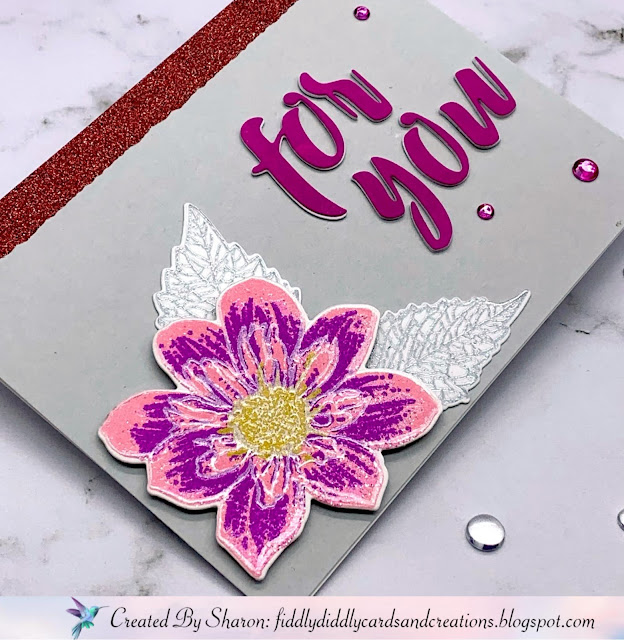
My second card for heat embossing techniques used lesson 4 - using embossing powder instead of colored ink for a layered stamp image:


I found this a much harder technique to do and did multiple attempts in multiple colors before I was happy with my results. 

The first struggle was finding embossing powders for my layers. I used build a flower Fashion Monger Dahlia which has 4 layers for the main flower and 2 for the center. 

I started with the solid layer in a pale pink color. the tick was to make sure each layer was fully cooled before adding the next. My second layer isn't as obvious on the photos but it was a slightly darker pink with glitter. The 3rd layer was a brighter pink.  I added my center in yellow after this, I chose to just do one of the center layers. My last layer was the outline of the flower. I initially tried gold for this but I lost the definition of the flower and the outline lines looked too thick so tried again with a pearlized white and liked this much better.

I only used one layer for my leaf, I used both gold and silver embossing powder on this and decided to go with the silver,

My flower and leaves were die cut ready to go on my card

I added a strip of glitter washi tape to the top of a landscape white A2 card base, This is actually nearer the base color of the flower but the camera shows it darker.

I matted a piece of grey cardstock over this and arranged my flower and leaves using both wet glue and foam tape in the corner of the card.

I cut my sentiment 4 times and used Magenta ink to color one of these. I stacked these together and adhered in place. 

I didn't have any embellishments in coordinating colors so I used clear gems and colored them with alcohol markers to match the pink in my sentiment.


Thank you for taking time to ready my very long post!!

Altenew products I used:

Envelope Liner Die Set
Purchase From:
SSS | ALW
Pure White Crisp Embossing Powder
Purchase From:
ALW
Crisp Dye Ink - Magenta
Purchase From:
ALW
Crisp Dye Ink - Forest Glades
Purchase From:
SSS | ALW
Embossing Ink
Embossing Ink
Purchase From:
ALW
Silver Embossing Powder
Purchase From:
ALW
Build a Flower Fashion Monger Dahlia stamp and Die set
Purchase From:
ALW
Wild Fern Stamp Set
Wild Fern Stamp Set
Purchase From:
ALW

Saturday, July 3, 2021

Growing Friendship

 Good afternoon, hope your weekend is amazing! We are spending it quietly at home.

I'm back with another of this weekend's new releases from Stamper's Delights. Chibi Friendship Grows is a sweet little gardener:


I printed her, her flower and the included sentiment onto stamping card. She was colored with Copic markers and trimmed to size.
I cut the top front section off a 7x7in card base. Then matted the remaining bottom section and inside with pink card and patterned papers. I also matted the section I had removed and adhered this back at a 90 degree angle in the center of the bottom front of the card, giving me an upside down T for the card front.
My Chibi and sentiment were matted with pink card and arranged on the center panel. I fussy cut the little flower and used foam pads to attach it to my card.
Finally I colored some card candy to coordinated with papers and added this to either side of my image panel.

Head on over to the Stamper's Delights Store to see all of this week’s New Releases.

Why not stop by the Stamper's Delight Facebook page for regular news and inspiration from my Teamies you can also enter the progressive challenge there, no blog needed and receive freebies!

Also for this weekend Stamper's Delights have a great give away over on the Kit and Clowder Facebook group - Come and see how you can win both clear and digital stamps!!!

All the design team projects are available on the Inspiration blog - hop on over there for more inspiration.

Thanks for stopping by and if you like what you see please leave a comment to let me know!


Thursday, July 1, 2021

Cute as a Bug

 Good afternoon from a hop Michigan - we were supposed to have storms all week this week but it appears they dissipated before they reached us.

It's the start of new release weekend over at Stamper's Delights and we have some super cute images waiting for you. Today is Kawaii New Release and Cute as a Bug is available as both a digital stamp AND in the new clear stamp format!!!

Here she is: 


Isn't she super sweet!!!
The digi set includes her with her little garden or on her own - She also has extra images you can add as well as a "cute as a bug" sentiment.
I printed her on stamping card and colored her with alcohol markers. she was the die cut into the shabby circle.
I made an arrow point card (I will be doing a tutorial post for this at a later date) and matted this with pink cardstock and coordinating design papers both inside and outside of the card.

Head on over to the Stamper's Delights Store to see all of this week’s New Releases.

Why not stop by the Stamper's Delight Facebook page for regular news and inspiration from my Teamies you can also enter the progressive challenge there, no blog needed and receive freebies!

Also for this weekend Stamper's Delights have a great give away over on the Kit and Clowder Facebook group - Come and see how you can win both clear and digital stamps!!!

All the design team projects are available on the Inspiration blog - hop on over there for more inspiration.

Thanks for stopping by and if you like what you see please leave a comment to let me know!

Saturday, June 5, 2021

Brighten the Day with a Smile

 Good afternoon, I hope everyone is having a great weekend. It is HOT here!

It's Chibi new release day over at Stamper's Delights and the cutest Chibi Smile image is now available:


She is adorable!!!

I arranged the included music notes and sentiment around her and printed on stamping cards

The image was the colored with alcohol markers. I matted an A7 card base with burgundy cardstock to coordinate with my image. I also die cut some quaver notes in coordinating colors to add some texture to the card.

The digital image has different formats to suit your scene building and the clear stamped image come with great stamps that can be used with all your other Stamper's Delights images:


Head on over to the Stamper's Delights Store to see all of this week’s New Releases.

Why not stop by the Stamper's Delight Facebook page for regular news and inspiration from my Teamies you can also enter the progressive challenge there, no blog needed and receive freebies!

 All the design team projects are available on the Inspiration blog - hop on over there for more inspiration.

Thanks for stopping by and if you like what you see please leave a comment to let me know!


Saturday, May 1, 2021

Altenew Educator's Certification Program - In the Mood for Color

 Good afternoon, it's May already - how crazy is that! we only have a few more weeks and school will be out - I've survived around 18months as a home school mom!

My post today is showcasing the work I have done for my next AECP class. The lessons this time were all about "In The Mood For Color" Stephanie Klauck led the lessons which taught about how your mood can apply to the theme of your cards. I chose to showcase 2 colors Blue and Pink. 

As defined in the classes blue has a calming mood, I chose to work with the Painted Butterflies stamp set. I have always found watching butterflies calming.


I started with a 4x5.25in piece of white cardstock and using different shades of blue ink and different butterfly layering stamps created a flutter across the card. I decided to stamp the sentiment vertical for interest. I carried the blue theme onto a mat between the stamped card and my A2 card base.
Finally I added some clear blue gems.


Pink is not only one of my favorite colors but is also said to be sweet, sensitive and caring and I fulfilled these with the sentiment on my next card:
 

For this card I used Beautiful Day stamp and die set - This is one of my all time favorite Altenew sets. I stamped the outline of the flowers and leaves with black ink and then used alcohol markers and colored pencils to add color and depth. They were then all die cut and put to once side while I moved on to next step.
I carried the pink theme onto my card layers. I used a white A2 card base and matted this with pink cardstock. I then took a 4x5.5in piece of cardstock and laid Altenew's Halftone Stencil onto it. I colored some matt texture paste with pink ink and spread this over the stencil to give some delicate detail to the surface.
While this dried I heat embossed my sentiment on to a strip of vellum. This was then wrapped around the bottom of my stenciled card. 
I added the stenciled piece onto my card base with foam tape. My flowers and leaves were arranged and added both with wet glue and foam squares to give more dimension.


These were going to be the 2 cards for my post but then we were invited to join an Instagram Hop celebrating the ACEP course so I decided as I loved composing these cards I would do a 3rd card using In The Mood For Color. 

As it's a celebration I decided rainbow was the perfect color combo. 


I loved using the Painted Butterflies stamp set  for my first card so used them again. This time I used some rainbow colors and had the butterflies flittering diagonally across my card front. I die cut the word hello and the font just was perfect to follow my butterflies

My A2 card base was decorated with strips of coordinating cardstock on a diagonal, I cut my card front down so the rainbow would show underneath.
Finally I added rainbow colored enamel dots


Thank you for taking time to stop by and read my post. I am learning so much on this course and can't wait to start the next class


Items I used:

Neenah Classic Crest Solar White 110lb Coverstock
Purchase From:
SSS | AZN
Copic Markers
Copic Markers
Purchase From:
SSS | AZN
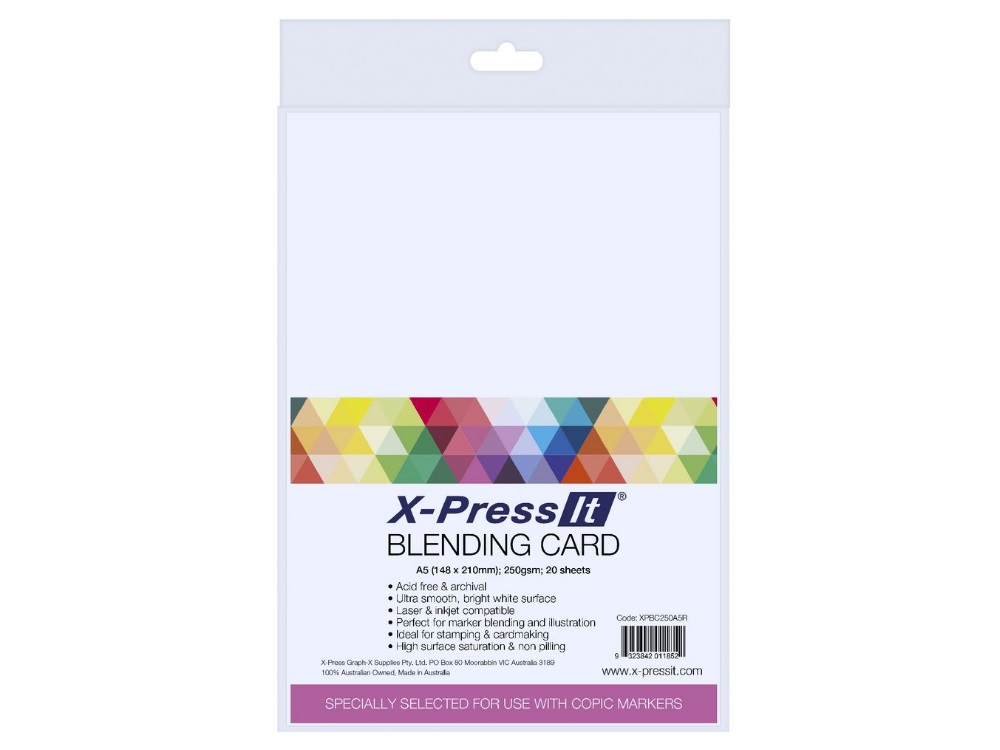
X-Press It Cardstock
Purchase From:
SSS | AZN
Altenew Beautiful Day Stamp & Die set
Purchase From:
ALW
Altenew Painted Butterflies Stamps
Purchase From:
ALW
Altenew Half tone Stencil
Purchase From:
ALW
Altenew Glacier Caves Crisp Inks
Purchase From:
ALW
Altenew Cool Summer Night Crisp Inks
Purchase From:
ALW
Altenew Blush Crisp Ink
Purchase From:
ALW
Altenew Jet Black Ink
Purchase From:
ALW
Versafine Ink
Versafine Ink
Purchase From:
SSS
Altenew Crystal Clear Embossing Powder
Purchase From:
ALW
Ranger Matt Texture Paste
Purchase From:
SSS
Altenew Envelope Liner Die Set
Purchase From:
ALW
Altenew Red Sunset Crisp Inks
Purchase From:
ALW
Altenew Summer Afternoon Crisp Inks
Purchase From:
ALW
Altenew Green Meadows Crisp Inks
Purchase From:
ALW
Shades of Purple Crsip Inks
Purchase From:
ALW
colored cardstock
colored cardstock
Purchase From:
SSS