Hello

Welcome to my blog, a place where I can lose myself in a crafty haven. Pull up a comfy chair grab a cuppa and come and have a read. Oh and if you like what you see, stop by and leave me some love in the comments section

Followers

Showing posts with label Wild fern. Show all posts

Sunday, August 8, 2021

Altenew Educators Certification Program - Impressive Heat Embossing

  Good afternoon! How can it be Sunday already? I wish time would slow down!

I'm back today with my latest submission for my AECP - This class was all about using heating embossing in different ways to stretch your stamps and crafting further.

My first card used the technique from class 2 but I also added elements from class 6, using clear embossing powder to give you a watermark effect - darkening the cardstock:


I started with 2 pieces of cardstock the same size, one green and one white. Using my MISTI I arranged by leaf stamps from the wild fern set long one side of the white card and stamped in green ink. I then, without moving the stamps, switched out the white card for the green piece and stamped the leaves in embossing ink. Turning the card 180 degrees and using embossing ink I stamped the leaves of the opposite side of the green card. I switched this out for the white card and stamped the leaves in green ink. This gave me 2 pieces of card stock both with leaves stamped down their long side. Using clear embossing powder I heat embossed the images on green card. which made the leaves look a darker shiny green.

I die cut the green piece with a rectangle die and when I laid this over the white card I could line up the leaves so they looked like complete leaves just in 2 different greens. These pieces were adhered together using wet glue so I had 'wiggle' time to make sure they were lined up correctly.


My next techniques was from lesson 6 I die cut the word 'Love' and heat embossed it layering the embossing ink and clear powder 4 times to give me a smooth raised die cut that looked like it was enameled. The mistake I made with this is I used clear embossing powder, I should have used white as the clear starts to yellow when you get multiple layers.

I worked out where I wanted my die cut and stamped the remainder of my sentiment directly on my green cardstock and heat embossed with with white powder.

I adhered my design onto a black A2 card base with foam tape to give dimension, lined up the Love with my stamped sentiment and added a few cream colored sequins to balance the card.


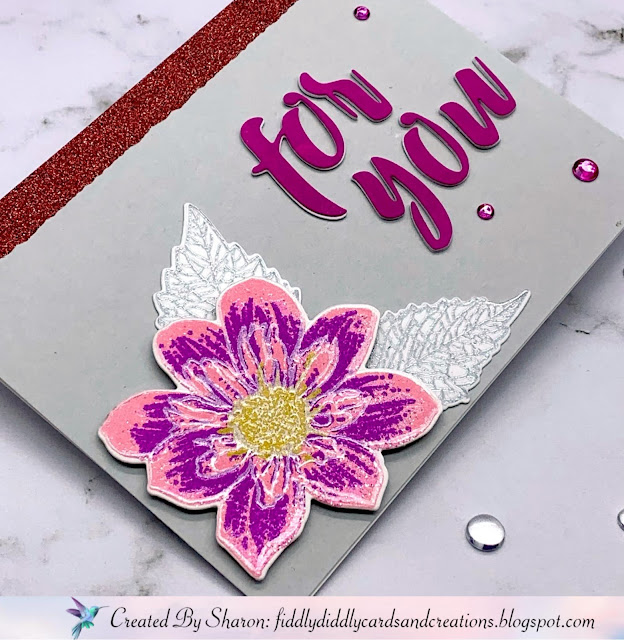
My second card for heat embossing techniques used lesson 4 - using embossing powder instead of colored ink for a layered stamp image:


I found this a much harder technique to do and did multiple attempts in multiple colors before I was happy with my results. 

The first struggle was finding embossing powders for my layers. I used build a flower Fashion Monger Dahlia which has 4 layers for the main flower and 2 for the center. 

I started with the solid layer in a pale pink color. the tick was to make sure each layer was fully cooled before adding the next. My second layer isn't as obvious on the photos but it was a slightly darker pink with glitter. The 3rd layer was a brighter pink.  I added my center in yellow after this, I chose to just do one of the center layers. My last layer was the outline of the flower. I initially tried gold for this but I lost the definition of the flower and the outline lines looked too thick so tried again with a pearlized white and liked this much better.

I only used one layer for my leaf, I used both gold and silver embossing powder on this and decided to go with the silver,

My flower and leaves were die cut ready to go on my card

I added a strip of glitter washi tape to the top of a landscape white A2 card base, This is actually nearer the base color of the flower but the camera shows it darker.

I matted a piece of grey cardstock over this and arranged my flower and leaves using both wet glue and foam tape in the corner of the card.

I cut my sentiment 4 times and used Magenta ink to color one of these. I stacked these together and adhered in place. 

I didn't have any embellishments in coordinating colors so I used clear gems and colored them with alcohol markers to match the pink in my sentiment.

Thank you for taking time to ready my very long post!!

Altenew products I used:

Envelope Liner Die Set
Purchase From:
SSS | ALW
Pure White Crisp Embossing Powder
Purchase From:
ALW
Crisp Dye Ink - Magenta
Purchase From:
ALW
Crisp Dye Ink - Forest Glades
Purchase From:
SSS | ALW
Embossing Ink
Embossing Ink
Purchase From:
ALW
Silver Embossing Powder
Purchase From:
ALW
Build a Flower Fashion Monger Dahlia stamp and Die set
Purchase From:
ALW
Wild Fern Stamp Set
Wild Fern Stamp Set
Purchase From:
ALW

Thursday, July 2, 2020

CAS Boutique Cards

Good Morning! I'm having a lazy day today, the heat is just too much to get busy!

My post today is all about Clean and Simple Boutique Cards - the third course in my Altenew Educator Certification Program. I have made 3 cards that are all CAS:

My first card was from lesson one simple styling, I've covered this by doing a single rose in the center of my card and a very simple sentiment:


I used Altenew's Painted Rose stamp set, stamping the layers of the rose with Rose Quartz, Puffy Heart and Purple Wine inks from the Rose Petal Mini Cube Set. I stamped the leaves with Frayed Leaf and then loosely drew the outline of them with a Faber Castell Pitt pen. Lastly I used a sentiment from Altenew Heartfelt Sentiments and stamped it with jet black ink.

 For my next card I used lesson 2 - Stamped backgrounds:


For this card I used one of the stamps from Wild Fern Stamp Set and stamped it multiple times on my card in  Just Green Ink. I then mixed some watercolor marker ink with water and, using a paint brush, made splatters cover the card front.
The sentiment, again from the Wild fern Stamp Set, was stamped in versamark ink and I heat embossed this with white embossing powder onto a strip of black card. This was then adhered on to my card.

My last card was my favorite technique and one I wasn't aware of. I added foiling:


This is a great technique if you don't have alternate ways of foiling. I do have a foil press but can't use that with my stamps! 
I used Altenew's Dahlia Blossoms, picked one of the layers of both the smaller and large flower and stamped this in Buttercream Ink. Then came the magic. I used my antistatic bag across my card and stamped the outline of the flowers with Stayzon ink. I heat embossed this with clear embossing powder. I had to repeat this step 3 times to get a thick enough outline for the foil to stick to. Following the embossing I laid Minc foil over the images and sent it through a laminator which had been heating up for a while. Once my card had cooled I removed the foil sheet and was left with a gorgeous rose pink foiled outline on my dahlias.
I went on to stamp the leaves from the Dahlia stamp set and some more from Altenew's beautiful Day stamp set
As I loved the foiling so much I had to do more! I chose a sentiment die from my stash. I die cut this in both black and white. I covered the white version in Stayzon ink and dipped it into my embossing ink. Again I repeated this 2 more times then covered it with foil and ran it through my laminator and it worked! I adhered this to the black diecut, slightly offsetting it so I had a black shadow to my foiled sentiment. This was then glued to my card.

This was my favorite lesson from the whole Clean and Simple Boutique Card course and I will be using frequently!!

Thanks for checking out my post - I hope it gave you some inspiration and if you like what you see please leave me some love in the comment section