Hello

Welcome to my blog, a place where I can lose myself in a crafty haven. Pull up a comfy chair grab a cuppa and come and have a read. Oh and if you like what you see, stop by and leave me some love in the comments section

Followers

Wednesday, April 27, 2022

Mother's Day Blessings

Good morning! The weather is really messing with us here. Saturday it was 77F today it's been snowing and is forecast to drop into the 20s overnight! We are currently waiting for Sassy to have her pups, she's due any day now so we can't go anywhere even if the weather was better!

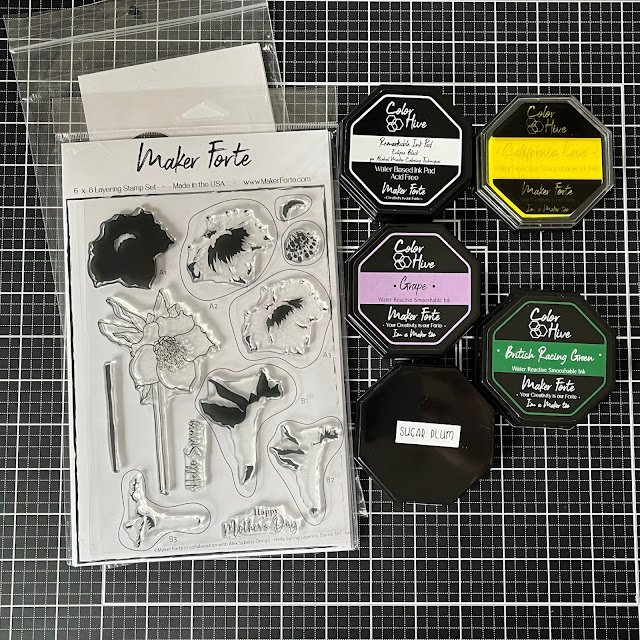
My post today is in celebration of all the Bonus mom's out there, I have one here who is always there for me to chat with! I have used Maker Forte products for this card starting with Motherhood Is A Blessing Stamp Set.


I started as always by collecting my supplies I used very little for this card. The gorgeous frame that is the main component of the stamp set doesn't need much more than a bit of color.


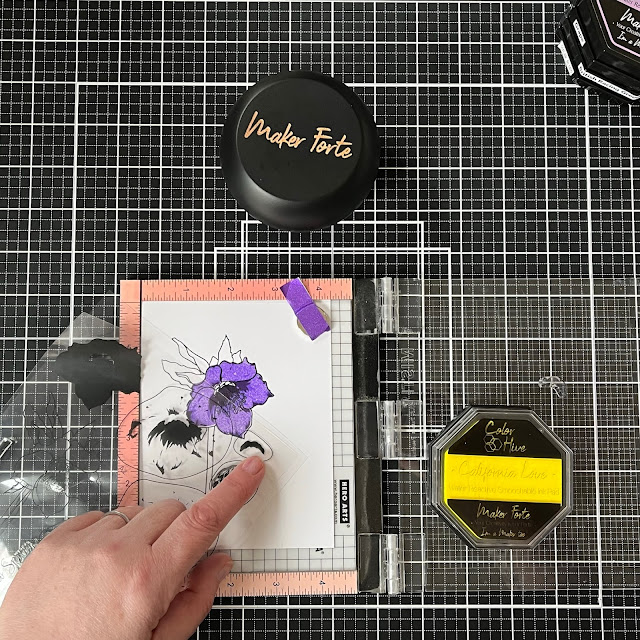
My design started by me stamping the frame on to some Bristol Vellum Card. This has a tooth to it which is needed with colored pencils. The ink color I chose for this was Memento London Fog because I didn't want black outlines on my flowers.for my sentiments.for my sentiments.
I stamped towards the bottom right of the card as I wanted plenty of white space on the card and room for my sentiments.

Once I had stamped the frame I used colored pencils in yellow and purple to color the flowers and of course green for the leaves. I decided to define the diamond of the frame with black fine liner. My thought was it would stand out from the flowers but I didn't want a thick line. This was where I made a mistake! I drew through the flower that goes over the frame. Luckily I was able to remove it with a sand eraser and I was able to disguise what was remaining with another layer of yellow pencil.


I used the Best Bonus Mom Ever sentiment on the card. I love this wording! This stamp is the only set I have seen with this wording. Being a Brit living in the US I have a bonus US mom for whom I am truly grateful.
This and the sentiment I placed in the frame were both stamped using Remarkable Eclipse Black Ink. I wanted them to stand out from the card and I think black ink does this. I did have to stamp a few times as the texture of the card left gaps - Hooray for my MISTI!


Once I had finished the stamping I started to build the card. Pulling the green color from the colored I chose a mat to coordinate. I used Welsh Dragon Solid Cardstock for my mat and an A2 Top Folding Card Base.


I cut my mat so it was 1/4in narrower than my base but the same length which left a slight white edge up both sides. Making sure this was central I used wet glue to fix it in place. My image was 1/4in narrower than my mat and I fixed this in place with foam tape. This gave dimension to my card. 


Finally I added some bling with Lemon Crown Jewels. I adhered these in place with Makers Magic Crystal Clear glue. Have you seen the Makers Magic Rings? These little pink heart rings hold glue and you can dip the Micro Brush Applicators in to it getting just the right amount for sticking little gems down.


I hope this has given you some inspiration for your Mother's Day cards whether it's for your real mom or your bonus mom.

Oh and Happy Mother's Day to all you Moms and Mums!

Wednesday, April 20, 2022

Butterfly Dreams

 Good morning, it's hard to believe it's spring give the weather we have had this past week. Wind, rain, cold and snow! 

My post today is inspiration for Maker Forte using their new Floating on Dreams Stamp Set.


I love this stamp set, I used a number of different products as well as the stamp set:


To start place the Spotlight Circle Stencil over a piece of Perfect Blend Cardstock. I had cut the card to 4x5.5in so it was slightly narrower than a A2 card base.

Over the circle I lined up the Acutely Aware Stencil, held this in place with magnets and inked over it with Icy Mist Ink


Once I removed the stencils I had a patterned spotlight in the center of my card. I then chose one of the gorgeous butterflies from Floating on Dreams and stamped this near the top left of the card. I used Remarkable Eclipse Ink for this, 1 so it stood out against the inking and 2 because I wanted to color it with alcohol markers.


The stamp set has some word trails which I stamped in Vegas Strip Ink. These trails are fine enough so you can shape them when you place on your stamping tool. I also added one of the sentiment from the set to the end of my trail.


I wanted some contrast to the card so colored the butterfly in red and pink markers. It is such a pretty stamp.


Now to build my card. I used a Top Folding A2 Card Base which I covered with Redwoods Solid Core Cardstock.


My image was added to the base using foam tape to give my card some dimension. For further interest I added some Roller Skate Crown Jewels. These help draw the eye in to the image making this the main focus.


Floating on Dreams Stamp Set has 5 different butterflies and 5 different word trails so you can mix and match for your needs. There is also a bunch of sentiments that fit with the word trails like the one I used on my card.


Thank you for taking time to read my post and if you love what you see please let me know in the comments.


Thursday, April 14, 2022

Eggstra Special Easter

 Good Morning, I'm back with another Easter card and this on is using some LDRS stamps and dies.

The stamp set is called Easter Pirouette and has super cute tiny images that make a great background:


I started by making the strip with the stamps. The eggs are all layering stamps so you get to choose what patten you want on them. I then layered an A2 card base with a dark yellow cardstock. I cut a white panel slightly narrower and ink the edges of this with Cracked Pistachio Distress ink. This was then added to my base. I inked the edges of the panel I had stamped, matted this with the same yellow cardstock and added this to the left side of the card.


I stamped and colored a couple of the chicks and die cut them with the coordinating dies and added these to the card with foam squares. Finally I stamped and die ct one of the included sentiments and added this to the card with foam tape.


Kev always asks if the card has pearls - I do like to use them on my cards and this one is no different. A trio of green pearls draw your eye to the sentiment!

Thanks for stopping by and if you love what you see please let me know in the comments.


Wednesday, April 13, 2022

Easter Blessings

 Good afternoon! I sure wish Spring would show it's self and stay! Easter is almost on us and I'm going to be sharing a few cards I have made over the course of this week.

The one I'm sharing today is using the gorgeous Layering Spring Floral Dies from Maker Forte


I love Layering Spring Floral dies, they are so striking on a card that very little else is needed. I started by collecting all the products I would be using:

The die is a 4 part layering collection. I cut 4 piece of different shades of yellow card just large enough for the dies. I backed these pieces with Stick It adhesive sheets before adding the dies.

The coating on these dies means that they cut like butter and the design releases from the die really easy despite some fine areas on the cuts.

Using Stick It means that I don't need to worry about glue showing through the open areas of the layers. They stack beautifully and so easily. I love the finished effect looks just like a carved egg.

I added the finished layered egg to a Top Folding A2 Card Base which I folded using the Right On Point Bone Folder.

As I said previously, this die cut doesn't need much else as it's so pretty on its own. I did want to add a sentiment to make this an Easter card. Sending Easter Blessings from the He Is Risen Stamp Set fit perfectly.

I stamped it with Versafine Ink and heat embossed with clear embossing powder. The sentiment was cut down in to a strip and added with foam squares across the egg.

Finally I wanted to add some bling and the Lemon Crown Jewel Gems fit perfectly in some of the flowers.

I adhered the gems in place with Maker's Magic Crystal Clear Glue. This works great for tiny items when used with the Micro Brush Applicators. I applied a small amount of glue to a Sticky Paws and dipped the brush in giving me the perfect amount of glue for the gems.

My card was finished - I made an identical card using purple card stock and a different sentiment from the He Is Risen set.

Thank you for taking time to read my post and I hope it has given you inspiration for both your Easter cards and for using these gorgeous dies.


Wednesday, April 6, 2022

Flower for Mother's Day

 Good morning I hope you are having a great week! 

My post today is inspiration for a Mother's Day card using Maker Forte Products.

I designed this card using Hello Spring Layering Stamp Set. I gathered the products I was going to be using but as always I add to this!

 I did switch Racing Green ink for Distress inks - more about that later.

I started by stamping the outline of the flower with Remarkable Eclipse Black Ink this gave me a crisp image to work with for the stamp layers:


My first layer of the flower was stamped with Grape Ink This was a solid layer and it gives a base for the rest of the layers. As I didn't have a slightly darker purple ink, I used Grape again for the next layer but I stamped it 3 times which darkens the ink:


The last of the 3 layers I stamped with Sugar Plum Ink this gives a dark shadow which gave the impression of depth to the image.


To brighten the flower I stamped the center and stamens with California Love ink. This brightened the center of the flower. To be able to see the stamens over the purple flower I stamped them multiple times so the yellow ink was visible.


Distress inks were used for the leaves, I decided Racing Green Ink was too dark for the base and didn't layer well with the distress colors I own. I started with Evergreen Distress Ink, the second layer was Lucky Clover and last layer I used Hickory Smoke - A gray that added enough shadow for the depth of the leaves.


Evergreen Bough Distress ink was used for the stem.

I wanted to give a halo around the flower so using the included Stencil, I covered my stamped image and using Grape Ink and a blending brush I inked a faint shadow around the covered image.


The stamp set includes 2 sentiments Hello Spring and Happy Mother's Day - the latter was the one I used on the card inking it with Remarkable Eclipse Ink.


Now to build my card. My base card was an A2 Top Folding Base, I wanted to add more color to my card so I trimmed the stamped card down to 4x5.5in.


I then matted my base card with a piece of Coronation Purple Cardstock cut to 4.25x5.5in. My image was then adhered using foam tape to give a slight dimension.


Finally I added a few Lemon Crown Jewel Gems. I chose this color to bring out the yellow in the center of the flower, they also have a slight purple iridescence to them.


 Thank you for taking time to read my post and if you are a Mom - I hope you have an amazing Mother's Day!


Saturday, April 2, 2022

Tea Cup Cutie Prrr Prr Prrr

 Good afternoon and happy weekend!

It's day 2 of Stamper's Delights new release and my card today is using Chibi Tea Cup Cutie Cat Boy. I love this image, he really doesn't look happy about being petted:


I started my card by printing the image. I added the included sentiment to the cup. Digital stamps are a great way of resizing and adjusting images so they fit any card.
Once I had colored the cutie with Copic markers I trimmed him ready to fit my card. I used an A7 card which I matted with blue cardstock.
I then chose a cat design paper - I colored the images on there too.
Using a animal themed font I printed out Meow and matted this in blue card to match my base. 
Brads were added to the Meow image and both that and my image were added to my base with foam tape.

Why not stop by the Stamper's Delight Facebook page for regular news and inspiration from my Teamies you can also enter the progressive challenge there, no blog needed and if you sign up for the Stamper's Delight Membership you will get free images to enter the challenge with!

If you are looking for more then read on: 

NEVER Having To Struggle With Your Creative Process Alone Ever Again…

What if you had all the knowledge and techniques you need to create beautiful inspiring projects each month and a supportive community all in one place without the hours of unnecessary searching leaving you feeling frustrated, alone and over whelmed?

Stamper's Delights Have Packed This Membership With So Much Goodness!

To inspire you and help you grow... It's finally time to invest in yourself and what YOU love! 

Work together with them to find your own artistic voice, to help you get out of your comfort zone and try new things.

They are looking for Founding Members who can help to mold this membership by sharing ideas, what is working and what could be improved and in return for being an active member you will be locked into the lowest monthly fee it will ever be for as long as you are a member. Stamper's Delights main launch will be much high as they build up the content libraries. 

Friday, April 1, 2022

Cactus Friends Stick Together

 Hello! Welcome April - who can believe we are into month 4 already?  oh and we have had snow again this week!

Todays post is inspiration for the new release at Stamper's Delights. This month the Kawaii release has 7 fun cactus images. I have used Kawaii Cactus 5:


Aren't they so cute!
I colored the images with Copic markers and I fussy cut around the top right section of the images. Using this I traced around the cut section on to the front of an A7 card base and cut this away giving me a shaped card.
My image was then glued in place covering the card front:


I then printed the sentiment in the top right of a 5x7in piece of cardstock. This was the ink blended with distress ink and the 'Stick' colored with green marker. When the card is closed the sentiment can still be seen.

Why not stop by the Stamper's Delight Facebook page for regular news and inspiration from my Teamies you can also enter the progressive challenge there, no blog needed and if you sign up for the Stamper's Delight Membership you will get free images to enter the challenge with!

If you are looking for more then read on: 

NEVER Having To Struggle With Your Creative Process Alone Ever Again…

What if you had all the knowledge and techniques you need to create beautiful inspiring projects each month and a supportive community all in one place without the hours of unnecessary searching leaving you feeling frustrated, alone and over whelmed?

Stamper's Delights Have Packed This Membership With So Much Goodness!

To inspire you and help you grow... It's finally time to invest in yourself and what YOU love! 

Work together with them to find your own artistic voice, to help you get out of your comfort zone and try new things.

They are looking for Founding Members who can help to mold this membership by sharing ideas, what is working and what could be improved and in return for being an active member you will be locked into the lowest monthly fee it will ever be for as long as you are a member. Stamper's Delights main launch will be much high as they build up the content libraries.