Hello

Welcome to my blog, a place where I can lose myself in a crafty haven. Pull up a comfy chair grab a cuppa and come and have a read. Oh and if you like what you see, stop by and leave me some love in the comments section

Followers

Thursday, December 22, 2016

Designer highlights

Good morning who's excited about the pending holidays - I have 2 excited kids who can't wait for Santa Claus to arrive!

Today my makes are being showcased over on the Prickley Pear Rubber Stamps blog. I have made a couple of new designs as well as all my previous makes

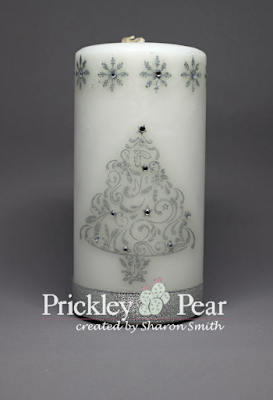
First of all is a candle and box I have decorated using the stunning Christmas stamps

And here's how I did it:
I stamped and heat set The Ornate Tree and Snowflake Border images using a metallic silver ink onto white tissue paper. I then carefully cut around the images and laid them on a plain white candle. I wrapped parchment paper around this and heated with my heat gun. This causes the top layer of the candle to melt and the tissue paper sinks into this. once cooled the image looks as though it has been stamped onto the candle. 
I added some crystal gems to the stamped image and some silver gossamer ribbon around the base to balance the design out.


For the box I made a box the same size as the candle from pearlescent white card. I then matted the lid of this with silver card. Using embossing ink I stamped the Ornate Tree onto a white piece of card along with the Celebrate the Season sentiment both from Prickley Pear Rubber Stamps. I then added a silver tinsel embossing powder and heat set this. I added some of the same crystal gems to match the candle and then matted this onto the lid of the box.


A stunning gift for someone over the holiday period.

As part of my highlight I also made a very simple Christmas card using the Little Drummer Boy stamp


I stamped the sweet little fellow in the bottom corner of a piece of white card. He was then colored using alcohol markers. I used a fine line pen to add a border to the card and a gold die cut star just finishes off the image. This was then matted onto a snowflake patterned kraft card and gold card as used for the star.

Thanks for stopping by - you can read more about me and my Prickley Pear Rubber Stamp designs over on the blog. Also checkout the Facebook page where the rest of my teamies showcase their work!
 photo Crafty Hugs_zpsmrp6bnmu.gif

Friday, December 9, 2016

Winter Coffee anyone?

Good morning from a very snowy Michigan - yes its finally arrived with a vengeance. It snowed all day yesterday and is still coming down!

Today is the start of the famous Winter Coffee Blog Hop  over at the Coffee Loving Cardmakers - Prickley Pear Rubber Stamps and Riley and Company are both sponsors so I am joining in with a cards I have made using both company's stamps.

I have to admit that I hate the taste and smell of coffee but I do love some of the cute coffee stamps that are out there, including this one from Prickley Pear:


As the theme of the blog bop is winter I have added snow flakes!
I masked to cup off the Coffee Stamp and stamped that and the Snowflake Corner with Versamark. I then added gold tinsel embossing powder and heated it. Next I masked off the flourish on the stamp and again using Versamark stamped the cup section. I used black tinsel embossing powder on this. I matted a card blank with gold and black card and added my image layer to this. A few dots of crystal drops just finished the design.


I stamped it using Espresso colored ink (so fitting don't you think!) I then matted my card with gold and dark brown card. I rounded the corners and added my image layer to my card base.  I then die-cut a coffee set and arranged this on my card. A very simple card but it gets the point of the sentiment across!

You too can join in the coffee blog hop by making up a card with either a coffee, tea or cocoa theme and linking it to the blog. If you are going to join in why not use the Riley and Company or Prickley Pear Rubber Stamps stamps - they have plenty of Coffee related ones to choose from. Whether you like Snark or serious they have the lot!!!!

Thanks for stopping by and I hope you check out the links above for more inspiration 

 photo Crafty Hugs_zpsmrp6bnmu.gif

Wednesday, December 7, 2016

Who needs salad!!!!

Good afternoon, I'm back with my second card from the Card Bonanza over at Riley and Co.

Today's make is for all you beer drinkers:


Yes who recalls telling a great story over a salad??? No? Me neither, although I'm not a beer drinker give me a glass of wine instead!

I started this card by stamping Riley and Company's small beer mug multiple times, randomly on a piece of white card. I then colored them with Copic makers and added Glossy Accents to the condensation drips on the glasses and put this to one side to dry.

I chose a pre-made scalloped card base and matted it with a mustard colored card. I stamped the Riley and Company Funny Bones sentiment - No Great Story onto the same white card as the beer glasses and matted this with the mustard colored card.

Once dry I started to assemble the card, The white background that was originally on the beer glass design looked too stark against the white on the sentiment so I used a Copic marker and colored around the beer glasses and hey presto! It looked 100% better!

Thank you for stopping by, for more inspiration check out the Riley and Company Blog. Or for more news about what the Moose and his pals are up to head on over to the company Facebook page 


 photo Crafty Hugs_zpsmrp6bnmu.gif

Tuesday, December 6, 2016

The use of words!!

Good afternoon, it keeps snowing - which sicks around for 24 hours then melts - that's the kind of snow I like! There is more forecast later in the week and I get the feeling that is going to be hanging around for a bit - but hopefully that means we will get our first white Christmas since being here!

It's Card Bonanza day over at Riley & Co so I'm here to share my makes with you. I have used Some of the newly released Funny Bone sentiment stamps on my cards.

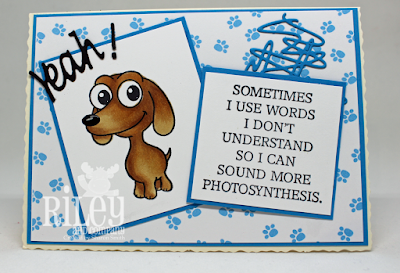
The first one uses Photosynthesis:


I love this sentiment - we all know that one person who tries to use big words to try and look better than they are!

I have teamed the stamp with Tucker the dog - I think this little guy has such a dumb look on his face - It's the huge eyes! 
I have colored him with Copic markers and added glossy accents to his nose to make it shine.

I then matted my image, sentiment and some paw print design paper with blue card. I added a die cut Yeah! and some die cut scribbles just to finish the design.

Come back tomorrow for the second card I have made!

Thank you for stopping by, for more inspiration check out the Riley and Company Blog. Or for more news about what the Moose and his pals are up to head on over to the company Facebook page 


 photo Crafty Hugs_zpsmrp6bnmu.gif

Friday, November 25, 2016

Thanksgiving week Day 5

Good Morning hope you all had a great Thanksgiving and didn't over indulge too much!

As well as the food who also enjoyed the wine a little too much?

Well maybe my Riley and Company inspirational card today may ring some bells


I have used the the Riley & Co. Wine Glass and stamped it 3 times - oops by third glass I got a little clumsy. I added wine and colored the glasses with my Copic Markers. I then Stamped the Awesome Wine sentiment onto the same card - how truthful is that after a few glasses??? 😆

My card base was matted with wine colored card and a coordinating design paper. I matted my images with the same card and adhered it to my base, continuing my split wine to the bottom edge of the card.

Thank you for stopping by, and if you are looking for some R&R after over-indulging stick around and check out the Riley and Company Blog for more inspiration.  Or for more news about what the Moose and his pals are up to head on over to the company Facebook page 

 photo Crafty Hugs_zpsmrp6bnmu.gif

Thursday, November 24, 2016

Thanksgiving Day!

Good Morning and Happy Thanksgiving!!!!

Today's inspiration is a very simple place card for the Thanksgiving table:


I used Turkey Riley stamp and colored him with my Copic Markers and matted him onto black card. I then printed the names of the people coming to dinner on my place cards. edged these with gold border stickers and use die-cut leaves to embellish the corner. A simple but nice touch to any dinner table.


Thank you for stopping by, now go and enjoy your dinner!

For more inspiration check out the Riley and Company Blog. Or for more news about what the Moose and his pals are up to head on over to the company Facebook page 


 photo Crafty Hugs_zpsmrp6bnmu.gif

Wednesday, November 23, 2016

Thanksgiving Week Day 3

Good Morning it's day 3 of my Riley and Company Thanksgiving Inspiration and one more day to go until Turkey day. Mine is busy thawing in the kitchen ready to be roasted a lovely bronze color!

So what sides do you serve with your turkey? All the trimming and more. So much that you can't sit down without unbuttoning your pants? 

Well that's a good place to start my inspiration for my next card:


I have stamped the sentiment, inked it with distress inks and matted onto a coordinating design paper. Campfire Riley is the perfect stamp to team the sentiment with. 
I have colored him with Copic Markers and inked the card with distress ink and again matted it onto design paper.

I then chose some design paper with Thanksgiving type dishes on it and matted this onto my card blank. I cut 2 banners, one in the design paper used for matting and another in orange card. I embossed the latter with a leaf design than arranged these, my sentiment and image on my card.

Thank you for stopping by, for more inspiration check out the Riley and Company Blog. Or for more news about what the Moose and his pals are up to head on over to the company Facebook page 


 photo Crafty Hugs_zpsmrp6bnmu.gif

Tuesday, November 22, 2016

Thanksgiving Week Day 2

Good morning and welcome to the second day of my Thanksgiving inspiration using Riley and Company Stamps

So what is the main dish for your Thanksgiving dinner??
Hope you all said turkey! Today's card is about that turkey:


Isn't that sentiment just the best - Turkey Hunting in the grocery store 😆  So I used Turkey Riley - all dressed in his founders hat - and colored him with Copic Markers. I stamped my sentiment and then matted both my image and sentiment with black card. I chose a leafy design paper and matted my card base with this and black card. I then die cut a leafy border again in black card. a few black crystal drops just balance my design.

Thank you for stopping by, for more inspiration check out the Riley and Company Blog. Or for more news about what the Moose and his pals are up to head on over to the company Facebook page 


 photo Crafty Hugs_zpsmrp6bnmu.gif

Monday, November 21, 2016

Day One of Thanksgiving week

Good morning - we had our first real snowfall over the weekend which means winter has finally arrived.
This week I am showcasing a collection of Thanksgiving cards I have made using Riley and Company stamps - well today's is more fall than Thanksgiving but it's like the opening to my theme week 😊

So fall as been and gone but does anyone know when the start of fall is????


Yep when pumpkin fever starts and this stamp from Riley & Company says it all and you all know how right it is! 😄

I colored the pumpkins on the stamp with my pencils, die cut the sentiment and inked with - yes you've guessed it carved pumpkin distress ink. some fall design paper and a coffee grinder die cut just finished is little notelet off.

To see more stamps like this pop over to the Riley and Company online store 

Thank you for stopping by, for more inspiration check out the Riley and Company Blog. Or for more news about what the Moose and his pals are up to head on over to the company Facebook page 


 photo Crafty Hugs_zpsmrp6bnmu.gif

Thursday, November 17, 2016

Christmas Gift Tags

Good afternoon! Christmas is almost a month away - are you ready???

I'm on my way to getting there but still have stuff to do and buy!

It's day 4 for the Prickley Pear new release - have you enjoyed all the goodies we have brought you so far??

Don't forget if you order on or before the 21st November you can get free shipping by using the code FREESHIP when you place your order

So to help with the Christmas planning I have used the new clear stamps to make some quick and easy tags.


I have used 3 sets of stamps:


This is using the Christmas Banner Set - stamped in different colors and layered across the tag

Next I have used the Christmas Cupcakes:


I colored the images with Copic markers and yes the cute candy are part of the stamp set!

the last Tag features the 3 Piece Tree Set :


This set makes some gorgeous 3D Christmas trees. I have added a sentiment from the Christmas Banner set 

All the clear sets com with an abundance of stamps and for such a reasonable price AND you can also purchase dies so you don't have to Fussy Cut!!!

Check out these and lots more over at Prickley Pear Rubber Stamps, there is a section just for the New Releases so you don't have to go hunting for them.
Whilst you are there why not click over to the blog and see all of the design teams creations - there will be a new post every day this week! Also don't forget to check out the Facebook Page to keep you up to date with our news 

Thanks for stopping by - now go shop!!!

 photo Crafty Hugs_zpsmrp6bnmu.gif

New Release Day 3

Good morning and welcome to day 3 of the Riley and Company new release

Today I'm show casing 2 of their new stamps and don't forget if you love them you  can get them shipped free (domestically) until the 21st November by using the code FREESHIP when you order!

My first Inspiration is using a Funny Bone's Sentiment - Although this one is kind of nice instead of Snarky - Friends Value You


Who doesn't want a true friend and I am lucky that I have a few - and they know who they are! 

The stamp comes as one but is made so if you want to split it as I have done you can. 

I have teamed the sentiment with Heart Riley who I think is a symbol of a true friend. He is colored with Copic makers and the die cut . I cut the same die twice, second time in red so I could insert the hearts back into the die. Some Ric Rac ribbon, pink design paper and matting with pink and red finishes the design off.

My second make today is a holiday hanging ornament. I just love Mushroom Lane the cottages are adorable and in the new release section of the store you will find 5 new ones including 2 winter ones.
I have chosen to use Mushroom Lane Winter House for my project


Isn't it the sweetest snow laden cottage you have seen, there is even a little snowman waiting to greet you!!

I colored it with Copic markers, adding chalks to the background. I then printed a snow-globe from one of my design cds. I used 2 circle dies to cut a frame then cut the center of the globe section out using the frame as the edges of my ornament. I backed the snow-globe with snowy acetate then using foam pads adhered it to my Mushroom Lane image. cutting the excess card away leaving just the design. 
I added some gold chord to hang the ornament and finished off with a red bow matching the bows on the cottage.

So to go shopping for these gorgeous stamps - check out the Riley & Co website you'll find the sentiment above along with 3 pages of new stamps in the New Release section.

 For more inspiration check out the Riley and Company Blog. Or for more news about what the Moose and his pals are up to head on over to the company Facebook page 

Thank you for stopping by and don't forget to leave a comment if you like what you see.

 photo Crafty Hugs_zpsmrp6bnmu.gif

Wednesday, November 16, 2016

Weeping Willow

Good afternoon! 
It's day 3 of Prickley Pear Rubber Stamps new Release so don't forget to be sure to check out 2 whole pages of new goodies on the website AND you can get free shipping until 21st November! All you have to do is enter the code FREESHIP at checkout.

Most of the Fall leaves have now dropped in our yard and it is starting to look bare.

As part of the new release Prickley Pear have some gorgeous winter trees. One being a willow which brings back memories of playing under them on my way to my Nanna's house when we were kids.


I stamped the Weeping Willow but didn't want to leave it bare so I added color with my Copic markers. Keeping the card simple I typed up a quote I found on the internet which I love. A willow die cut added to one corner using green card (which I also used to mat the design onto my base) was all that was needed - keeping the tree looking elegant.

Check out these and lots more over at Prickley Pear Rubber Stamps, there is a section just for the New Releases so you don't have to go hunting for them.
Whilst you are there why not click over to the blog and see all of the design teams creations - there will be a new post every day this week! Also don't forget to check out the Facebook Page to keep you up to date with our news 

Thanks for stopping by - now go shop!!!

 photo Crafty Hugs_zpsmrp6bnmu.gif

Remember to dress Appropriately!!

Good Morning!
I'm back again with some of the Riley & Co snark as a reminder they have a fab new release this week and my teamies and I will be showing off these new stamps over the week. 

If you love the stamps you can get them shipped free (domestically) until the 21st November by using the code FREESHIP when you order

So today I want to share a stamp with a lesson on for you:


LOL I can't hula-hoop but if I could I know I definitely would need to be fully dressed!!!

I have drawn a bra onto Riley - he's got to be comfortable right? I then colored him with my Copic Markers. I stamped the sentiment and matted this, Riley and my card with red card. I then used speech bubble design paper and a circles die cut on my base before adding Riley and my funny bones sentiment to the card.

So to go shopping check out the Riley & Co website you'll find the sentiment above along with 3 pages of new stamps in the New Release section. For more inspiration check out the Riley and Company Blog. Or for more news about what the Moose and his pals are up to head on over to the company Facebook page 

Thank you for stopping by and don't forget to leave a comment if you like what you see.


 photo Crafty Hugs_zpsmrp6bnmu.gif

Tuesday, November 15, 2016

Right or wrong - you pick!!

Good morning from a very foggy Michigan! I hope everyone is driving safely around the area because visibility is really poor.

I'm back today with another fab new release, this one is full of the snarky stamps from Riley & Co's Funny Bones collection as well as some of the adorable Mushroom Lane cottages.

If you love the stamps you can get them shipped free (domestically) until the 21st November by using the code FREESHIP when you order

I will be posting my inspiration all week so I'm starting off today with this one:


Ok we all know it's always good to do the right thing - right??????
Hey but sometimes doing the wrong this can be so much more fun! Just like this Funny Bone's Right from Wrong stamp clearly says!!!
Retro Helen & Alice are having a good gossip about it. Wouldn't you just love to know what their 'wrong' is 😅

I stamped both stamps with black ink then colored Helen & Alice with my Copics. I then matted the pair with diecuts in pink and blue and my sentiment with the same colors. I chose some girly shopping design paper and matted this with the same pink card onto my white card base.

So to go shopping check out the Riley & Co website you'll find the sentiment above along with 3 pages of new stamps in the New Release section. For more inspiration check out the Riley and Company Blog. Or for more news about what the Moose and his pals are up to head on over to the company Facebook page 

Thank you for stopping by and don't forget to leave a comment if you like what you see.

 photo Crafty Hugs_zpsmrp6bnmu.gif

Monday, November 14, 2016

Blue snowfall

Good evening, It's going to be a great week! Do you know why? It's time for a new Prickley Pear Rubber Stamps fall/winter release!

Be sure to check out 2 whole pages of new goodies on the website AND you can get free shipping until 21st November! All you have to do is enter the code FREESHIP at checkout.

So each day this week me and my teamies will be posting our designs using the gorgeous new releases.
Today I have decided to go all snowy - we still haven't had any here and fingers crossed it's a few weeks away yet!


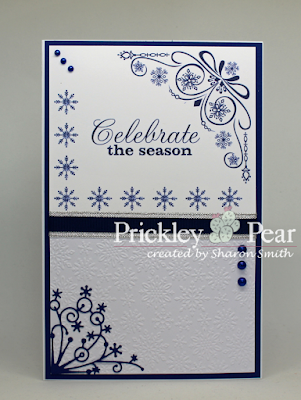
I embossed a sheet of whit card with snowflakes and matted this with blue card onto my card base. 

I used 3 of the new stamps, the first is the gorgeous Snowflake Corner. I then used the Snowflake Border - which is 3 snowflakes, I repeated this 3 times around the opposite corner. I then added Celebrate the Season to the center . All were stamped with blue ink and the images added to the top of my card. I added silver and dark blue ribbon to hide the bottom of my stamped card. continuing with the snowflake theme I added a die cut. A few pearls colored to match in with the card were added to balance the design 

Check out these and lots more over at Prickley Pear Rubber Stamps, there is a section just for the New Releases so you don't have to go hunting for them.
Whilst you are there why not click over to the blog and see all of the design teams creations - there will be a new post every day this week! Also don't forget to check out the Facebook Page to keep you up to date with our news 

Thanks for stopping by - now go shop!!!


 photo Crafty Hugs_zpsmrp6bnmu.gif

Elfing around in baubles

Good afternoon! Sunny and warm here today so hard to believe it's November and I'm planning Christmas! 
Today's first post is an adorable little elf from Scrapper's Delights. She is sitting watching the snow fall all around her all:


I started by building a scene using my graphics program. I placed Warm Wishes Elf digital stamp into a digital bauble added 2 further baubles and filled these with snowflakes. I then added in background and printed the whole image. 
I colored Warm Wishes with my Copic markers,  I tried to stay away from traditional Christmas colors and thought the pink and blue were so cute together.

Once colored I matted the picture onto Pink card and then onto my card base. I added silver cord for the bauble ties and added lots of loose glitter to the snow drops for added sparkle.

A very simple card but I think adorable at the same time.

Thanks for stopping by now head on over to the Scrapper's Delights Store to see all of the new releases.
We also have a monthly challenge where you can enter any makes you doWhy not stop by the Scrapper's Delight Facebook page for regular news on and inspiration from my Teamies and keep your eyes peeled on my blog for new releases from them!

I am entering this card into the following challenges:
Artistic Inspiration - #167 Anything Goes 
Craft Your Passion - #338 Anything Goes 
The Paper Nest Dolls - #11 Anything Goes


 photo Crafty Hugs_zpsmrp6bnmu.gif

Monday, November 7, 2016

Sketch Inspiration

Good Morning, it's a new week we put all the outside furniture away over the weekend and cleaned off the deck getting ready for winter!

Despite that today's card is a reminder of summer. Inspired by Stamping used inspiration pictures whether it's a color collection, sketch or picture. The idea is you use one or more of these in your design but with your own spin on it.

It gave me the opportunity to use a stamp I have had a long time but rarely use:


These were the pictures I chose to use:


I started with my stamped image and colored the flowers with in the color theme using my Copic Markers. I then used a stitched circle die to cut out the image this is the main focus of the card.
Staying within the sketch theme,  I matted my card base with some patterned design paper, a die cut strip and a rectangle of peach colored card, again following the color scheme.
I added my image using foam squares for dimension but felt the card looked a bit bare. Using the same peach colored card I cut 4 corner die cuts making it look as though they were embossed rather than separate parts.
A few Enamel dots finished the sketch theme as well as balanced my design.

  Products used:
  Lili of the Valley Hydrangea Stamp - Retired
  Patterned design Paper-from my Stash

Thank you for stopping by and if you like what you see please leave some love in the comments 

  photo Crafty Hugs_zpsmrp6bnmu.gif

Friday, November 4, 2016

Snowflakes stick together!

Good morning, I can believe we are still walking around in T-Shirts and it is November! Unfortunately as we live in Michigan I can't see this lasting for long!!!

I'm back today with my 2nd inspiration for Prickley Pear. I'm staying with the winter theme and although this card isn't necessarily a Christmas card it could be used as such:


It's a very simple card, I used a 5x5 inch scalloped card blank and matted it with blue card and snow flake patterned design paper. I then stamped this lovely sentiment from Prickley Pear. It's called Stick Together and I really love the wording. 
I die cut the stamp using a scalloped frame die. I also used the same die on some blue card. I adhered the sentiment using wet glue but then used foam squares on the frame to give it dimension. 
The 3 blue snowflakes were white buttons, I remove the stitch hoops from the backs and colored them to match my design.

Thank you for stopping by, you can find more inspiration from me and my teamies on the Prickley Pear blog and their Facebook page.


 photo Crafty Hugs_zpsmrp6bnmu.gif

Thursday, November 3, 2016

O Holy Night

Good afternoon - time is flying by so quickly I can't believe November has arrived already.
It's the time of year when most design teams have a review and new calls. I have decided to leave a few of my teams and concentrate more on the ones I really enjoy being part of. 
This lead to an opportunity to join another team. Tanya the owner of Riley and Company also owns Prickley Pear Rubber Stamps and has given a couple of us the opportunity to work on both teams. As I love both company's stamps I jumped at the chance.

Today is my first showcase for Prickley Pear Rubber Stamps. I got to chose the images I wanted to work with. I love Christmas and the real reason for the season, whilst I love using cute images at this time of year I love the more traditional styles so when I saw the Mary and Baby Jesus stamp I had to have it


I teamed the stamp with the O Holy Night sentiment stamp. The image was colored with my Copic markers but this time I have also used my Polychromo pencils which has added so much more depth. I love the effect and will be using them more!

Once colored I die cut the stamped images and inked around the edge before removing from the die. This is where I had a happy accident, I didn't realize there was green ink on my mat and I ended up picking it up with the blue I was using however it gave a warmer glow to my image and emphasized the green in the image more. 
I matted my card base with some green card and some blue design paper. Ivy die cuts balanced the image. I die-cut a white flower and colored it to match in with the Christmas roses in the image.

Prickley Pear Rubber Stamps have a diverse range of stamps - some for every occasion. whether you need cutesy or more realistic images they carry them. The also have a great range of sentiments and I will be posting more of them over the coming weeks 

Thank you for stopping by and reading my first post for Prickley Pear. You can find more inspiration on their blog and their Facebook page.

 photo Crafty Hugs_zpsmrp6bnmu.gif

Monday, October 31, 2016

Halloween!!

Happy Halloween! I've sent Mollie off to school with her costume and a 3lb bag of apples (her requested contribution to her school party)
She loves Halloween - but then Mollie loves any excuse to dress up. Her and James carved pumpkins yesterday and roasted the seeds to eat!

Another one who loves Halloween is Riley and Company. I have made quite a few cards this year using the cute little Moose dressed up and today I'm sharing my last Halloween one.


Meet Mummy Riley Think he's a bit tied up at the moment.
 I colored the image with my Copic markers, then inked the edges of the paper with distress ink. 
I found a length of bandaging that I had only used part of and cut this into strips and rolled into smaller bandage rolls.
 I matted Halloween themed design papers with black card and added to my card base.
 The image was also matted with black and placed at an angle on the card.
 The Sentiment is also a Riley and Company stamp and as I no longer partake in my original career I think it's quite fitting for me! This again was inked with distress ink and adhered to the card using foam tape.
I glued the bandages in place to stop them unraveling and draped them over the card. A few black enamel dots just balance out the design.

Thank you for stopping by, for more inspiration check out the Riley and Company Blog. Or for more news about what the Moose and his pals are up to head on over to the company Facebook page 


 photo Crafty Hugs_zpsmrp6bnmu.gif