Hello

Welcome to my blog, a place where I can lose myself in a crafty haven. Pull up a comfy chair grab a cuppa and come and have a read. Oh and if you like what you see, stop by and leave me some love in the comments section

Followers

Friday, October 27, 2023

Gnome Matter What

 Good morning, It's been a while since I posted but I have lots of crafty news to share over the next couple of weeks so stay tuned!

My post today is using CutCardStock products o make this adorable Gnome card:


I used Pop-Tone cardstock in a variety of colors to build the gnome which is a die plate from Gina Marie Designs.

Once I had him put together I made him a background. using Neenah Classic Crest, a Cloud Stencil and some Tumbled Glass Distress ink I created a sky.

Then tearing Brown Bag Kraft Cardstock and inking the torn edges with Brown Corduroy gave me the ground for him to stand on.

I curved a sentiment, holding it in shape using my Misti and stamped this in Momento Tuxedo Black Ink.

Finally I added the whole design to a top folding A2 card base made from Pewter Grey Cardstock adhering it in place with foam tape to give some dimension to the card.


Saturday, August 26, 2023

AECP - Progressive Card Making

 Good afternoon! Hopefully today is gong to be a little cooler than it has been as we are heading to a rodeo later today.

School starts again next week - the summer feels as like it has gone on forever and both Mollie and me are ready to get back into our routines.

I have had a break from my Altenew Educators Certification Program but need to get back into it. I am 2 classes away from completing it - well as of today 1 class!!!

Progressive Card Making by Justine Hovey is the latest class I have completed. She discussing many card making techniques and levels that all crafters can achieve. I love this idea because not only can beginners achieve her techniques but it is learning curve leading to becoming more advanced.

Even though I view myself as an advanced card maker I want to demonstrate different levels of experience so I am covering stamping, masking, dry embossing and heat embossing on my designs today. This makes a long blog post so bear with me!! 😊

First card is a Floral card using simple stamping, 1 layer masking and dry embossing:

The card starts as plain cardstock, I have Neenah Solar White for my base and stamping. Green and cream cardstock for my layers.

I stamped the floral stem from the Floral Sprig Stamp Set using Crisp Dye Ink in Jet Black. I stamp twice, once on my cardstock then on to masking paper.


The image is fussy cut from the masking paper, making sure I cut along the outer lines of the image which ensures that when you stamp your next image over it you get a seamless image. I then lay it over the image stamped on cardstock.

Arranging the stamp for my 2nd image so it looks as though there are 2 stems from one branch it is stamped again. I do add masking paper to the stem of the stamp before I ink it so this does not stamp that section on my card.


When I remove the mask my first image looks as though it is in front of the second image. With this stamp it also looks as the the stamped images are 1 image. I had double inked my first image which is why it is darker making it appear nearer than the 2nd image.


I love coloring with alcohol  markers and Altenew Markers are great because, like their inks, they come in coordinating colors so choosing coordinating colors is easy. Once colored I then fussy cut the spring from the cardstock as I want a different background to frame it ad don't own the die.


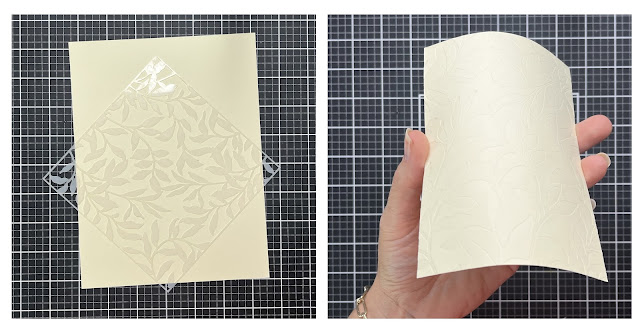
My background is dry embossed using Leaf Bed Stencil. To do this you place the stencil over your cardstock and run it through your die cutter. You may need added shims to do this to give more pressure which pushes the stencil into the fibers of the cardstock embossing the stencil pattern in to it.


It does give a very delicate looking pattern that can just be seen on the right photo.

Now to construct my design: I stamped a sentiment from Sentiment Strips 2 onto cream cardstock and trimmed this to a strip. I want mats on my card so I trim a strip of card so it is 2/8th bigger than my sentiment. My embossed card is trimmed to 5.5in x 4in and a green mat is cut to 5.5in x 4 and 2/8th. 


I mat the card and add my image all with wet glue, my sentiment is added with Instant Dimension Foam Tape to give dimension.
Some clear bubble gems are used to draw the eye to the sentiment. 


My second card shows the same techniques but at a more advanced level. I am also showing heat embossing with this card.

The circles in this image are all flat on the card and are individual circles but I have achieved dimension using masking and shading in my coloring. This is also a great way to make cards using the smaller stamp sets.

To start I stamped the circles from Circle Delights Stamp Set multiple times onto masking paper, these are then fussy cut. Do not use dies for this as you will be left with a white edge around the mask which you don't want.

Once these are all cut I then arrange them onto my cardstock to plan out my pattern. I photographed this to give me a plan. Then I start stamping using Jet Black Crisp Dye Ink. Each circle is covered with a mask as I stamp them.

I do decide to change the plan so that I have a curved image and so I am following the rule of thirds.

Once stamped I removed the masks. Although I see myself as an advance paper crafter I do still make mistakes. Can you see the ones I made here? I can correct this in my next step.

Once again I use alcohol markers to color my images. I did plan on just using yellow and orange but changed my mind and did each size of circle in 2 different colors. This is where you add dimension to the card. I used the Jet Black and Moon Rock  Woodless Colored Pencils to add shading around the circles where they overlap emphasizing the layers giving the illusion of depth. 

I also managed to hide my mistakes!


The next stage is using embossing powders. Unfortunately I forgot to photograph this but will explain what I did. 
I die-cut the Congrats from Script Word Dies in black cardstock. Then using Embossing Ink I pressed the word into the pad, totally covering it in the sticky glue 'ink'. I then covered it in Crystal Clear Embossing Powder. This needs to be heat set with a heat gun. I repeated these steps 3 times, this gives a thick layer of clear embossing making your sentiment dimensional and shiny as you can see on the second photo.

If you don't have colored cardstock you can also achieve this look with colored embossing powder on white cardstock.


Constructing this card was simple as my image was already done. I layered this with black cardstock and added it to an A2 cardbase using wet glue. My image at mat were trimmed slight smaller so I get the bordered look.

My sentiment was also added with wet glue, embossed items can curl slightly so to make sure it adheres flat I place an acrylic block over the top of it while the glue dries. I scattered  a few black iridescent pearls around the sentiment to pull the whole design together.


Thank you for taking time to read my post, I hope I demonstrate techniques from the class in a way it is easy to follow.

I look forward to reading your comments.


Sunday, July 23, 2023

Eat Me or Drink Me???

 Good afternoon, it's Mollie's birthday today and she has a couple of friends over for a catch up and cake. 

Stamper's Delights have an Alice themed set of digital stamps and today's post is using the latest one. Alice has come across the Eat Me Drink Me items


She is trying to decide which to choose!

I stacked the images to make my scene then printed it. I used Copic markers to color her and die cut into an oval.

I designed my patterned paper by adding the words Eat Me and Drink Me randomly This was matted with blue cardstock and added to an A2 cardbase.

I inked the edges of my topper with blue ink to tie the layers together and added it to my card with foam tape for dimension.Our design team will be posting more inspiration using the Stamper's Delights Spice Girls so check them out over on their Facebook Page.


All images are available in the store along with lots of other super cute digital stamps. If you do use any of the images please share with us in the Fan Facebook Group.

Thanks for stopping by and if you like what you see let me know in the comments!

Wednesday, July 12, 2023

Wavy Thank You

 Good morning! I have been a little absent over the last few months but I'm back on a roll with posting.

My post today is showcasing a simple thank you card that is quick and easy to design making it a great card for batch making.

I used products from CutCardstock for the design also using some items from my stash.

It started its life as an A2 Classic Crest Cardbase, Covered with Stardream Metallic Lagoon Cardstock and a layer of Neenah Solar White Cardstock

The top layer was die cut with a Crafter's Companion Edgeable die giving me the floral wave and the negative Thank You cut in to it.

The base was then matted with Lagoon, followed by the Neenah Solar White with cut 2/8th in smaller than the last. Finally my Topper was adhered in place.

Using Diamond Press Flower Dies I diecut and layered a flower and added this to the card

Finally some color-coordinated gems were glued in place for added sparkle.


Thank you for stopping by and I hope my card has peaked your interest and given you inspiration!


Sunday, July 9, 2023

Wanna Zig-a-Zig-Ahhh

 Good afternoon! Hope you are enjoying the summer, We have had some great weather but could do with more rain as the ground is parched.

I'm back today with a super cute image from Stamper's Delights. Do you remember the Spice Girls bringing us Girl Power? Meet Posh-Victoria as a super cute Chibi character:

She is part of the latest new digital stamp release which also includes all the other girls and a a group image.


Aren't they the cutest?
I resized, printed and then colored Posh with alcohol markers, She was fussy cut and put to one side while I made my card base.

Using smooth 60lb cardstock I printed the text 'Girl Power' using a laser jet printer. Then I placed some rainbow toner reactive foil over and fed it through my Minc. This gave me a foiled sentiment as my card topper.

A scalloped die was used to frame this and it was then added to my A2 card base which was matted with rainbow digital paper.

Posh was added on foam squares. I had her slightly over lap the topper to make her stand out against it.

Our design team will be posting more inspiration using the Stamper's Delights Spice Girls so check them out over on their Facebook Page.

All images are available in the store along with lots of other super cute digital stamps. If you do use any of the images please share with us in the Fan Facebook Group.

Thanks for stopping by and if you like what you see let me know in the comments!


Friday, May 26, 2023

Sunflower Frame

 Good morning!!! It a holiday weekend and the weather is looking great for it. Memorial weekend marks the unofficial start of summer and the flowers in our yard are starting to see this.

I love flowers and sunflowers are one ion my favorites so when Design Bundles had this frame for free of course I had to use it.


It is made by layering 8 pieces of cardstock with either foam tape or wet glue. I used Pop Tone cardstock from CutCardStock for the main layers. The top Layer is Neenah Solar White to give it a bright white finish.


I love how the detail of the petals pop because of the different shades yellow and orange.


Sunday, May 21, 2023

Game Over!

 Good afternoon! we have had a mixed bag of weather this week, the last 3 days Mollie and I did a yard sale and of course it had to rain and be on the chilly side!

I'm back today with more inspiration from Stamper's Delights. We are still celebrating this month's Italian Brothers in the Digital Stamp club.

The design team have made some super cute cards for inspiration - just check out their posts on the Blog!

My card is using Italian Brother M and Peach. They have been colored with Copic markers. I then trimmed the image to fit on a matted A2 card base. I typed the sentiment using my computer, It's difficult to see in the photo but I then foiled it with red foil to coordinate with the mats. The Mushrooms are included with the images. I resized these so I had a "family", colored them with my markers and added them on foam squares to my card. 

The bright colors mean I don't have to add further embellishments as they would be a distraction from the images.

Love what you see? Check out the blog posts from the rest of the team for more inspiration. Also join us on the Fan Facebook Group and share your designs there!

Join the Free Community too - Freebies, Challenges and more will be happening here but you can only access if you have joined us!

Thank you for stopping by. The clubs are open for you to join check all of them out here!  

Sunday, May 14, 2023

Princess and Sweet as Peaches

Good afternoon and Happy Mother's Day. I hope you are all having a fabulous day!

My post today is using a brand new monthly image from Stamper's Delights.


Check out month's membership images on the website,  Princess sweet as peaches is a stunner! I have added mushrooms to her and colored her with Copic Markers. The mushrooms are a separate image, I pasted multiples resized them to make a background pattern which again I colored with Copics.

I matted a A7 card base with red card and some patterned paper. My image and background were trimmed to size and added to the base the mushrooms adhered flat and image with foam tape. Finally I die cut P L A Y 4 times, stacked them together and added to my card with foam squares.

Love what you see? Check out the blog posts from the rest of the team for more inspiration. Also join us on the Fan Facebook Group and share your designs there!

Join the Free Community too - Freebies, Challenges and more will be happening here but you can only access if you have joined us!

Thank you for stopping by. The clubs are open for you to join check all of them out here!  

Thursday, May 11, 2023

Masculine New Home Card

 Good morning! Spring is finally here! I'm staying a little quiet about it though because I don't want to tempt fate 😋

Do you struggle with masculine cards? Then read on, my card today is for a man that has moved in to a new home.


I decided on a night themed card and ink blended my sky with Distress Inks. It started life as a piece of Neenah Solar White cardstock but ends up being saturated in the ink.


My row of houses was cut twice, once from CutCardStock Pop Tone Black Licorice and once from Lemon Drop.
The black piece was adhered to the card and the waste of the yellow one was placed in the windows of the black one giving me the look of lights being on


As it's night time I used Copic Opaque White to add stars.


My sentiment needs to be bold so I cut New Home 3 times from Neenah Solar White and stacked these tin to of each other.


Building the card was easy. I used Classic Crest Epic Black in 130lb for my cardbase. This gives a sturdy frame. 


My Topper was adhered flat to this and my sentiment placed above the row of houses. I did notice I had a black smudge that I couldn't cover with my sentiment. Male cards don't generally have embellishments on so I used a White Gelly Roll Pen to add more stars - covering the smudge!


Thanks for stopping by and hopefully you gained some inspiration for masculine cards.

Sunday, March 26, 2023

Fawn Hugs

Good afternoon, we had snow and frozen rain yesterday - Today you wouldn't think so - although cool it's a nice spring day just in time for Spring Break!

I'm back with a card made using Stamper's Delights Chibi Fawn who's another cute member of this month's digital stamp and coloring club pack


I sized him to fit an A2 card and printed him on stamping cardstock. He was then colored with Copic markers and fussy cut leaving a thin white border.

My card base was matted with brown cardstock. I have these cute wood slices as digital images so I printed and fussy cut a heart shaped one - Hugs was stamped in to the middle. I added foam squares to the back of their and threaded some jute string through this to make a pendant. 

The heart was added to some leafy digital paper and the string fastened behind this.
I then used foam tape to adhere the paper to my base.
Finally Chibi Fawn was added again using foam squares.

Love what you see? Check out the blog posts from the rest of the team for more inspiration. Also join us on the Fan Facebook Group and share your designs there!

Join the Free Community too - Freebies, Challenges and more will be happening here but you can only access if you have joined us!

Thank you for stopping by. The clubs are open for you to join check all of them out here!  

Sunday, March 12, 2023

Is that Spring I can See?

Good afternoon is that spring that's around the corner? We've woken to snow the last few days but it's not hung around thank goodness!

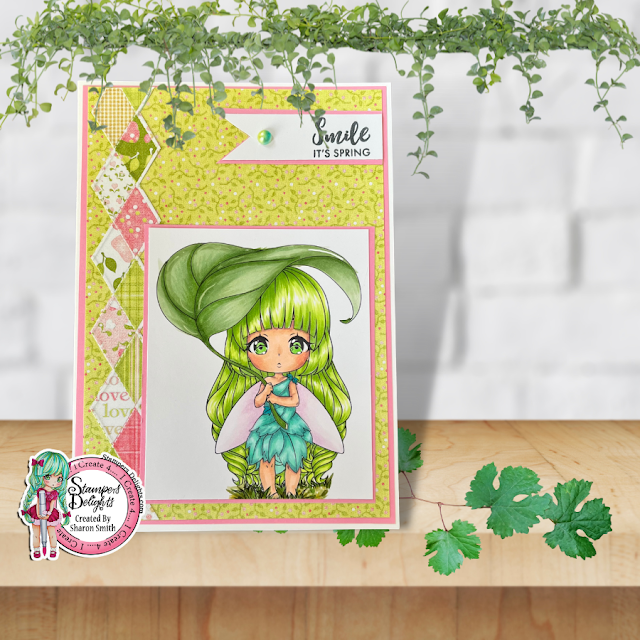
Have you seen this month's Stamper's Delights club Images? Meet Chibi Fairy Under a Leaf if you have.


I started my card by printing off the image at a size to fit an A7 card base. She was colored with Copic Markers and trimmed to size.
I used some spring colored pattern paper to mat my card base and a sentiment stamp that seem to fit as she's not smiling!!
Her hair was amazing to color - Loys of ringlets - Wish my hair was more like this although not green lol. 

Love what you see? Check out the blog posts from the rest of the team for more inspiration. Also join us on the Fan Facebook Group and share your designs there!

Join the Free Community too - Freebies, Challenges and more will be happening here but you can only access if you have joined us!

Thank you for stopping by. The clubs are open for you to join check all of them out here!  

Friday, March 10, 2023

Gnome in a Box Garden

Hello, I've been a bit quiet on here but have still been crafting in the background. We are suppose to have a snow storm today so I'm catching up with things while keeping warm.

My post this morning is to showcase this super cute box card:


I made it using a Silhouette Design Store cutting file. The card stock I used is Pop Tone from Cutcardstock. This card is extremely affordable and comes in a rainbow of colors. These are the ones I used today:


After cutting all the pieces the box was easy to construct only needing TomBow Mono Glue to add the decorations and glue it together. Score lines are added by the cutting machine which makes it easy fold.

Oh and once the glue is dried the card folds flat so it will fit in a 5x7in envelope.


It then just pops back up again once you let go! The depth gives it stability to stand on its own and separates the layers enough to make it have a 3D feel.


Hope this has given you inspiration for your own paper crafting!

Friday, February 24, 2023

Wonderland Digital Stamp Club

Good afternoon! We have had a winter storm over the last few days so have been home in the warmth.

Stamper's Delights have some new stamp clubs and the image I have worked with today is from their Wonderland Club - Alice Reading is so adorable.


I colored the image with Copic markers and fussy cut around it. Using an A7 card base I matted it with blue cardstock then a paler blue gingham which felt very "Alice" like. I then colored a strip of cat themed backing paper, matted this with the blue card and added to the left of the card.
Finally Alice was added popped up on foam squares.

Love what you see? Check out the blog posts from the rest of the team for more inspiration. Also join us on the Fan Facebook Group and share your designs there!

Join the Free Community too - Freebies, Challenges and more will be happening here but you can only access if you have joined us!

Thank you for stopping by. The clubs are open for you to join check all of them out here!  

Friday, February 17, 2023

Pretty Little Clutch

Hello! we have had a crazy week of weather, Tuesday it was 52f and sunshine. Yesterday came another blizzard and the temps are in the 20s again!

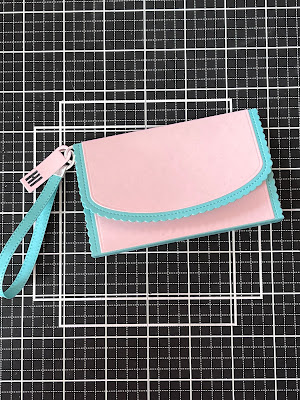
Have you ever wanted to send a gift card but didn't want just a plain envelope or store provided card? Then this little clutch is perfect.


Stardream Metallic cardstock in Lagoon makes this extra special by giving it a sparkle.
I die cut all the components from Stardream Lagoon and Pop-Tone Strawberry Lemonade cardstock


The dies I use are from Concord & 9th's Classic Clutch Collection this also has stamps for the decoration.
The first step is to create the main part of the clutch the die cut full piece and mat. By scoring the parts and matting the Lagoon base with Pink Lemonade


This is the flap and back sections, part of the inside also has a mat. I leave this open at the top to form a pocket.

There is also a cute zip for pockets, this is from silver mirror card along with a heart pull. I add this to the back pocket of the clutch using wet glue.

The sides and bottom of this fold at the score lines and strong adhesive tape holds it in place.

Next I need to create the sides of the purse. Again these are cut using a die, they are then folded into concertina shapes.

I apply lots of tape on these as they need to be strong enough to hold the clutch in shape. The tent shape faces the outer edge of the sides to allow plenty of room for a gift card to fit inside.

They fit perfectly and still allow the piece of cardstock I placed inside to fit a gift card. Then you can use the main section for another small gift.

The clutch doesn't stay closed on its own so self adhesive Velcro dots are perfect for this. I place both parts together and apply to the flap of the clutch. when I then close the flap the second part adheres in the perfect place to hold the flap down.
The clutch has an adorable strap, this also has adorable tags and findings. I cut the strap in the Lagoon cardstock and the findings in silver mirror.
I then adhere this to the inside of the clutch which leaves the strap and tags hanging from the side.
Lastly the flap needs some decoration the word enjoy fits perfectly across the flap along with some die cut hearts. The outside as well as the inside looks pretty.
I just love the little zipper on the back.
I hope you have gained some inspiration from my post, If you have please tag cutcardstock on you Instagram or Facebook posts.