Hello

Welcome to my blog, a place where I can lose myself in a crafty haven. Pull up a comfy chair grab a cuppa and come and have a read. Oh and if you like what you see, stop by and leave me some love in the comments section

Followers

Showing posts with label Clouds. Show all posts

Friday, October 27, 2023

Gnome Matter What

 Good morning, It's been a while since I posted but I have lots of crafty news to share over the next couple of weeks so stay tuned!

My post today is using CutCardStock products o make this adorable Gnome card:


I used Pop-Tone cardstock in a variety of colors to build the gnome which is a die plate from Gina Marie Designs.

Once I had him put together I made him a background. using Neenah Classic Crest, a Cloud Stencil and some Tumbled Glass Distress ink I created a sky.

Then tearing Brown Bag Kraft Cardstock and inking the torn edges with Brown Corduroy gave me the ground for him to stand on.

I curved a sentiment, holding it in shape using my Misti and stamped this in Momento Tuxedo Black Ink.

Finally I added the whole design to a top folding A2 card base made from Pewter Grey Cardstock adhering it in place with foam tape to give some dimension to the card.


Saturday, November 6, 2021

Hello November!

 Good afternoon, hope you are having a good weekend and the weather is being kind where ever you are!

It's Chibi new release day at Stamper's Delights and we have a cutie for you today. Meet Tumnus Fawn:


I printed him on to stamping card and colored him with my Copic markers. He was then fussy cut. Using a cloud stencil I inked a background for him. I also tore 2 pieces of cardstock for the ground.
My A2 card base was matted with green card and the cloud piece. I arranged my ground ad added Tumnus.
Finally using the same green and brown cardstock I die cut a sentiment.

Head on over to the Stamper's Delights Store to see all of this week’s New Releases.

Why not stop by the Stamper's Delight Facebook page for regular news and inspiration from my Teamies you can also enter the progressive challenge there, no blog needed and if you sign up for the Stamper's Delight Membership you will get free images to enter the challenge with!

All the design team projects are available on the Inspiration blog - hop on over there for more inspiration.

Thanks for stopping by and if you like what you see please leave a comment to let me know!


Monday, November 30, 2020

Altenew Educator Certification Program - Seasonal Scene Building

 Good morning! It's back to school teacher for me today after the holidays, we had a great family weekend!

My post today is showcasing the next class in me Altenew Educator's Program, Seasonal Scene Building taught by Nichol Magouirk. It is a great class with lots of content.

My first card uses the Modern Fox stamp set:


Nichol makes Spring cards, here in Michigan spring can be still very cold so my scene is a frosty one. I started with using Forest Glades ink to create my ground. I then used distress ink and a cloud stencil to lightly create sky.

I then stamped my tree in Evergreen and Dark Chocolate inks. I used the naked tree to add 2 further ones in the distance.

My fox was stamped with Paper Bag and Jet Black ink, I think he's spotted his dinner off the card! I then stamped the sentiment in Dark Chocolate to coordinate with the images.

I used foam tape to add my image to a grey card base. Finally I added some white gel pen to the tree to make it look frosty.

My next card uses a stamp set which builds a scene with all its components - Be a Lighthouse:


I started my card by die cutting an oval from a piece of dark grey card. I then placed this over a piece of white card the same size and with a pencil drew inside the oval onto the white card. This gave me a template, I used the penciled oval to center my images.

I used distress ink to give me sky and water before I stamped the scene.

I started with the waves stamp, I initially used Ocean Wave ink, but thought this was too bright so toned it down with Dusk ink. My lighthouse and land were stamped in Jet Black, Grapevine and Evergreen Ink. The stamps layer really well. I then masked off my light house and added the clouds in Nimbus and Cloudy Sky ink. I added these in a random areas stamping outside of the penciled oval too. Finally I added some birds in black ink.

I then glued the card with oval die cut onto my image making sure the center my scene. Foam Tape was added to this an adhered to a grey card base. I stamped one of the sentiments in Versafine ink and heat embossed this with clear powder. This was trimmed to size and added level with the horizon.

My style is usually clean and simple, I rarely do full scenes so this class took me out of my comfort zone and hopefully will encourage me to do more with my stamps 

Thanks for stopping by and if you love what you see please let me know in the comments


Saturday, June 6, 2020

Scouting outdoors

Good afternoon! Where is this year going. We are already in the 6th month but it feels as though we have missed half of those!

As it's the first Saturday of the Month its time for Scrapper's Delights to have a new Kawaii release and wow is it a cute one this month.


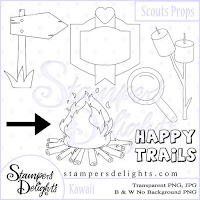
Not only have they released the little characters but also a whole host of props to use with them.
My first card is using the Scout and images from both of the prop sets:


What I Did:
Scouts and Camping Props
I started by building my scene with the props and little girl scout including adding marshmallows for her to toast. I added the sentiment and once arranged I resized and printed on to stamping card.
I colored the scene with alcohol markers, As Mollie is a girl scout I had to color the image in the colors she currently wears. The clouds were made by using a stencil and distress ink.
I then matted a 5x7in card base with black cardstock and added my image. The scene is so busy that it didn't need any embellishing.


The next image is Cute As a Bug and wow is she cute:

What I Did:
Cute as A Bug
I resized the image, added the sentiment and printed her onto stamping card. She was colored with alcohol markers her dress is plain but I just had to add ladybug dots. The clouds were done the same as the camping scene just lighter!
My 5x7in card base was matted with black card and some digital design paper that has an adorable ladybug border.
I matted the image with the same black card and used foam tape to adhere her to the card.

What I Used:
Scout:
Digital Stamps: Stamper's Delights Scouts, Scout Props and Camping Props
Stamping Card: Xpress-It
Alcohol Markers: Copic
Stencil: Picket Fence, Layers of Cloud
Ink: Tim Holtz Distress Tumbled Glass
White card for base: Core'Dinations Premium cardstock heavy weight
Black Card: Core'dinations
Glue: Zipdry

Cute As A Bug
Digital Stamps: Stamper's Delights Cute as a Bug
Stamping Card: X-press It
Alcohol Markers: Copic
Stencil: Picket Fence, Layers of Cloud
Ink: Tim Holtz Distress Tumbled Glass
White card for base: Core'Dinations Premium cardstock heavy weight
Black Card: Core'dinations
Digital Design Paper: Design Bundles
Glue: Zipdry
Foam Tape: Dollar Store

Head on over to the Stamper's Delights Store to see all of this week’s full new release here's what they look like:


Why not stop by the Stamper's Delight Facebook page for regular news on and inspiration from my Teamies you can also enter the progressive challenge there, no blog needed and you can receive the freebies to enter with! 


We also have a monthly challenge where you can enter any makes you do!

Thanks for stopping by and if you like what you see please leave a comment to let me know!


Thursday, February 2, 2017

Happy (Hoppy) Spring

Good afternoon I'm back with my 2nd card for the Prickley Pear inspiration Thursday

Even though we are under a blanket of snow spring is just around the corner (hopefully!) so I have used some cute bunnies on this card:


I started by building my background. I die cut some clouds from post-it notes and arranged them on my card for masks. I then stamped Jumping Bunny and Left Bunny and masked these off too. I inked the top of my card with blue ink, graduated this into a light green and then a darker green as I reached the bottom. I then removed all my masks and colored my bunnies with alcohol markers also adding blades of grass.
I matted my card base with green card and then adhered my topper. I used the Happy Spring sentiment from the Easter/Spring Banner Stamp set just to finish the design.

Thank you for stopping by, you can find more inspiration from me and my teamies on the Prickley Pear blog and their Facebook page.


 photo Crafty Hugs_zpsmrp6bnmu.gif