Hello

Welcome to my blog, a place where I can lose myself in a crafty haven. Pull up a comfy chair grab a cuppa and come and have a read. Oh and if you like what you see, stop by and leave me some love in the comments section

Followers

Wednesday, November 24, 2021

Merry Puppy Christmas

 Good morning! Hope everyone is ready for the holiday. Thanksgiving isn't celebrated in the UK but we've embraced it since coming to the US.

My card today is using some of The Little Paper tree's new release, if you know me I'm crazy about my fur babies so as soon as I saw this little guy he was printed and colored:


This little guy and his tree are part of The Sunshine and Bee digital stamp collection Fairy Digital Stamps - He has 2 fairy friends also in the collection.
I printed him and the tree on Stamping card and colored him with my Copic markers. I matted an A7 card base with green mirror card and some festive digital paper. I trimmed my image and matted it the the same green mirror card. Using word dies I cut Merry Christmas 4 times, 3 in white card and the forth in mirror. I stacked these to give dimension.


My image was added using foam tape again for dimension. Finally I added Golden Baubles to the tree as ornaments.

Thank you for taking time to read, If you love what you see you can buy the images at The Little Paper Tree store where they sell lots of crafting goodies. Do You want some discount? Then use SHARON10 during checkout for 10% off your order!


Monday, November 22, 2021

Hot Chocolate and Cocoa

 Good afternoon. Are you looking forward to the holiday this week? 

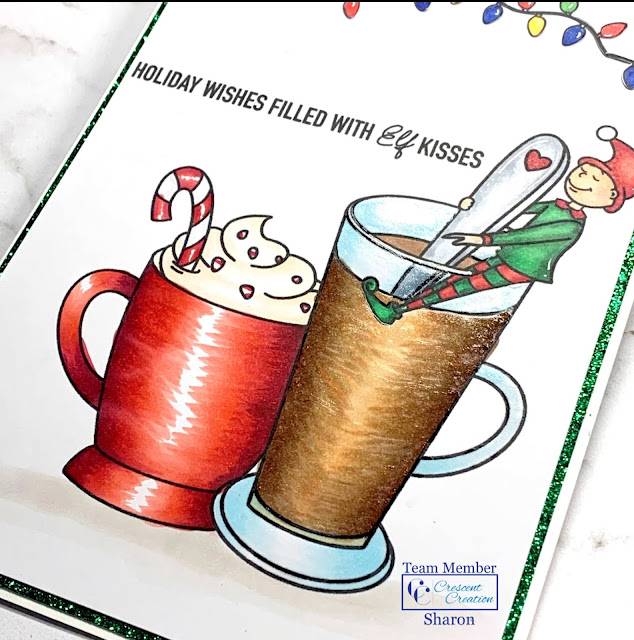
Well before that Crescent Creations has a new release and are doing a blog/you tube hop to celebrate where you could win yourself some goodies. I have used Sweet Christmas for my inspiration:

I resized the cups and placed them together, they are great for building a scene because although they are png images they are solid images so you can layer them without the worry of the back image showing through. The sentiment was added before printing on to stamping cardstock.

The images were colored with Copic markers I then added glaze to the tall glass to make it look more like glass.


I matted an A7 card base with green glitter card, this card is part of the new release and is great because although the glitter shines amazingly it doesn't shed!
My image was added to the glitter card stock I felt the card needed something more so I used the lights from Christmas Gnomies digital stamp set, colored and cut them a few times and strung them along the top of the card.

To take part in the hop you have to stop at each of my teamies blogs/you tube channels and leave us a comment. The winner will be announced on 30th November on the Crescent Creations channel and Instagram. It would be amazing if you could subscribe/follow all the design team's channels as you hop!

You hopped here from Tammi and the next amazing inspiration is Heather's. If you get lost along the way head back to Crescent Creations for the full list!

Thanks for stopping by.


Sunday, November 21, 2021

Christmas Decor

 Good morning! Hope everyone is having a good weekend. we have some dry weather so better than the week has been!

My post today is inspiration for the last new release at Crescent Creations:


The Merry Christmas Big Sentiment Digital Stamp is great for making quick and easy cards. I printed it onto stamping card, colored the ornaments and holly with Copic markers and traced the sentiment with black glaze pen.
I matted an A2 card base with alternating red glitter and gold mirror card and added my image.
Finally I added a few gilded pearls to draw the eye into the design.


There is a new release from Crescent Creations coming this week ( may have used a sneak peek on my card) as well as a blog hop to check back soon!

Friday, November 19, 2021

Retirement Good Luck.

 One of my hubby's colleagues is retiring next month so I was asked to make a card that everyone could sign.

I chose to make an 8x8in card which gave plenty of room for all the signatures. My Carnation Craft dies were perfect for the occasion

I chose to use Eminence from Equinox Bloom collection - I love sunflowers and the size of the vase was perfect for the 8x8in card


I printed and die cut the woven wicker to frame the flowers. My card base was matted with coordinating cardstock and paper.

I shaped the wicker to give it a more realistic look and adhered it with glue gel. I shaped the vase and floral display and again added it with glue gel.


The flowers were decoupaged to give further dimension. I die cut and stamped the sentiment. After I had added this I felt there was a lot of empty space on the card so I added coordinating matt enamel dots. I then remembered I had these little fluffy bumble bees from the Fine Splendor Carnation Craft collection - They worked perfectly to tie the card design together.

Thank you for stopping by, I would love for your to leave me a comment.


Thursday, November 18, 2021

It's Your Day

 Good afternoon from my craftroom which is currently inhabited by 4 puppies, a rabbit and me of course!

My card today is using some dies from a UK company. I jus love Carnations Crafts their flower dies and art work is out of this world. For this card I have to give credit to the Carnation Crafts website for inspiration.


I used The Z fold card shape for the card base and white frame and the details of the card are from Elegant Alfresco. I cut 2 of the largest rectangle layer from white cardstock and adhered these down one side with red liner tape to give me a side folding card base. The filigree was die cut from the same card.
I then added the Elegant Arbor for my flowers to trail up. I die cut a collection of the flowers and added these onto the card using a mix of glue gel and Bearly Art glue. the chair, table and tea set were glued in place to complete the scene. All the images were shaped with my ball tools to give dimension and a more realistic look.


This was a Birthday card so I cut the sentiment from coordinating card stock and stacked them for dimension. The was adhered to the top of the arbor completing the card.


When I make cards like this with lots of dimension it's too bulky and delicate for a standard envelope so I either make a box or like I did with this one wrapped it in coordinating tissue paper.

 Thank you for stopping by, Carnation Crafts have a ton of die collections for any occasion. They also provide images and coordinating background papers for free on their website.


Wednesday, November 17, 2021

Artist Trading Card

 Good Morning from a rainy Michigan. We've had a mismatch of weather this last week, snow, wind, sunshine and now rain.

My post today is using one of the new releases from The Little Paper Tree. I used there Sunshine and Bee Designs digital stamps - Poppy Wreath:


I decided instead of creating a greeting card with this I would make an Artist Trading Card (ATC). I printed the image off smaller than I would usually do and colored the whole of the card with Copic markers. I chose to do pink poppies instead of the traditional red. I finished the center of the flowers with a yellow glaze pen to give some shine and dimension.
Once the image was colored I sent in back through the printer to add the sentiment. I did it this way so none of it was lost when I colored the image.
Finally I matted it onto a card printed with ATC details on the back.


Thank you for taking time to read, If you love what you see you can buy the images at The Little Paper Tree store where they sell lots of crafting goodies. Do You want some discount? Then use SHARON10 during checkout for 10% off your order!


Thursday, November 11, 2021

New Release Instagram Hop

 Good Morning! Happy Thursday it's nearly the weekend hope you have fun times planned.

It's Sunshine & Bee Designs new release day at The Little Paper Tree and we have some super cute images for you this month:


I couldn't resist coloring this little scene. The image is 2 digital stamps. I placed the Reindeer and Tree and then layered the sentiment over so it fit perfectly. I printed it onto Stamping card and colored with my Copic markers.

I cut this down to 4x5.25inches. I matted an A2 card base with red cardstock. I strung some Christmas colored bells onto some bakers twine and hung this across the top of my stamped and colored card. This was then added to my card base with foam tape giving it dimension.


The Instagram hop is happening over on my Instagram account so head over there for the details and to enter. 
Comments left here will not be entered you need to comment on Instagram

Thank you for sopping by, Go checkout the new release over at The Little Paper Tree and don't forget to enter the hop!


Wednesday, November 10, 2021

Thank You!

 Good morning, its a little warmer that the last couple of days but I'm currently on house arrest so not going out anyway.

A few days ago I had abdominal surgery which was booked and happened with in a matter of days. So as you can imagine I'm a little sore. I have managed to make a card for the fab Drs, nurses and care staff that looked after me and Kev on the day.

I used the Autumn Oval Wreath and one of the Kind, Lovely beautiful sentiments from The Little Paper Tree's digital collections.

I arranged them both and then printed on to stamping cardstock, They were then colored with Copic markers and Polychromo pencils.

I matted an A2 card base with blue cardstock and my colored image. To complete the design I added black glaze pen to the word Kind and scattered some gems around the sentiment.


Thank you for taking time to read, If you love what you see you can buy the images at The Little Paper Tree store where they sell lots of crafting goodies. Do You want some discount? Then use SHARON10 during checkout for 10% off your order!


Saturday, November 6, 2021

Hello November!

 Good afternoon, hope you are having a good weekend and the weather is being kind where ever you are!

It's Chibi new release day at Stamper's Delights and we have a cutie for you today. Meet Tumnus Fawn:


I printed him on to stamping card and colored him with my Copic markers. He was then fussy cut. Using a cloud stencil I inked a background for him. I also tore 2 pieces of cardstock for the ground.
My A2 card base was matted with green card and the cloud piece. I arranged my ground ad added Tumnus.
Finally using the same green and brown cardstock I die cut a sentiment.

Head on over to the Stamper's Delights Store to see all of this week’s New Releases.

Why not stop by the Stamper's Delight Facebook page for regular news and inspiration from my Teamies you can also enter the progressive challenge there, no blog needed and if you sign up for the Stamper's Delight Membership you will get free images to enter the challenge with!

All the design team projects are available on the Inspiration blog - hop on over there for more inspiration.

Thanks for stopping by and if you like what you see please leave a comment to let me know!


Thursday, November 4, 2021

Are You Ready For Secret Santa

 Good afternoon, are you ready for Christmas? No? me neither. I have a few gifts but so many more to get and cards still to make.

It's new release day at Stamper's Delights and I have a cute Anime girl who is great for holiday cards, meet Anime Secret Santa:


She is all dressed up as Santa's Elf ready to hand out those gifts.

I printed the image on to Stamping card and colored her with Copic markers. I then matted an A2card base with red card stock and candy cane digital design paper. My images was also matted onto red card and added to the card. To finish I die cut a sentiment from both red and green cardstock adhering these together to give a shadow before adding to my card.

Head on over to the Stamper's Delights Store to see all of this week’s New Releases.

Why not stop by the Stamper's Delight Facebook page for regular news and inspiration from my Teamies you can also enter the progressive challenge there, no blog needed and if you sign up for the Stamper's Delight Membership you will get free images to enter the challenge with!

All the design team projects are available on the Inspiration blog - hop on over there for more inspiration.

Thanks for stopping by and if you like what you see please leave a comment to let me know!


Wednesday, November 3, 2021

Remembrance

Good Morning! Remembrance Day also called Poppy day is the 11th of November - The significance of the day is, I hope, known to all. It was when World War 1 ended - The 11th hour of the 11th Day of the 11th Month.

In the UK with is remembered by the wearing of a poppy. My card is using the Stained Glass Poppy from The Little Paper Tree:


I colored the Poppy with Copic markers and cut the circle out.
I matted an A7 card base with red card. I then printed the Flanders Field poem onto grey card stock. If you've not heard the poem it tells the reason for using the poppy as a symbol of remembrance.
I added this to my card base and adhered my Poppy with foam tape.
Using my Cameo I then cut the letters for remember and added these to the card. This didn't appear to stand out as much as I wanted so I covered the letters with crystal glaze.

I hope my card has made you stop and think about the significance of the date. To all the veterans including my own Kev. Thank you for your service!