Hello

Welcome to my blog, a place where I can lose myself in a crafty haven. Pull up a comfy chair grab a cuppa and come and have a read. Oh and if you like what you see, stop by and leave me some love in the comments section

Followers

Sunday, February 23, 2020

Have a Fairy Merry Day

Good afternoon! The weather here is gorgeous, yes we still have snow on the ground but the sun is bright in the sky and the temps mean that it's bearable to be outside. It's only trying to fool us thought, more snow storms are predicted this coming week!

Today's card is using an image that I colored a few weeks back. She is from the lovely Sherry West and is called Have a Fairy Merry Day. She is a stunner!


What I Did:
 I resized and printed the image on stamping card. She was colored with alcohol markers - wow did that hair take some coloring!
I then chose design papers and cardstock to coordinate with my coloring. My 5x7 in card base was matted with some of these. I used a different paper that was from the same set to off set under my image.
As I wanted to keep the whole card delicate looking I used a fine script sentiment die and positioned this along the lower edge of the card.

What I Used:
Sherry West Digital Stamp: Have a Fairy Merry Day
Stamping card: X-press It                       
White card base: Core'dinations Premium Cardstock
Aqua Card: Core'Dinations
Design Papers: Lili of the Valley (retired)
Die cut sentiment: The die was gifted to me so unknown
Copic Markers:
          Skin: BV000, E000, E00, E01, R30
          Hair: E35, E5550, E51, E53
          Wings: B00,B000, B0000
          Dress: B000, B00, B01, B02, B05, Trim R00
          Pants: R00, R01, R02, R11
          Shoes B000, B00, B02, B05
          Flower: R11, R21
          Rock: N2, N3, N4
          Shadow: W1

Sherry West has a number of gorgeous images, keep a look out as you will see lots more of hers here!

Thanks for stopping by and if you love what you see let me know in the comments.


Thursday, February 20, 2020

Flower Girl

Good afternoon, Oh I wish winter was done now, I'm over the snow and ice and frigid temperatures.

Today's post is all about Stamper's Delights Thrifty Thursday! Yes head on over to the store and see what amazing stamps are at reduced price. While there check out the one I have used a great mother's day set: Anime Just for You Mum.


As Mother's Day isn't for a few months here in US I decided to make her in to a friend card.

What I Did:
I resized and printed the stamp with out the sentiment (yes you get both plus a separate sentiment) on to stamping paper. She was colored her with alcohol markers with some pencil to add detail.
I then matted a white card base with teal cardstock. An oval die cut aperture was made with a piece of yellow card and this was then lightly inked through a stencil to give a shadow pattern.
A adhered my image into the aperture and positioned this on my card base. The flowers were shaped into a spray and placed around the bottom edge of the aperture. I die cut and colored some leaves to add a more realistic look to the flower spray.
The sentiment is a rub-on which balanced the card for me

What I Used: 
Stamping card: X-press It
Alcohol Markers: Copic - I didn't list these as I colored
Pencils: Prismacolor Premier
White card base: Core'Dinations Premium Cardstock
Teal and yellow card: from my stash
Flowers: From my stash
Leaves: die cut using Susan's Garden Club dies
Sentiment: Crafter's Companion

Head on over to the Stamper's Delights Store to see all of this weeks thrifty offers.
We also have a monthly challenge where you can enter any makes you do
Why not stop by the Stamper's Delight Facebook page for regular news on and inspiration from my Teamies you can also enter the progressive challenge there, no blog needed and receive freebies! 

Thanks for stopping by and if you like what you see please leave a comment to let me know!


Tuesday, February 18, 2020

Jasmine

Good morning, It's Tuesday already! How come Monday's always go faster when they are a holiday!

Today's card uses the Jasmine dies from Susan's Garden Notes at Elizabeth Craft Designs. Unfortunately these dies have all now been discontinued but I love them so will still be using them in my cards.


What I Did:
 I began by making the flowers. I repeatedly cut the flowers from white cardstock, Colored with Pan Pastels and shaped to give a realistic look.
The leaves were again cut and shaped using Pan Pastel and ink to shade these.
I assembled the flowers, using fake pollen to again give a more lifelike feel to them. They were then arranged with the leaves onto a white die cut frame and allowed to dry. My card base was matted with the same green card used for the leaves and a piece of design paper which I felt helped draw the eye to the flowers.
 I stamped and heat embossed my sentiment, die cut this into a tag. My flower frame was adhered to the card and sentiment placed to balance the design.

The flower do give your cards some great dimension:


What I Used:
White cardstock for flowers: Top Flight 82lb
White card stock for card base and frame: Core'dinations Premium 
Green cardstock: Core'Dinations
Design Paper: Lili of the Valley (Retired)
Sentiment: Altenew: Sunflower Daisy stamp set
Embossing Ink: Versafine
Embossing Powder: Copper Kate White fine detail
Sentiment die: unknown

I am entering this card into the following challenges:
  The Flower Challenge: Add leaves
  A bit More time to Craft: Anything goes
  Crafty Hazelnut's Patterned Paper: Use patterned paper

Thanks for stopping by and if you love what you see please leave a comment to let me know


Monday, February 17, 2020

Easter Blessings

Good morning, it's a President's Day here so a holiday. It is great to have a long weekend with family.

Today is also the start of a new challenge over at Jan's Digital Stamps Challenge. She has some gorgeous new releases this month and my card today is showcasing Cottontail Easter a cute set that is ideal for your Easter crafts:


What I Did:
I used my graphics program to build the scene of the bunny, the eggs and the sentiment all of which are included in the set. I then printed this onto stamping card and colored with Copic markers. I recorded my first ever You Tube video while coloring which you can view here.
I then matted an 8x8 in Card base with Yellow cardstock and a spring like paper. I also matted a smaller Easter paper with the yellow card and positioned this on my card
I added my matted image with using foam tape to give dimension. A few nuvo drops just balanced the design.

What I Used:
Jan Mahew: Cottontail Easter digital stamp collection
Stamping card: X-press It
White Card Base: Craft UK
Yellow cardstock: Core'Dinations
Green floral paper: Lili Of the Valley (Retired)
Easter Paper: Digital download (unknown)
Nuvo Drops: Tonic, English Mustard

The challenge runs for 2 weeks and is an anything goes challenge so if you make and create there is no reason not to come and join us!

Thanks for stopping by check out the Challenge blog for more inspiration from my teamies.


Friday, February 14, 2020

Stamper's Delights Kawaii Love

Happy Valentine's Day! Hope you have also received lots of love today. If not I'm here to share my love of crafting with you.

There is a new Kawaii release over at Stamper's Delights, we have 2 new image sets to share with you. The first one is an adorable wolf with a little sassy howl about him. The second is the the start of a new Zodiac themed collection we are kicking it off with Pisces and each month we will have another zodiac sign to share with you:


Here is what is included in the sets:


What I Did:
Wolf:
I resized and stamped the image on stamping card, used my Scan N Cut to fussy cut him then colored him with alcohol markers. I the used my graphics program to re-size and color the sentiments, which by the way are included with the little guy! The Hooowl was repeated to make a design paper which was matted with brown card and added to a 5x7in white card base. I then resized and colored the main sentiment and die cut this with a speech bubble die. I also cut a mat for this with the same die.
I cut my sentiment to size, matted it and adhered it to the top of the card. I then used foam tape to add my little wolf to the card.

Pisces
As for the wolf I resized the little mermaid character, I then layered together 2 of the other images to build my sentiment. I wanted my mermaid's tail to look iridescent so I used an embossing pen to color it and heat embossed glitter embossing powder onto it. This took a few layers to get a complete coverage but I love the sparkle. The remainder of the image was colored with alcohol markers, I added iridescent gems to her headband and glaze pen to her pearl necklace.
I then matted a white 5x7 in card base with dark blue card, I used a punch to cut out the corners of my image and again used blue cardstock to mat this. I added some design paper to my card base which had a wave pattern to it. After adding my image I die cut some bubbles and added these to the finished card. 

What I Used:
Wolf:
Stamper's Delights: Kawaii Wolf Digital Stamp Collection
Stamping Card: X-press It
White Card Base: Core'Dinations Preimum cardstock
Brown Card: Core'Dinations
Copic Markers - Sorry I forgot to list the colors
Foam Pads
Zip Dry Glue

Pisces
Stamper's Delights: Kawaii Digital Stamp Collection
Stamping Card: Xpress-It
White Card Base: Core'Dinations Preimum cardstock
Dark Blue Cardstock: From my stash
Design Paper: digital paper unknown
Bubbles die cuts: Tattered Lace Tuck Ins
Copic Markers - Sorry I forgot to list the colors
Zip Dry glue
Xyron glue runner


Head on over to the Stamper's Delights Store to see all of this weeks thrifty offers.
We also have a monthly challenge where you can enter any makes you do
Why not stop by the Stamper's Delight Facebook page for regular news on and inspiration from my Teamies you can also enter the progressive challenge there, no blog needed and receive freebies! 


Thanks for stopping by and if you like what you see please leave a comment to let me know!


Thursday, February 13, 2020

Happy Galentine's

Good afternoon - Valentine's Day is almost upon us, Mollie has had her party today as she is on mid-winter break tomorrow so I get to spend the day with her 😊.

Scrapper's Delights has had a makeover which has included a name change as well as a web address change. So my post today is my first one for the new and improved Stamper's Delights!!

It's Thrifty Thursday so head on over to the store where you can get today's image at a thrifty price!

To highlight this I my card today is a Galetine's one (yes it's a thing where you send a girlfriend a Valentine's!). This guy is part of a duo, Anime We Have Gifts, but I decided to just use the hunk!


What I Did:
I printed my image on stamping card, colored him with alcohol markers and fussy cut him out. Next I used a heart stencil and pink ink on white card for my background I then adhered this to a purple card base. My hunk was then glued in place, we don't want him running away! I typed the sentiment on my pc and printed this, matted it with the same card as my base and positioned it on the card.

What I Used:
White Stamping Card: X-press It
Purple Card Base: The Paper Studio
Stencil: DyLusions Love Hearts
Ink: Tim Holtz Distress, Spun Sugar
Copic Markers:
           Skin: E000, E11, E21, 
           Hair: E30, E50, E51
           Jeans: B21, B23, B37
           T-Shirt: T0, T2, T4
           Boots: E33, E35, E37
           Gift BV000, BV11, BV13, BV17

Head on over to the Stamper's Delights Store to see all of this weeks thrifty offers.
We also have a monthly challenge where you can enter any makes you do
Why not stop by the Stamper's Delight Facebook page for regular news on and inspiration from my Teamies you can also enter the progressive challenge there, no blog needed and receive freebies! 


Tuesday, February 11, 2020

Sentiments are the bomb

Good morning, We are covered in snow and temps are below freezing so staying inside to keep warm, what better excuse for hiding away in my craft room!

There is a new challenge starting over at Arty Divas and the sponsor this challenge are a great stamp company, The Project Bin.
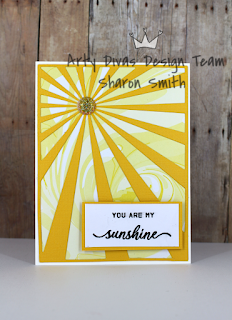
I have a whole set on sentiments to use so I decided to make 2 cards:


What I did:
For the first card I used a 4.25 x 5.5in card base and matted it with some bright yellow design paper. I then used a sunburst die to cut the sun and it's rays.I placed a gem in the center of this for extra shine! I then stamped the Project Bin sentiment on white card and matted this with the same yellow I had used for my sun burst. This was the placed on foam tape to give dimension.

The second card was also a 4.25 x 5.5in white card base which I matted in purple. I then cut a 1.5in strip of vellum and stamped the sentiment using embossing ink. I then heat embossed using dark purple embossing powder. This was the wrapped around some floral design paper. I didn't have gems in the correct purple so i colored the ones used with an alcohol marker.

What I used:
Card 1
The Project Bin sentiment stamps: Just Sayin'
White Card base: Core'Dinations
Yellow design Paper: unknown (from my Stash)
Yellow Card: Core'Dinations Color Core
Sun Burst Die: Gina Marie Designs
Gem: From my stash
Black Ink: Versafine
Foam pads

Card 2
The Project Bin Sentiment stamps: Just Sayin'
White card base and colored card as above
Design Paper: Lili of the Valley (Retired)
Vellum: From my stash
Embossing Ink: Versamark
Embossing Powder: Copper Kate Vibrant Violet
Gems: from my stash
Alcohol Marker: Copic BV17

 Our challenge is anything goes so if you craft or make art you can join in. Just head on over to the blog and add your design!

Thanks for stopping by and if you like what you see please let me know in the comments

Monday, February 3, 2020

Pink Orchids

Good morning, I am still in bed at this hour but I know my family and friends in the UK will be around! My post today is the first one for Jan's Digi Stamps Challenge. When I saw Jan's stunning images I just had to apply to be on the team and lucky me I was chosen.

The challenge runs for 2 weeks and is an 'anything goes' challenge so if you make and create there is no reason not to come and join us.

I have an obsession with flowers at the minute so I couldn't resist coloring Botanical Orchids which comes with colored and line images as well as suitable sentiments.


What I Did
I arranged the png image of the flowers along with the sentiment using my graphics program the printed them onto stamping card.
I colored the image using Copic markers and then added depth and texture with Prismacolor pencils
I cut a 5x7in card base from white card and matted this with pink and green card to coordinate with the image.
I added my image topper and to balance the image I added some crystal gems.

What I Used
Digital Stamp and Sentiment: Botanical Orchids
X-Press It Stamping Card
Copic Markers: R000,10,02; E51; Y11; G24, 94; YG61, 91,95,97
Primacolor Premier Pencils: hot pink, sand,Jasmine, Deco Pink, Goldenrod, Marine Green, Warm Grey
Nuvo Marker: 452
White Card: Core'Dinations Premier Cardstock
Pink and Green Cardstock: Core'Dinations
Studio Katia Iridescnet Crystals
ZipDry Glue
Ranger Multi Medium Matte

Thank you for stopping, come and join the challenge here you can also check out my teamies gorgeous designs too!