Hello

Welcome to my blog, a place where I can lose myself in a crafty haven. Pull up a comfy chair grab a cuppa and come and have a read. Oh and if you like what you see, stop by and leave me some love in the comments section

Followers

Thursday, August 19, 2021

Sweet Sentiment - I love you!

 Good morning! It's almost school time - we are counting down the days!

Today I am blogging about both a new Facebook Group and a new release from Sweet Sentiment.

If you know Rhea Weigan she is an amazing colorist and used to run a successful FB group well started up Passionate Paper Creations & Friends again and is promoting sponsors. 

For the next 4 Days Sweet Sentiment is the sponsor. This is a company run by Jammie Clark who teaches coloring classes but also has their own range of stamps. My card today is using one for her new releases - I love You, Friend


There is both a male and female character included in the set as well as I LOVE YOU spelt out in ASL 
I colored the image with copic markers along with the signed phrase which was stamped multiple times.
My A7 card base was matted with black and red card stock. Black card was used to mat my sign language panel and the included sentiments.
Finally I added my girl with glue gel to give her dimension.

I will be back tomorrow with her male counterpart but in the meantime please head on over to the PPC Facebook group and check out my teamies posts as well as all the other amazing work that the coloring community is sharing there.
Also go checkout Sweet Sentiment's website and other fab products!
 
Thanks for stopping by and if you love what you see please let me know in the comments!


Tuesday, August 17, 2021

Altenew Educators Certification - Magical Markers

 Good afternoon, after a week without power and extreme temperatures I'm ready for some cooler weather - shame the forecast doesn't agree!

My post today is my submission cards for my latest AECP class - Magical Markers by Sara Naumann - it's all about using alcohol markers but not just for coloring - there are so many techniques you can do with them.

My first card was designed using markers with a stencil:


I used the Weave builder stencil and 2 shades of grey marker. Coloring through the stencil I did the first 2 rows in a darker pen. I then flipped the stencil and used a lighter markers to color the first 2 rows on this side. I think it has given a tire track effect.

I matted a white A2 card base with black and grey cardstock, trimmed my stenciled piece down and matted this onto the same black card before adhering it to the left side of my card base.

Thanks was diecut twice once from white cardstock and once from black - I colored the white with the same lighter grey marker as the stenciled panel so it coordinated. I then attached this to the black to the back of the grey sentiment slightly off center giving me a shadow. When I adhered this to my card it stood out due to this shadow. 

To finished the card I stamped 'a million' underneath thanks. 


My next card uses techniques from lessons 3& 4


I started by stamping my feather and sentiment onto vellum. While this was drying I cut a piece of card stock slightly smaller than my A2 card base. I then scribbled a purple and bright pink directly onto my glass mat. I added isopropyl alcohol to the colors and picking them up with a splatter brush made splatters over my piece of card. I then edged this with ink by running the purple marker round the piece. I cut another piece of cardstock same length but slightly wider than my vellum and edged this in the same way.

Once dry I colored my feather using 2 alcohol markers, starting with light and adding depth with darker one. I then pounced my lighter marker over the coloring to give me texture. I adhered the vellum to the strip of card and then added this to my splattered piece. Using foam tape I attached this topper to my card base.

Finally I colored some white pearls with the darker purple marker and added these to the card.


My final card used a technique from Lesson 2 - coloring peel-offs with alcohol markers.


I cut a piece of white cardstock slightly smaller than my A2 card base. then using the wide tip of a blue marker I colored 4 strips of silver peel-offs. Once dry I laid these on the white card making a crossed border in one corner.

Beautiful Day is still my favorite stamp set. I stamped a flower and leaf outline and colored these with 3 shades of blue marker. They were then die cut with coordinating dies.

I arranged these on the bottom of my card near the crossed peel-offs. There was a lot of white space so I stamped directly onto the card with some of the included flower spray stamps and colored these with same color markers as main flower. I stamped the sentiment above these balancing my design.

The white card was added to a grey card base and the leaves were glued directly to the card and flower added with foam squares. 

Finally I colored a white pearl with a black marker and added this to the center of my diecut flower.


Thank you for taking time to read.
If you like what I have made please let me know in the comments.


Altenew products I used:

Neenah Classic Crest Solar White 110lb Coverstock
Purchase From:
SSS | AZN | ALW
Beautiful Day Stamp & Die set
Purchase From:
ALW
Crisp Dye Ink - Jet Black
Purchase From:
SSS | ALW
Envelope Liner Die Set
Purchase From:
SSS | ALW
Pure White Crisp Embossing Powder
Purchase From:
ALW
Thanks Die
Thanks Die
Purchase From:
SSS | ALW
Crisp Dye Ink - Magenta
Purchase From:
ALW
Crisp Dye Ink - Forest Glades
Purchase From:
SSS | ALW
Embossing Ink
Embossing Ink
Purchase From:
ALW
Silver Embossing Powder
Purchase From:
ALW
Build a Flower Fashion Monger Dahlia stamp and Die set
Purchase From:
ALW
Wild Fern Stamp Set
Wild Fern Stamp Set
Purchase From:
ALW
Halftone Thanks Stamps
Purchase From:
ALW
Weave Builder Stencil
Purchase From:
ALW
Mini Delights - Strength Stamp & Die
Purchase From:
ALW
Vellum Translucent Paper
Purchase From:
ALW

Sunday, August 8, 2021

Altenew Educators Certification Program - Impressive Heat Embossing

  Good afternoon! How can it be Sunday already? I wish time would slow down!

I'm back today with my latest submission for my AECP - This class was all about using heating embossing in different ways to stretch your stamps and crafting further.

My first card used the technique from class 2 but I also added elements from class 6, using clear embossing powder to give you a watermark effect - darkening the cardstock:


I started with 2 pieces of cardstock the same size, one green and one white. Using my MISTI I arranged by leaf stamps from the wild fern set long one side of the white card and stamped in green ink. I then, without moving the stamps, switched out the white card for the green piece and stamped the leaves in embossing ink. Turning the card 180 degrees and using embossing ink I stamped the leaves of the opposite side of the green card. I switched this out for the white card and stamped the leaves in green ink. This gave me 2 pieces of card stock both with leaves stamped down their long side. Using clear embossing powder I heat embossed the images on green card. which made the leaves look a darker shiny green.

I die cut the green piece with a rectangle die and when I laid this over the white card I could line up the leaves so they looked like complete leaves just in 2 different greens. These pieces were adhered together using wet glue so I had 'wiggle' time to make sure they were lined up correctly.


My next techniques was from lesson 6 I die cut the word 'Love' and heat embossed it layering the embossing ink and clear powder 4 times to give me a smooth raised die cut that looked like it was enameled. The mistake I made with this is I used clear embossing powder, I should have used white as the clear starts to yellow when you get multiple layers.

I worked out where I wanted my die cut and stamped the remainder of my sentiment directly on my green cardstock and heat embossed with with white powder.

I adhered my design onto a black A2 card base with foam tape to give dimension, lined up the Love with my stamped sentiment and added a few cream colored sequins to balance the card.


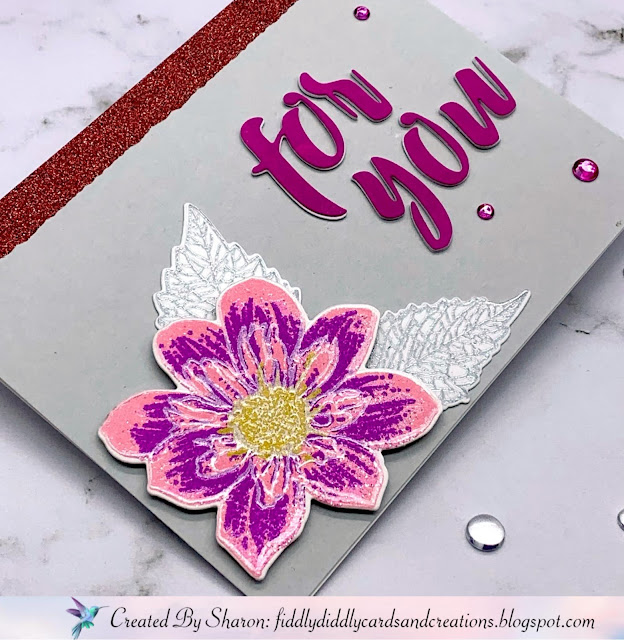
My second card for heat embossing techniques used lesson 4 - using embossing powder instead of colored ink for a layered stamp image:


I found this a much harder technique to do and did multiple attempts in multiple colors before I was happy with my results. 

The first struggle was finding embossing powders for my layers. I used build a flower Fashion Monger Dahlia which has 4 layers for the main flower and 2 for the center. 

I started with the solid layer in a pale pink color. the tick was to make sure each layer was fully cooled before adding the next. My second layer isn't as obvious on the photos but it was a slightly darker pink with glitter. The 3rd layer was a brighter pink.  I added my center in yellow after this, I chose to just do one of the center layers. My last layer was the outline of the flower. I initially tried gold for this but I lost the definition of the flower and the outline lines looked too thick so tried again with a pearlized white and liked this much better.

I only used one layer for my leaf, I used both gold and silver embossing powder on this and decided to go with the silver,

My flower and leaves were die cut ready to go on my card

I added a strip of glitter washi tape to the top of a landscape white A2 card base, This is actually nearer the base color of the flower but the camera shows it darker.

I matted a piece of grey cardstock over this and arranged my flower and leaves using both wet glue and foam tape in the corner of the card.

I cut my sentiment 4 times and used Magenta ink to color one of these. I stacked these together and adhered in place. 

I didn't have any embellishments in coordinating colors so I used clear gems and colored them with alcohol markers to match the pink in my sentiment.


Thank you for taking time to ready my very long post!!

Altenew products I used:

Envelope Liner Die Set
Purchase From:
SSS | ALW
Pure White Crisp Embossing Powder
Purchase From:
ALW
Crisp Dye Ink - Magenta
Purchase From:
ALW
Crisp Dye Ink - Forest Glades
Purchase From:
SSS | ALW
Embossing Ink
Embossing Ink
Purchase From:
ALW
Silver Embossing Powder
Purchase From:
ALW
Build a Flower Fashion Monger Dahlia stamp and Die set
Purchase From:
ALW
Wild Fern Stamp Set
Wild Fern Stamp Set
Purchase From:
ALW

Saturday, August 7, 2021

Autumn Blessings

 Good afternoon! Hope you are having a great weekend! It's hot and humid here.

It's Stamper's Delights Chibi New release today and the image is super cute! Meet Chibi Too Cute To Spook


Isn't she the cutest??? I added leaves and the included sentiment to my image with my graphics program and then colored her with Copic markers and die cut her into a circle.

My A7 card base was matted with orange cardstock and some fall digital design paper. I also cut a circle from the same orange cardstock to frame my image.

I then die cut leaves from fall colored foil and 'scattered' these around my cutie.

If you want more of a Halloween style she is also available with a jack-o-lantern!


She is also now available in Stamper's Delights new clear stamps:


Head on over to the Stamper's Delights Store to see all of this week’s New Releases.

Why not stop by the Stamper's Delight Facebook page for regular news and inspiration from my Teamies you can also enter the progressive challenge there, no blog needed and if you sign up for the Stamper's Delight Membership you will get free images to enter the challenge with!

All the design team projects are available on the Inspiration blog - hop on over there for more inspiration.

Thanks for stopping by and if you like what you see please leave a comment to let me know!


Thursday, August 5, 2021

Halloween Fun

 Good afternoon! I'm so over the heat of summer and can't wait for the fall temperatures. Fall is my favorite season, I love all the color changes and crisp air.

With Fall comes Halloween and Stamper's Delights Kawaii new release this month is all about the dress up with the re-release of the cutie Frankie-Stein:


He's all ready to head out trick a treating! I started by designing my background. I used a star (included in the collection!) and copied and pasted it numerous times then printed and colored it. Frankie was colored with Copic markers and I fussy cut him. When I added him to the star background the colors of the stars were too busy. I decided instead of adding a sentiment to the image to do the same as my background but printed it onto striped vellum This over lay toned down the colors of the stars making Frankie pop more!

I matted a black card base with Orange card, and added all my layers. Frankie was then added using foam squares to give dimension.

Head on over to the Stamper's Delights Store to see all of this week’s New Releases.

Why not stop by the Stamper's Delight Facebook page for regular news and inspiration from my Teamies you can also enter the progressive challenge there, no blog needed and if you sign up for the Stamper's Delight Membership you will get free images to enter the challenge with!

All the design team projects are available on the Inspiration blog - hop on over there for more inspiration.

Thanks for stopping by and if you like what you see please leave a comment to let me know!