Hello

Welcome to my blog, a place where I can lose myself in a crafty haven. Pull up a comfy chair grab a cuppa and come and have a read. Oh and if you like what you see, stop by and leave me some love in the comments section

Followers

Showing posts with label stars. Show all posts

Monday, October 4, 2021

Stockings for Christmas? No Shoes!!

 Good Morning! How is it Monday again???

A couple of weeks ago I was honored to take part in a workshop taught by Lana Taber as part of her final challenge for the AECP program.

She provided an amazing kit for us to work with and we made 3 different Christmas cards. When I say different I not only been they were 3 different designs but they were unusual too! Who has ever made or received a holiday card made with a stiletto shoe stamp?

The first card is a wreath card:


Can you make out the shoes? 

We started by stamping and masking the shoes multiple times to give the wreath. These were then colored with artist markers. The original card was just the shoes but Lana decided we would add greenery to it and it really was effective. I stamped the sentiment in embossing ink and them heated embossed with gold powder. We added the card front onto a white card base, gold gems were adhered to give the look of Christmas baubles. Finally I added a red ribbon bow to the top of the wreath

The next card was a Christmas tree again built with shoes


We started by finding the center on the card and then started stamping and masking the shoes, working down to form the tree shape.

Once the shoes were colored the greenery of the tree was added making sure to fill in all the gaps between the shoes. I decided to put a bow at the top of my tree. I formed the bow in the center of a piece of red ribbon leaving long tails. These were then spiraled down the tree fixing in multiple places with hot glue. 

I heat embossed my sentiment again this time using red and gold powder.

I added the card front to my card base and scattered gold gems around to look like more tree decorations.

My last card was a simple one but is just as effective as a Christmas card:


We started by stamping, coloring and masking the shoes. Then using a stencil and gold pigment ink scattered stars across the card, because the shoes were masked this gave the impression the stars end behind them.

I added my sentiment under my shoes to balance the design and of course a scattering of the gold gems just finished the look!

Lana did an amazing job in first designing these cards and then teaching 5 of us how to make them.

She passed the challenge and is now an educator - a huge congratulations to her!!!!


Altenew Products I Used

Crisp Dye Ink - Jet Black
Purchase From:
SSS | ALW
Embossing Ink
Embossing Ink
Purchase From:
ALW
Red Sunset Artist Markers
Purchase From:
ALW
Bold Heels
Bold Heels
Purchase From:
ALW
Halftone Holidays
Halftone Holidays
Purchase From:
ALW
Starry Night
Starry Night
Purchase From:
ALW
Milky Way Stencil
Milky Way Stencil
Purchase From:
ALW
Antique Gold Embossing Powder
Purchase From:
ALW

Thursday, August 5, 2021

Halloween Fun

 Good afternoon! I'm so over the heat of summer and can't wait for the fall temperatures. Fall is my favorite season, I love all the color changes and crisp air.

With Fall comes Halloween and Stamper's Delights Kawaii new release this month is all about the dress up with the re-release of the cutie Frankie-Stein:


He's all ready to head out trick a treating! I started by designing my background. I used a star (included in the collection!) and copied and pasted it numerous times then printed and colored it. Frankie was colored with Copic markers and I fussy cut him. When I added him to the star background the colors of the stars were too busy. I decided instead of adding a sentiment to the image to do the same as my background but printed it onto striped vellum This over lay toned down the colors of the stars making Frankie pop more!

I matted a black card base with Orange card, and added all my layers. Frankie was then added using foam squares to give dimension.

Head on over to the Stamper's Delights Store to see all of this week’s New Releases.

Why not stop by the Stamper's Delight Facebook page for regular news and inspiration from my Teamies you can also enter the progressive challenge there, no blog needed and if you sign up for the Stamper's Delight Membership you will get free images to enter the challenge with!

All the design team projects are available on the Inspiration blog - hop on over there for more inspiration.

Thanks for stopping by and if you like what you see please leave a comment to let me know!


Tuesday, September 15, 2020

Aim High

 Good Morning! we are on week 3 of virtual school and all I can say is it's an experience!

Aside from that it's Tuesday again!!! So welcome to my Digi Choosday inspiration for joining our challenge. The design team today are showing you "for the boys" designs made with a shaped card. I have used Little Dude School/Student:


What I did:
I arranged the digital design paper, Little Dude and sentiment in my graphics program and then printed the design.
As the theme was shaped card I used a nesting die to cut my card base, mat and image into the tag shape. I then glued these all together. Finally I added some wooden stars to complement the design

What I Used:
Die for Card base and Mats: Crafter's Companion
Stars: From my stash
Glue: Zip Dry

The Digi Choosday Challenge runs for 2 weeks, it is always anything goes so there is no reason not to enter and you never know you may just win!

 Looking for more inspiration? Then check out my teamies designs over on the Facebook page, you can also post your own Polkadoodles' designs on the Craft Stamp and Colour with Polkadoodles Facebook group

Thanks for stopping by, now go join the challenge!


Saturday, March 7, 2020

Kawaii New Release

Good Afternoon! We are had a mixed bag of weather this week - was gorgeous at the beginning of the week that saw the snow shrinking back, then we've had snow, rain and sunshine since!

My designs today are using the gorgeous new Kawaii releases from Stamper's Delights. I am so in love with this genre that they are doing and get excited for what comes next!

We have 2 sets being released today. The first is a great set for all your Easter makes. Meet Bunny Love:


What I Did:
Bunny Love:
Using my graphics program I arranged the main character and a bunny gang and printed them onto stamping card. I did add the sentiment to this but changed my mind later.
The images were colored with alcohol markers and you can see this on my You Tube channel.
I used an 8x8in card base and matted this with blue card and a green Easter digital design paper. I then matted my image and a cute floral design paper with the same blue card and arranged these on my base.
My sentiment was recolored before printing, matting and placing in the center of my card using foam dots.

The second digital stamp set is continuing the Zodiac theme: Aries


What I Did:
Aries
This little guy was resized and printed on to stamping card. After I had colored him with alcohol markers I cut him out using my scan n cut, I also added a mat to him but increasing his size on the scan n cut and cutting it out in green cardstock.
I matted my card with the same green cardstock, I then printed the Aries multiple times on some design paper and added this to my card base.
Stars were die cut from the green card and arranged over the card before adding my image raised on foam tape.

What I Used:
Bunny Love:
Stamper's Delights Kawaii Bunny Love digital stamp collection
Stamping Card: X-press It
Copic Markers
Blue cardstock: from my stash
Digital Design Paper: Polkadoodles Easter Collection 
8x8in Card Base: Craft UK
Zipdry glue
Foam Tape

Aries
Stamper's Delights Kawaii Aries digital Stamp Collection
Stamping Card: X-press It
Copic Markers
Green Cardstock: Core'Dinations
Star Die: Tattered Lace Tuck in Star dies
Design paper: Lili of The Valley (retired)
Scan N Cut
Zipdry Glue
Foam Tape


I have an amazing new bunch of teamies who have also done amazing designs with these images you can check them out on the Inspirational blog.
Head on over to the Stamper's Delights Store to see all of this weeks thrifty offers.
We also have a monthly challenge where you can enter any makes you do
Why not stop by the Stamper's Delight Facebook page for regular news on and inspiration from my Teamies you can also enter the progressive challenge there, no blog needed and receive freebies! 


Thanks for Stopping by and if you like what you see, please let me know in the comments.


Friday, March 29, 2019

It's your month Aries

Good afternoon. Tomorrow we fly to the UK and I am so looking forward to spending time with my family and friends. I'm busy making sure I have all my blog posts covered as well as getting stuff together to pack.

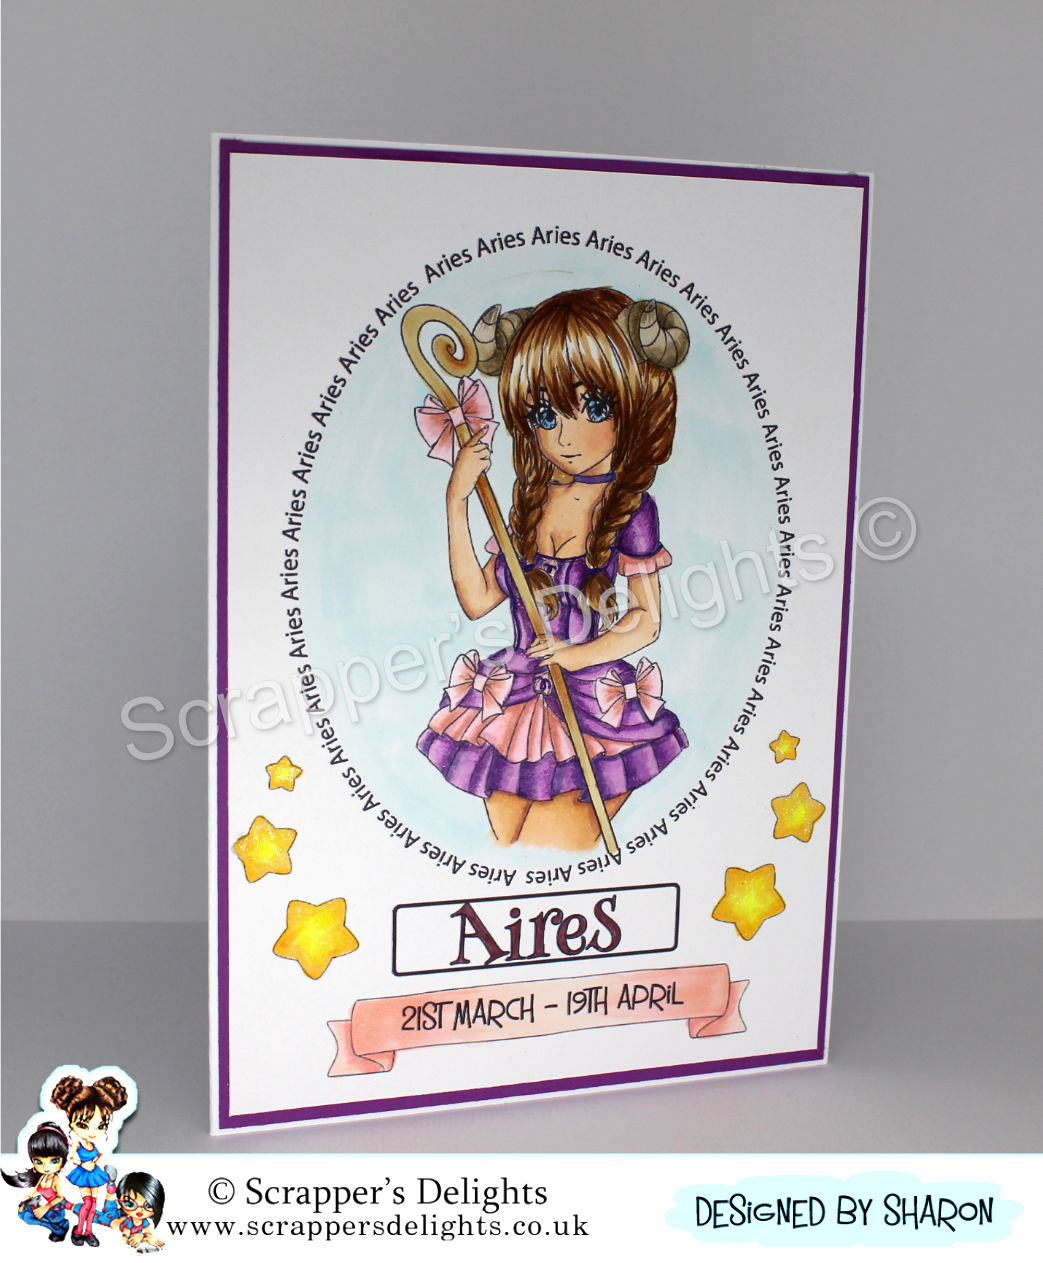
Todays post is the VIP release from Scrapper's Delights and its the next zodiac sign which started on 21st of March.
Let me introduce you to Miss Aries:

Isn't she so pretty,  she is a complete kit of a ton of extra embellishments that all relate to her sign.
I have incorporated 5 separate png images in my card using a graphics program to resize and bring them all together. I colored my card with alcohol markers and colored pencils. A white 5x7in card base was matted with purple card before adding my card front. The only other thing I have added is sparkle pen to the stars which doesn't show up well in the photo.

The Scrapper's Delights VIP deals includes 3 teen Anime each month with bonus images, this month Aries, that you can only get by taking advantage of the offer.
 The teen images are so cute too:


Head on over to the store for more details.

Thanks for stopping by, you can find my teamies inspiration over on the Facebook page and the Scrapper's Delights Blog 


Friday, July 6, 2018

Proud

Good morning, it's been a strange week with the 4th being mid week it's thrown all my days out. 

Speaking of Independence Day the moodboard challenge over at SumMore Fun is all patriotic this time round. 
So I have made a card using their Strokes of Pride stamp set which is a Raisin Boat set perfect for the challenge:


I stamped the stars using embossing ink onto shiny card and then embossed with clear powder. I then colored my card with blue ink, polishing it so the stars shone through.
next I used Stayzon ink to add the sentiments.
This was the matted with red card and added to a white card base, keeping to the red white and blue theme in the pictures of the moodboard.


So want to join our challenge and get the chance to win a gift certificate to SumMore Fun? Oh and the prize doubles if you use stamps from from the store! 

Want some discount too? Use the code SHARON10 at check out and I will save you 10%

Now check out the mood board:

And then pop on over to the SumMore Fun Blog for details, our few rules and to link your project.

Thank you for stopping by, If you are looking for more inspiration check out my teamies creations on the Blog, FaceBook, Instagram and Pinterest.