Hello

Welcome to my blog, a place where I can lose myself in a crafty haven. Pull up a comfy chair grab a cuppa and come and have a read. Oh and if you like what you see, stop by and leave me some love in the comments section

Followers

Saturday, November 26, 2022

I made the Naughty List

 Hello, the weather is a lot better this weekend - we had a ton of snow fall last weekend so never left the house!

Are you on Santa's naughty list?  Little Chibi Xmas Decorations is the reason there is a list. She is opening presents before the big Day!

I was gifted a laser jet printer for my birthday so since then I have been playing with toner foiling. I added the included sentiment to my image, resized them both and printed using my laser jet.

I placed blue toner foil over most of the sentiment and red over the word Santa. This was then fed through my laminator giving my a foiled sentiment!'

I them colored my image with Copic Markers - She looks like she's been caught red handed opening the gift. 

I didn't go for the traditional red Santa hat and I wanted the lights to stand out against it so I made it part of her Pyjamas.

Once colored I matted an A7 card base with red mirror cardstock and added my image. I did then add a little gold gel pen to the lights - where they meet the cable.

I don't think anyone could stay mad at that little face and I think Santa would forgive her.


Be sure and check out more DT inspiration and join us at

We'd love for you to connect with us on our Facebook page too:
Thank you for taking time to read my post, I hope it has given you inspiration for your holiday cards.


Saturday, November 12, 2022

Cosy Hot Chocolate With Happy Marshmallows

Hello! Happy weekend. we have snow forecast so looking forward to staying in the warm with a cosy blanket and just maybe a hot chocolate.

Have you seen the Stamper's Delights Kawaii Xmas  Coco Digital Stamp - It is so cute! 


I couldn't resist using it for one of my holiday cards. 

I printed it twice do that I could use parts to layer it. The first image I colored it completely with my Copic markers. The second image I colored the bow on the candy cane, the top 4 marshmallows and the holly with the berries. I then fussy cut these from the image.

Using foam squares I layered the different parts onto my fully colored image to give it some dimension. 
I matted a white A2 card base with green mirror cardstock and added my topper. Using sentiment dies I cut Happy Holidays from some red mirror card and added these to my card. 

Finally I chose some 'peppermint' Christmas clay piece and adhered these around my cup.

You can find the Kawaii Xmas Coco image on Stamper's Delights webpage and he comes with or without a face - The choice is yours! 


Be sure and check out more DT inspiration and join us at

We'd love for you to connect with us on our Facebook page too:
Thank you for taking time to read my post, I hope it has given you inspiration for your holiday cards.

Wednesday, November 2, 2022

Floating on Dreams

 Good morning! The days are great at the moment, nice mid temperature fall days which make being outside fun.

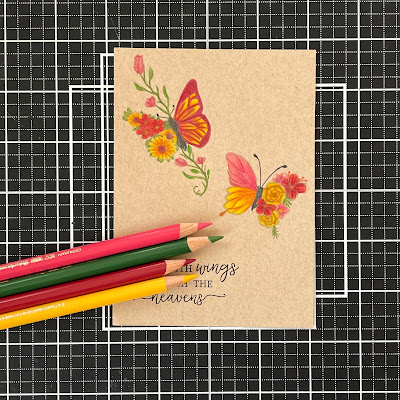
I'm back with a card using Maker Forte supplies, I love these images from Floating on Dreams Stamp Set. There is also trails you can add to the butterflies that have sentiments. As well as the main sentiments.


I don't color with pencils often so decided to try them and a no line coloring technique on this card. Remarkable Fog Inkis great for this technique as it leaves faint lines instead of the stark black lines. However, because I have used Toned Tan paper my sentiment needs be darker so I used Eclipse Black Ink for this.


My next stage is to color the images, I chose just a few color blends and used them on both butterflies. Coloring with pencil takes longer as you have to layer your colors to get a good coverage. My Faber Castel Polychromo Pencils lay down a good coverage of color.


The rest of the card is kept simple, mats are using colors similar to the pencil colors. A buttery yellow was my fist choice but this doesn't make the colors pop. Redwoods Cardstock on its own was the same however when layer both of these colors it gives a totally different effect.


Using a Top Folding A2 Cardbase I added the layers. I have trimmed these and my design so they are slightly narrower than my base. This draws the eye to the design.


My card needs a little more detail so I chose Roller Skates and Lemon Roller Skates.


These coordinate with the colors in the butterflies. I just like to have a little sparkle or texture on my cards. Makers Magicis great to adhere these in place and of course the Maker's Magic Wand helps to position these perfectly.


I love the wording on this sentiment I perfect way to describe a butterfly!


Thank you for joining us today and I hope I gave you some inspiration for your designs.