Hello

Welcome to my blog, a place where I can lose myself in a crafty haven. Pull up a comfy chair grab a cuppa and come and have a read. Oh and if you like what you see, stop by and leave me some love in the comments section

Followers

Sunday, September 29, 2024

Baby Love

 Good afternoon! We've had a busy weekend but I still found time to sit and do some crafting. 


This beautiful image is part of a coloring book by Radiant Artistry Designs. It is available from Kathleen's Kofi account and is called Delightful Treasures. I colored the image with Copic markers and Prismacolor pencils before matting it and adding to a slimline cardbase.

If you don't know how Ko-Fi works you join the membership or make one time donations to support the artist and in return you get access to their work. Kathleen has some amazing work and is very generous with her art. You can find her on her Facebook and Instagram accounts where she does often give away free images. 

I hope you love my work - if so let me know in the comments


Crafty Hugs 

Sharon


Saturday, August 31, 2024

Raccoon Love!

 Good afternoon, I've been neglecting my blog a bit recently but I have had so much happening that life got in the way a little.

I have been crafting (except for a little break while I recovered from surgery) I just have been sharing to social media instead of here. I do feel that crafty blogs aren't viewed as much as they used to be because social media has taken over but I am trying again to see if I can draw more attention back to blogging!

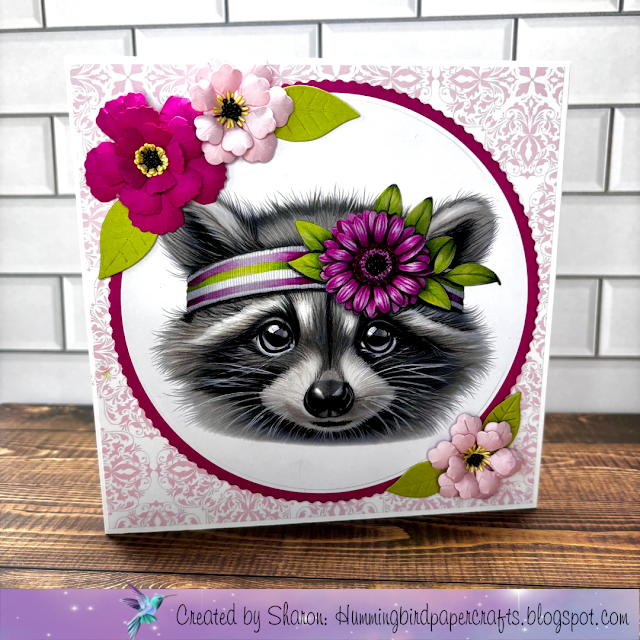
My design today is using a stunning grey scale image from Radiant Artistry Designs. They design digital coloring books that are available via Ko-Fi. 

Kathleen is someone whose artwork I have loved from afar but have been blessed to be chosen to design for her. I posted my first card using her designs last week. check out my Instagram to see my blueberry pie!

The coloring book I am using today is Delightful Treasures and has some stunning images of babies, young children and cute animals.


Any one that knows me know I have a love for all animals (except spiders!) and I find raccoons adorable so when I saw this cutie I had to use her.
I colored the face using the W collection of Copic markers. Then adding colors for her headband and flower. 
While coloring with markers I lost a lot of the fine hair detail and my image looked a little flat. To recreate this I used similar shades in Prismacolor Pencils and a white colored pencil to add highlights to eyes and nose I also drew back in her whiskers.
When she was all colored I die cut her into a circle and cut a second scalloped circle to frame her.

I matted a 6X6in cardbase with some coordinating digital design paper and made flowers from some Diamond Press layering flowers.


It's not often I make 6x6in cards but feel that this size showcases the stunning image perfectly

If you want to explore Kathleen's other coloring books you can join her Ko-Fi for as little as $5 a month and for context the coloring book I used today has 50 pages - That is 50 individual images that you can print and color or color digitally if that is your preferred medium.

Thank you for stopping by, please if you love what you see let me know in the comments. This will help me decide whether to keep my blog up and running!




Monday, January 29, 2024

Valentine's Card 'Donut" have to be hard to make!

Good morning,  the weather here is being a bit hormonal (😂) We have had lots of snow, then rain and fog then it was snowing again last night!

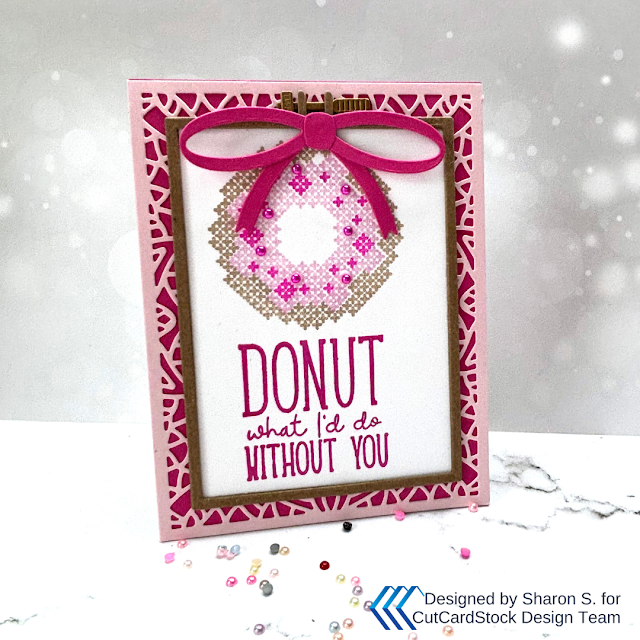
I'm back with super cute card suitable for my teenager to give her friend.


Aren't these stamps and dies just the cutest! The design is so simple to make. I started with an A2 top folding cardbase and as always this was cut from Neenah Solar White 110lb card stock. I matted this with Razzleberry Pop-Tone Cardstock. 

Using an Altenew Plate die and Pink Lemonade Pop-Tone Cardstock I die cut the lacy panel and adhered this to my base.

The cross-stitch frame is cut from Brown Bag Kraft CardStock 4 times this gives a chipboard effect. I did the same with the fastening at the top of the frame using Stardream Cardstock in Antique Gold Metallic.

My images were stamped using a combination of pink and tan colored inks on to Neenah Solar White Card. This was glued to the back of the frame.

The bow is also included in the set and is cut from Razzleberry Cardstock. This was then glued to the top of the hoop which was then adhered to my base.

Finally I added some flat back pearls to look as those it had sugar balls on.


Products Used:

Diamond Press Sweet Cross Stitch Stamp and Die Collection
Altenew Ornate Cover Die


Thank you for stopping by and as always if you like what you see leave me some love!!!


Friday, January 12, 2024

Christmas all year round!

 Hello, it's been a while!!! I was so busy at the end of last year that I didn't get much time to post here. Things are a little easier now so I intend to post more frequently!

We had a good dump of snow on Wednesday and a winter storm with potentially a lot more snow is heading in today and Saturday!

Christmas is always a busy time for us crafters so this year I will be holiday crafting all year round so I am more than ready when it finally arrives. 

My card today is a card and a gift all in one.


Using a Gina Marie Designs Ornament die I cut 6 of it so I could stack them on top of one another making a chipboard thickness. This stops delicate parts from breaking off and makes the ornament substantial enough to hang on a tree.
I decorated a top folding A2 cardbase with some MirriSparkle Glitter cardstock. I then die cut a tiny hole in the center of the front of the card about half an inch down.
Ribbon was added to the ornament - this was then threaded through the hole in the card and adhered inside with tape.
Finally I added some gems to the ornament to make it sparkle.


Items Used:
Gina Marie Scene Ornament Die


Thank you for stopping by and I hope I have given you inspiration for your holiday cards. Also of you have a lot of Christmas crafting to do - START NOW 😊